timanddana
New Member
Posts: 21
Likes: 1
1960 Shasta Deluxe 19'
Currently Offline
|
Post by timanddana on May 15, 2022 10:34:58 GMT -8
We purchased new aluminum from Hemet Valley, but they were unable to provide the full length side pieces. So we have 4 side pieces instead 2 for each side. I have seen some talk of just overlaying the two pieces and sealing, but have also seen references to vertical seam (H-seam?). But, I haven't seen much detail given. Does anyone know where to find vertical seam and how to install it? Do I need it for a 4 foot seam? On the curbside, it will be just the area above and below the left hand side of the door frame. On the streetside it will be along the right side of the kitchen window (so above the window about 1 ft and below the window about 4 ft).
I guess the Shasta's didn't normally need these, since they were relatively short.
Thanks,
Dana
|
|
nccamper
Administrator 
Posts: 7,797 
Likes: 2,911
1962 Forester- 1956 Shasta
Currently Offline
|
Post by nccamper on May 15, 2022 15:45:32 GMT -8
I’ve never done it myself and hope someone will chime in with experience. The actual placement obviously has to do with the framing behind it. I’ve seen it done by the door which is easy because the span is minimal and the framing is heavy in those areas. I’m not sure about the Driver side framing. The only time I’ve taken apart a camper with two pieces on each side I found putty tape between the pieces which were overlapped with the front piece over the rear piece and screwed every 6” or so apart.
|
|
|
|
Post by vikx on May 15, 2022 20:51:49 GMT -8
H trim is impossible to find unless you can have it locally made. I overlapped the street side metal with pure butyl tape and screwed securely into a wall stud. So far, no leaks.
|
|
timanddana
New Member
Posts: 21
Likes: 1
1960 Shasta Deluxe 19'
Currently Offline
|
Post by timanddana on May 16, 2022 14:09:33 GMT -8
I spoke with Steve at Hemet Valley this afternoon. He said they stopped using the h-seam because it leaked so often.
He said to overlap the front over the back by 1 inch. Run a bead of silicone between the pieces and put a line of screws about 10-12 inches apart.
If the s-fold is being overlapped, then remove the nailing tab (and the underside of the fold) on the top layer (forward) for that inch overlap. This will allow the top s-fold to lay flat against the bottom layer(rear). Be sure to put a screw into the s-fold. If any silicone pushes out of the seam, let it dry and then rub it off.
Since my curb-side seam is at the back of the door frame, and the s-fold won't be overlapped, I can skip that last part. I think I will be alright on the street-side also, because the seam/s-fold will be at the backside of the kitchen window frame.
I'll let you know how it turns out.
|
|
nccamper
Administrator
Posts: 7,797
Likes: 2,911
1962 Forester- 1956 Shasta
Currently Offline
|
Post by nccamper on May 16, 2022 14:40:08 GMT -8
Where the screw goes in the siding will be decided by how many inch the brake is in the aluminum. This is obvious, but you want to screw in the gully of the break. 4 inch break might have a screw every 8 inches. A 6 inch break will probably have a screw every 6 inches instead of 12. Hopefully that makes sense.
|
|
timanddana
New Member
Posts: 21
Likes: 1
1960 Shasta Deluxe 19'
Currently Offline
|
Post by timanddana on May 16, 2022 17:44:03 GMT -8
Yes about the breaks, ours is 4 inch break, so every 8 inches for us.
|
|
mobiltec
5K Member
 I make mistakes so you don't have to...
Posts: 9,866
Likes: 3,789
1954 Jewel In Progress...
Currently Offline
|
Post by mobiltec on May 26, 2022 7:39:50 GMT -8
I spoke with Steve at Hemet Valley this afternoon. He said they stopped using the h-seam because it leaked so often. He said to overlap the front over the back by 1 inch. Run a bead of silicone between the pieces and put a line of screws about 10-12 inches apart. If the s-fold is being overlapped, then remove the nailing tab (and the underside of the fold) on the top layer (forward) for that inch overlap. This will allow the top s-fold to lay flat against the bottom layer(rear). Be sure to put a screw into the s-fold. If any silicone pushes out of the seam, let it dry and then rub it off. Since my curb-side seam is at the back of the door frame, and the s-fold won't be overlapped, I can skip that last part. I think I will be alright on the street-side also, because the seam/s-fold will be at the backside of the kitchen window frame. I'll let you know how it turns out. I also asked Steve about H Seams and it turns out that he makes them. He just doesn't recommend them unless you goop the insert area of the seam metal. Not sure why he didn't tell you about it. Here's a photo of the H Seam he makes. 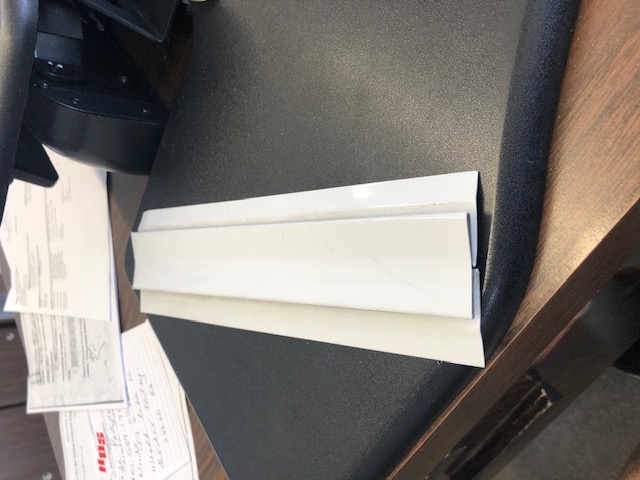 |
|


