1963oasis
New Member
Posts: 9
Likes: 1
Currently Offline
|
Post by 1963oasis on Jul 18, 2021 9:33:54 GMT -8
 Hello this is my first post. (Not sure what the difference is between a thread and post on here). So we bought a new roof and all new skins for a cab over or bunk over oasis trailer from 1963. Its kinda like the frolic cabovers or the astrodomes you see but instead of roof curving down into the backend (oasis made that style too) my oasis trailer comes to a end at the top back and is flat roof after the cabover design in front. (The back end has a fin design). Ok so the only thing we could do was watch Larrys videos on YouTube and that was all about roofing a rounded canned ham shape. We did read and research as well on all the fb forums - the trick to no buckling was to work on both sides when folding down and stapling the roof on. We stapled it in the front s lock around the bunk window and curved it around the humps and curves designs and worked on both sides evenly and working front to back as in Larrys video. Jumping from one side to the other about one foot sections at a time banging and stapling. We used the wood block to push down on roof as in Larrys video and everything was great and tight as a drum. We even bought the body hammer another member here suggested. Then we noticed that the 1/2” roof over hang on one side had drifted to the top of roof in the back and no longer was hanging over to become our fold over. If we yanked on the roof to correct the 1/2” in the back, a huge buckle appeared in the middle of roof (on street side) and not one that is fixable as in one of Larrys 57 westerner videos. The buckle is much to large. The 1/2” drifted and now we cant continue. Is the roof destroyed? If we worked from both sides a little at a time how did this happen? Tying down the roof to keep it taught and inline with 4 straps doesnt seem feasible considering the shape of the trailer? (Although the part of trailer that is down is taught). Someone suggested to start your trailer roof in the middle and then work front to back??? Thats confusing me. A little over half the roof has been banged down and stapled on the edges and if I undo that will a miracle happen if I work in the middle outward? If so very specific instructions please and at what point does the aluminum s lock get stapled in the front? That front piece needs to be level. Thanks. I’d include a photo but Im only on a cell phone, not a computer.
|
|
PT
Active Member

Posts: 460 
Likes: 260
1964 Aloha & 1962 Holiday House
Currently Offline
|
Post by PT on Jul 18, 2021 11:00:07 GMT -8
Welcome :-) Yep - you're in a difficult situation... Not what you want to hear, but you'll probably need to pull/cut the staples and try it again. As you mentioned - the S-lock seam at the front has to be level so it needs to be stapled in and work back from there. You really need to figure out a way to keep some moderate tension on the skin to keep it in line as you work with it - when it's a little loose to start with it will start to shift as it's tightened down. I've been able to screw a long 1x4 board into the very edge of one end of the skin (just a screw every few feet) - hopefully enough free skin in the rear of yours to do this? and then put two threaded hooks into the wood - attach ratchet straps that are anchored to something and tighten things up... Then you need to be crazy careful and alternate from side to side after every couple staples to check things and avoid shifting The image below is different than your situation but gives you a visual of what I'm talking about. 
Hang in there and good luck
|
|
|
|
Post by vikx on Jul 18, 2021 11:25:06 GMT -8
Whew, I don't know how to answer without pix but will try with a few ideas.
It sounds as if the roof metal is crooked. As you started, all seemed good, but the further you went, the more the side foldover was misaligned. I don't know how it happened, but probably very subtle in the beginning, so you wouldn't notice.
There are a few (unpleasant) fixes to try.
Depending on how long the misaligned area is, it might be possible to slip an angle under the roof edge to protect the gap. This is not a good fix but will work if you're looking at the last 6" or so... I doubt you do this; it involves waterproof tape on the underside of the metal, screws and exact sealing on the final fix.
Pick the staples out and re-align the roof metal. Try to start with the seam fairly even in front. It won't be perfect, no trailer is. The roof vent will help to get the roof in the proper position. You will have staple damage on the folds, but it's possible you can seal new staples and divots with OSI gutter seal. As you lay the roof metal, check to see it is even along each side all the way, front to back.
Re-aligning the roof involves tying straps to hold it tight (use spacers at the curves-pool noodles or??) and looking closely to see how the edges line up. Pull back and forth until it makes you happy. Check the roof vent too.
If the stapled roof is over the cabover, you might be able to slip new metal up and under the existing metal at the lower portion. I would say at least 18" up and under, then cut the old metal at a rafter (add one if you have to), putty and screw to secure the seam. (this seam can be well sealed later) You would need to pick a few staples to slip the metal under but fewer than remmoving the entire roof.
The best solution would be to measure and order new roof metal. If it is ordered wider than needed, you can trim as you go, ending with a 5/8 overlap at each side bend.
Staple the front seam lip last. If it is a little off, the window side pieces are adjustable (cut to fit) to allow for a straight beginning for the lower metal. The cuts may have to be crooked to get the lower seam relatively straight as you look at it. In other words, even if the upper seam is crooked, the adjusted sides end up with a straight seam across the front of the trailer.
I hope this helps. Pictures are very important, helping us to help you.
|
|
1963oasis
New Member
Posts: 9
Likes: 1
Currently Offline
|
Post by 1963oasis on Jul 18, 2021 12:46:51 GMT -8
How do I reply to a response? Thanks. I wanted to address a response to a individual on the thread but apparently Im not forum savvy 😏
|
|
|
|
Post by vikx on Jul 18, 2021 13:08:44 GMT -8
Scroll down to "quick reply", type your message and post quick reply...
|
|
1963oasis
New Member
Posts: 9
Likes: 1
Currently Offline
|
Post by 1963oasis on Jul 18, 2021 19:01:42 GMT -8
Hi Vikx,
Thanks for taking time to read my lengthy post. I appreciate all these thoughts you took time on and will discuss them with my spouse. I did want to ask your opinion about one of your solutions- ‘the roof vent will help your roof get in proper position’ if we get all the staples off and removed and try resetting the roof are you suggesting that we should immediately try attach the roof first at the vents? I have two vents one near the bunk over and one in the middle where roof staightens out. I dont think I see a suggestion to work from middle outward? Whats your opinion on that? Thanks again. Really appreciate your thoughts.
|
|
1963oasis
New Member
Posts: 9
Likes: 1
Currently Offline
|
Post by 1963oasis on Jul 18, 2021 19:06:00 GMT -8
Thanks for these thoughts. I think between you and vikx You may of helped me think of some creative ways to strap the roof of this odd roof. Thanks for sending the photo and your time. Time to figure out a game plan
|
|
|
|
Post by vikx on Jul 18, 2021 20:09:13 GMT -8
Do not attach the roof to the vents. You can clamp it but do not attach it. Check the alignment of the roof often! I'm not sure what is going on, but I think you were a "smidge" off at the start and it just got worse the length of the roof.
Also, you might use Nashua waterproof tape on the underside of the fold. It will help seal the staple divots. Use OSI Gutter Seal 5 oz tube from Lowes to seal the outer flaws once the roof is in place.
|
|
1963oasis
New Member
Posts: 9
Likes: 1
Currently Offline
|
Post by 1963oasis on Jul 18, 2021 20:44:00 GMT -8
Thanks for the clarification vikx. We did put 1/2” wood block spacers clamped to the overhang on one side and trimmed the other side as we went. The 1/2” spacers we thought were brilliant until we saw that the clamps and wood spacers were actually moving away from the aluminum overhang not holding tight enough & now no longer being a 1/2”. I like the idea of adding the waterproof tape under the fold if this has a chance of working-thanks. Its gonna take a few days. I’ll report back
|
|
|
|
Post by vikx on Jul 19, 2021 11:20:54 GMT -8
Good Luck! I am a little concerned about "trimmed the other side". Hang in there; we are here to help.
|
|
|
|
Post by Teachndad on Jul 20, 2021 6:14:18 GMT -8
Hi Friends, Okay, what a pickle. I know nothing of what I speak, so this is a wild guess but have you tried raising a corner of the frame with a jack. It's like when you take a box and twist it, it's going to shift. Maybe on the side where the gap has formed, lift that corner with the jack. Place the jack under the frame and lift the corner and see if the aluminum shifts. Try with all corners. Larry has recommended this in the past on this forum. I can't tell you whether it was for this situation, though. I don't know the pattern of jacking the corners. Might be worth a try???  or not. Thoughts anyone? Rod P.S. If you want, I can post the pix for you. Check your messages. |
|
mobiltec
5K Member
 I make mistakes so you don't have to...
Posts: 9,822
Likes: 3,749
1954 Jewel In Progress...
Currently Offline
|
Post by mobiltec on Jul 20, 2021 7:18:35 GMT -8
I've used the method that Rod explained above me here. But usually this is done before any stapling or fold over is done. You must strap down the metal and if you have valleys and humps in your roof like some Scotties and other dome type trailers have, you just need to fill in the gap between the metal and the straps with blocks of wood to hold it down. You can also use a 4 inch piece of plastic conduit with a board slid into it to hold down the bottom of a dome. I bet that is the point where things started to go wrong.
You can try lifting up one corner or the other of the trailer with a jack to see how well it works. But you may have to remove some or a lot of ths staples first. Don't over twist the trailer now. Just enough to see where it goes and if it is going to help. See your trailer may have settled if it is not on concrete. You should have leveled the trailer before beginning and you should have all four straps on and tight and checked the entire length of the roof to see if you have the half inch fold over haning out on both sides before starting. That's why the strapping is so important.
It sounds like you are going to have to remove most or all of your staples, level the trailer and then strap it down to continue properly. It would be great if I could see photos. Hard to diagnose a problem when I can't see what it looks like. You can send photos to me personally if you want. Send them to mobiltec@gmail.com. I will post them here with my thoughts.
|
|
1963oasis
New Member
Posts: 9
Likes: 1
Currently Offline
|
Post by 1963oasis on Jul 20, 2021 8:42:24 GMT -8
Thanks teachndad and mobiltec. I gotta get to work but will send pics to mobiltech or teachndad this eve. These are very helpful tips and no the trailer wasnt on level concrete and no it wasnt on jack stands. So you may very well be right and we have screwed it up royally. I’ll be back in touch this eve. Thanks so much.
|
|
mobiltec
5K Member
I make mistakes so you don't have to...
Posts: 9,822
Likes: 3,749
1954 Jewel In Progress...
Currently Offline
|
Post by mobiltec on Jul 20, 2021 15:54:15 GMT -8
Thanks teachndad and mobiltec. I gotta get to work but will send pics to mobiltech or teachndad this eve. These are very helpful tips and no the trailer wasnt on level concrete and no it wasnt on jack stands. So you may very well be right and we have screwed it up royally. I’ll be back in touch this eve. Thanks so much. Well just remember that after pulling the staples you can most likely still use this roof. I'll have to see what it looks like right now first. |
|
1963oasis
New Member
Posts: 9
Likes: 1
Currently Offline
|
Post by 1963oasis on Jul 20, 2021 16:06:11 GMT -8
Thanks Larry I really hope I can. I just got pics sent to teachndad on a email just now and he will post on here for me . Maybe I’ll forward you the pics as well. Look in spam folder if you dont see them in regular. Thanks for your thoughts. Here are the photos with descriptions. Images were taken at low resolution. Door side: roof is partially stapled up to door. This side we cut the hangover trim as we go along. 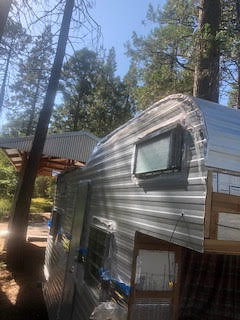 Side view of trailer to help give ideas for strapping down this weird shaped roof.  Top of cabover nice and taught. This section stapled.  This is the street side stapled up to almost the middle. This is roof relaxed &when we realized the roof shifted at the end corner.  This is the size of the buckle once we yank the roof on the end to the 1/2” over hang we need.  This is the back end where it shifted taken from the top corner bird’s eye view where you can see it shifted from a 1/2” over hang to no over hang. (The bends in roof right past that was us trying to yank roof back over the 1/2” and see if we could correct the situation and bend it down and it created that huge buckle) 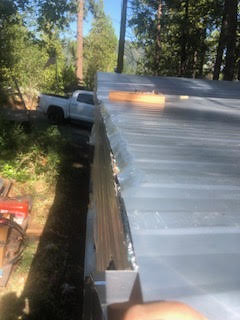 |
|


 Hello this is my first post. (Not sure what the difference is between a thread and post on here). So we bought a new roof and all new skins for a cab over or bunk over oasis trailer from 1963. Its kinda like the frolic cabovers or the astrodomes you see but instead of roof curving down into the backend (oasis made that style too) my oasis trailer comes to a end at the top back and is flat roof after the cabover design in front. (The back end has a fin design).


 or not.
