kirkadie
1K Member

Posts: 1,156 
Likes: 556
'69 Serro Scotty Hilander
Currently Offline
|
Post by kirkadie on Dec 30, 2013 14:23:14 GMT -8
|
|
|
|
Post by bigbill on Jan 2, 2014 8:20:45 GMT -8
Tongue jack wheels have been mentioned a few times lately so I thought I would throw this out, many of the old steel wheels don't work very well so we have been replacing them with the heavy duty swivel casters with hard rubber wheels that can be bought at HF, tractor supply, and many hardware stores just make sure it is rated for more than your tongue weight. Then find a piece of pipe that will slid over your jack stem and weld a plate on it that you can bolt the caster to. it will roll better than the steel wheels. Also when buying make sure you select one at least as wide as the old steel wheels.
|
|
jodybitzz
Active Member

Posts: 238 
Likes: 87
1968 Shasta 1500
Currently Offline
|
Post by jodybitzz on Jan 4, 2014 11:02:10 GMT -8
First coat of shellac. We can't find the amber shellac in the gallon size and this birch is sucking it up!  |
|
jodybitzz
Active Member
Posts: 238
Likes: 87
1968 Shasta 1500
Currently Offline
|
Post by jodybitzz on Jan 10, 2014 15:00:34 GMT -8
|
|
|
|
Post by bigbill on Jan 10, 2014 16:55:46 GMT -8
Before long you will be putting the roof on. looking nice.
|
|
jodybitzz
Active Member
Posts: 238
Likes: 87
1968 Shasta 1500
Currently Offline
|
Post by jodybitzz on Jan 10, 2014 19:05:18 GMT -8
Stopping place for the night. Hope to have some framing up by Sunday.  |
|
kirkadie
1K Member
Posts: 1,156
Likes: 556
'69 Serro Scotty Hilander
Currently Offline
|
Post by kirkadie on Jan 11, 2014 12:48:18 GMT -8
You might consider putting down the 1/4" sub-floor and final floor covering next. Then cover it with cheap 1/8" masonite to protect the flooring. Will help with height calculations since you'll have 1/4" less headroom than original build (which could cause consternation when reapplying outer skin). The masonite will allow you to scrape the ladder around, drop hammers, etc, even spill paint or shellaq without worry.
My 2 cents...
|
|
jodybitzz
Active Member
Posts: 238
Likes: 87
1968 Shasta 1500
Currently Offline
|
Post by jodybitzz on Jan 11, 2014 18:06:18 GMT -8
You might consider putting down the 1/4" sub-floor and final floor covering next. Then cover it with cheap 1/8" masonite to protect the flooring. Will help with height calculations since you'll have 1/4" less headroom than original build (which could cause consternation when reapplying outer skin). The masonite will allow you to scrape the ladder around, drop hammers, etc, even spill paint or shellaq without worry. My 2 cents... Tomorrow we will be bolting the floor down and covering with lauan and then after that laying the tiles. That's a great idea about covering the tile with the Masonite for protection! We were trying to figure out what to cover the tiles with to protect it. We are actually going to make the camper about 3 inches higher than it was originally and she will be getting new skin. Thank you for your 2 cents!! |
|
jodybitzz
Active Member
Posts: 238
Likes: 87
1968 Shasta 1500
Currently Offline
|
Post by jodybitzz on Jan 11, 2014 18:23:53 GMT -8
Not bolted yet but a preview 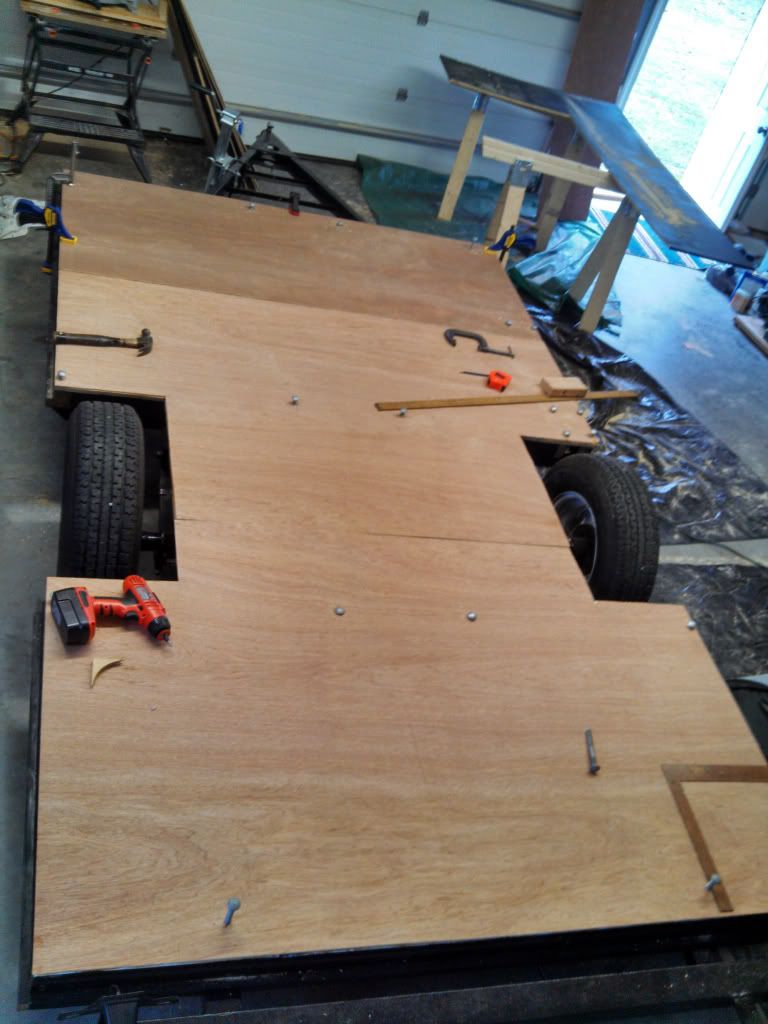 |
|
kirkadie
1K Member
Posts: 1,156
Likes: 556
'69 Serro Scotty Hilander
Currently Offline
|
Post by kirkadie on Jan 11, 2014 19:41:01 GMT -8
One more crazy observation Jody... if it's not too late, countersink your bolts into the under plywood so their tops are flush, then staple on ( or staple and glue with PL adhesive)the lauan on top. The bolts can leave dimples in the tiles unless they are flush, plus you have to go back and use a hard putty like 'rock hard' (old time hardwood flooring guys used it to fill gaps) and then lots of tedious and risky sanding. The lauan is used to mask/cover all the dimples from screws/nails and give a smooth surface for the tiles or linoleum flooring. The lauan is too thin to countersink. Since you have already drilled for the bolts in the lauan underlayment, I'm thinking judicious use of famowood or even plaster patch to fill the holes. I was fortunate to read a thing on the Scotty web page about this precaution. If y'all are not familiar with the Scotty site here it is; www.nationalserroscotty.org/Although of course they are tuned primarily to Scottys, they have a big section on rebuilds of other makes, and a great section on resources. If you want, check out both 'rebuilds and restores', and 'resources'. Open to everyone nutty to go through this process, and totally mfg bi-partisan. We are, all of us, in this together, all wanting to get to the same place someday; the massive gathering of information to keep our little bit of Americana alive and rolling. Looks like you are doing up your Ham great, so please excuse these little nit-picking interjections. I mean no offense; it's only my own compulsion to overstudy everything, probably why my rebuild will be left for grand kids to complete. |
|
|
|
Post by bigbill on Jan 11, 2014 20:41:02 GMT -8
You should be able to buy leveling compound at any big box store it is not very expensive.
|
|
jodybitzz
Active Member
Posts: 238
Likes: 87
1968 Shasta 1500
Currently Offline
|
Post by jodybitzz on Jan 12, 2014 15:46:33 GMT -8
One more crazy observation Jody... if it's not too late, countersink your bolts into the under plywood so their tops are flush, then staple on ( or staple and glue with PL adhesive)the lauan on top. The bolts can leave dimples in the tiles unless they are flush, plus you have to go back and use a hard putty like 'rock hard' (old time hardwood flooring guys used it to fill gaps) and then lots of tedious and risky sanding. The lauan is used to mask/cover all the dimples from screws/nails and give a smooth surface for the tiles or linoleum flooring. The lauan is too thin to countersink. Since you have already drilled for the bolts in the lauan underlayment, I'm thinking judicious use of famowood or even plaster patch to fill the holes. I was fortunate to read a thing on the Scotty web page about this precaution. If y'all are not familiar with the Scotty site here it is; www.nationalserroscotty.org/Although of course they are tuned primarily to Scottys, they have a big section on rebuilds of other makes, and a great section on resources. If you want, check out both 'rebuilds and restores', and 'resources'. Open to everyone nutty to go through this process, and totally mfg bi-partisan. We are, all of us, in this together, all wanting to get to the same place someday; the massive gathering of information to keep our little bit of Americana alive and rolling. Looks like you are doing up your Ham great, so please excuse these little nit-picking interjections. I mean no offense; it's only my own compulsion to overstudy everything, probably why my rebuild will be left for grand kids to complete. Kirkadie, you are not nit-picking at all! We love everyone's feedback! This is our first (and only) time with a project like this. We are obviously learning and making mistakes as we go. The pictures above were taken before we synced up the carriage bolts so they were not flush with the lauan. We secured the floor today. The wheel wells are not attached yet and we need to fill in the holes like you mentioned. Slowly but surely!   |
|
jodybitzz
Active Member
Posts: 238
Likes: 87
1968 Shasta 1500
Currently Offline
|
Post by jodybitzz on Feb 9, 2014 9:17:42 GMT -8
Back at it after taking some time off for vacation and getting sick. The wheel wells are finally attached. After several hours of sheet metal fabrication and waterproofing every nook and crannie, I would say Miss Daisy is going to have the most secure wheel wells ever!  |
|
jodybitzz
Active Member
Posts: 238
Likes: 87
1968 Shasta 1500
Currently Offline
|
Post by jodybitzz on Feb 9, 2014 9:46:25 GMT -8
 Inside the wheel well. Sheet metal wrapped around lip of wheel well and sealed with butyl tape. Each screw hole is also sealed with the butyl tape. |
|
jodybitzz
Active Member
Posts: 238
Likes: 87
1968 Shasta 1500
Currently Offline
|
Post by jodybitzz on Feb 15, 2014 11:31:01 GMT -8
Starting the framing today. Put a 15 degree degree angle on the back  |
|