mobiltec
5K Member
 I make mistakes so you don't have to...
Posts: 9,822 
Likes: 3,748
1954 Jewel In Progress...
Currently Offline
|
Post by mobiltec on Nov 20, 2013 19:30:51 GMT -8
That's how I've been doing it all along Bill so I guess I will just keep doing it. It's the top radius front and rear that I have had so little practice with. Going to start in front and move to the rear. That way at least I'm going down hill LOL... You'll get to see it and all my struggles on video soon.
Just noticed we kinda hijacked the thread a bit. Still roof stuff though.
|
|
Gary
Junior Member
 1967 Aristocrat "Kini"
Posts: 76
Likes: 29
1967 Aristocrat LoLiner ST
Currently Offline
|
Post by Gary on Nov 20, 2013 22:19:46 GMT -8
What I found very helpful is a heavy block of steel (I used square pipe) to hold down the roof while bending the edge. Here I am using it to fold the skin below the front window (non-standard, I know, but that area is a bad leak magnet.) 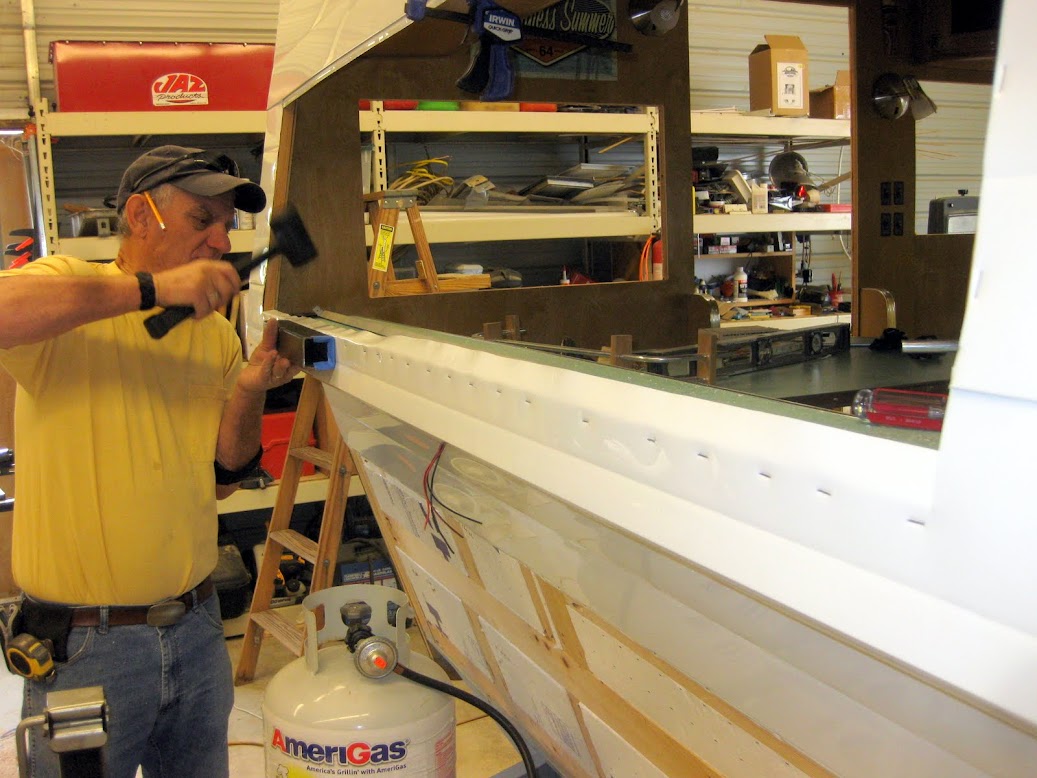 Here are those cuts around the tight radius. I did use butyl both under and over the fold.  -Gary |
|
soup
1K Member
 "I hate cold Soup"
Posts: 1,237
Likes: 204
Currently Offline
|
Post by soup on Nov 21, 2013 3:42:34 GMT -8
Shasta campers did have putty tape under the roof skin fold over.
Also, you can just make 1 cut slit at each cut (instead of "V" cuts shown above) and let the metal flaps overlap. It will give less of a "tweaked" look on final skin surface. The finished skin will be smoother going around the radius.
|
|
cowcharge
1K Member
Posts: 1,003
Likes: 328
Currently Offline
|
Post by cowcharge on Nov 21, 2013 8:08:35 GMT -8
Anybody that can learn too cut a circle with a skill saw can learn to form metal. Glad you're not setting the bar too high... |
|
mobiltec
5K Member
I make mistakes so you don't have to...
Posts: 9,822
Likes: 3,748
1954 Jewel In Progress...
Currently Offline
|
Post by mobiltec on Nov 21, 2013 8:29:25 GMT -8
Anybody that can learn too cut a circle with a skill saw can learn to form metal. Glad you're not setting the bar too high... LOL.. Cowcharge he's saying that because in a few of my videos I actually do cut circles with my skill saw. I'm probably making too big of deal out of this upcoming roof installation but as I said before, I already screwed one up. I use a 4x4 block of wood to hold the metal down when I bend it over. The steel might work better... I think I will give that a shot this time as well. I think that the thing that is intimidating about doing a roof as opposed to the front or rear radius of a trailer is the fact that if you screw up even a little bit, you have now ruined 4 or 5 pieces of metal that have been seamed and sealed together instead of just one piece of metal that is cheap and easy to replace. |
|
|
|
Post by bigbill on Nov 21, 2013 16:05:19 GMT -8
Larry When you are bending the alum over the edge on a roof front or rear radius you don't want to see the dips and dives in your metal like you see in Gary's window picture use a much lighter hammer and strike it much closer together every time you get an uneven place in the metal you are stretching it causing you to have to make cuts for relief I use a Snap-on flat faced pick hammer it is very light and has about a 1 1/4" diameter face on one end and a pick on the other. This allows me to create a smooth even bend with no excess stretching. Your metal needs to bend smooth like it would in a brake. some guys use a piece of wood or metal against the lip and hit it instead of a direct hit. Play with some scrap and see what works for you. Also if you find you need cuts a single cut will be better than the Vs Like Soup said. If you are going to use cuts start below the curve and work your way to the top and this creates an over lap at each cut that sheds water instead of funneling it in.
|
|
mobiltec
5K Member
I make mistakes so you don't have to...
Posts: 9,822
Likes: 3,748
1954 Jewel In Progress...
Currently Offline
|
Post by mobiltec on Nov 21, 2013 18:01:22 GMT -8
As my skydiving instructor said..... "What could go wrong?"....
Taking all this in Bill and I appreciate the tips. Another first about this is the lack of breaks. This roof is all smooth. It's definitely going to be fun.
 |
|
61 Shasta
Active Member
Doing what I want as soon as she wants me to
Posts: 200
Likes: 38
Currently Offline
|
Post by 61 Shasta on Nov 21, 2013 20:05:21 GMT -8
When I had the new skins made for my 61 compact, they ended up being made from 26 gauge as opposed to original 28. I didn't need a roof but the front and back skins had some serious radius's to work in. One of the things I learned was to keep pressure on the outside of the radius. I ended up clamping a strip of plywood to the outside of the radius made a huge difference. Now, in order to do that I had to basically build a frame work that went from the front to back and then used bar clamps to keep pressure where I needed it. It took some doing but believe me it really did the job. I don't see why you couldn't do the same thing using the bottom of the trailer as a point to clamp from. Unfortunately, I didn't take pictures so can't share the way I did it but hopefully you will get the idea. Wish this thread had been here then, I learned the "go easy" part the hard way. Great suggestion Bill
|
|
|
|
Post by bigbill on Nov 21, 2013 20:43:42 GMT -8
61 Shasta
That is the same way I seem to have learned most things to do with real world repair and fabrication. I have a great knowledge that I gained from books but they never gave me the fine points of things like metal message. years ago a professor explained it this way " I can teach you the reaction of metal to heat and I can teach you how the atmosphere can effect a weld even how and what to shield it with but you have to practice it to make it all workable". He proved to be a very wise man, I have found that to be true in everything from work to being married to the same woman almost 50 years. You learn from your mistakes and hopefully you live through them.
|
|
mobiltec
5K Member
I make mistakes so you don't have to...
Posts: 9,822
Likes: 3,748
1954 Jewel In Progress...
Currently Offline
|
Post by mobiltec on Nov 21, 2013 20:56:40 GMT -8
I did the front and rear of this Shasta as you can see by the 4 inch breaks. Can't be much harder than this.... And I will have gravity working with me instead of against me. When I look close I can see what Bill means about the flat spots. The smaller hammer might be a good idea so I am going to find one. I amy try a few. I've always used a rubber mallet.  |
|
|
|
Post by vikx on Nov 21, 2013 21:01:42 GMT -8
|
|
|
|
Post by bigbill on Nov 22, 2013 4:06:30 GMT -8
The real question is how did we live without ratchet straps. They have to be one of my most important things in my tool kit.
|
|
Gary
Junior Member
1967 Aristocrat "Kini"
Posts: 76
Likes: 29
1967 Aristocrat LoLiner ST
Currently Offline
|
Post by Gary on Nov 22, 2013 14:46:04 GMT -8
The "dips and dives" in my window pic were only there because the shot was taken after the first few hits at the very beginning of the process. Obviously I didn't leave it that way...
As for the straight cuts vs V-cuts, you can get away with straight cuts on the gentle curve of a canned ham, but on a radius as tight as mine, you'd have a lot of overlap you'd have to pound flat. V-cuts make a nice fair curve with no need for bashing.
|
|
soup
1K Member
"I hate cold Soup"
Posts: 1,237
Likes: 204
Currently Offline
|
Post by soup on Nov 22, 2013 14:54:11 GMT -8
OH, Sure, take all the fun bashing out of it, jezz! LOL 10-4 on the V cuts on tight curves. I like your work Gary. Sorry, I didn't mean anything by it. It's just the cuts on the window pic, to me, look to have been cut different than the ones in the pic above. The ones in the pic above are perfect. But don't listen to me anyway. I work out of a tent!!!  I still like the bashing part though!  For the record, I use a pick point/flat light auto body hammer with a wood block to work it. |
|
Gary
Junior Member
1967 Aristocrat "Kini"
Posts: 76
Likes: 29
1967 Aristocrat LoLiner ST
Currently Offline
|
Post by Gary on Nov 22, 2013 15:02:51 GMT -8
And please notice that the points of the Vs are out, not in. Don't cut out little pie wedges and throw them away. That does leave gaps. When you make the cuts the way I've shown,the points and Vs nest together very nicely when bent over, without overlap or gaps.
|
|


