|
|
Post by Teachndad on Jun 17, 2018 5:30:51 GMT -8
Hi Friends, I inherited an old Rockwell tabler saw. It looks kind of like this, except it's rusty and not as clean. 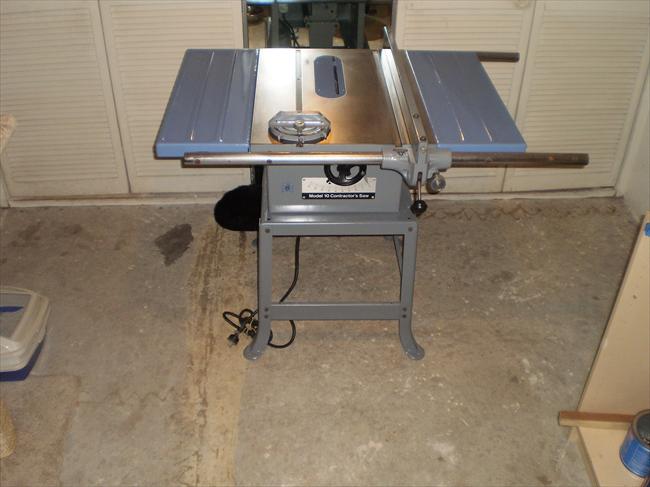 The base is different, but the saw itself looks to be about the same. The table top is rusted and the slides for the fence are rusted. It’s surface rust. Below, you can see the level of rust in this picture on the table top piece- This is not my saw below. Mine was complete. 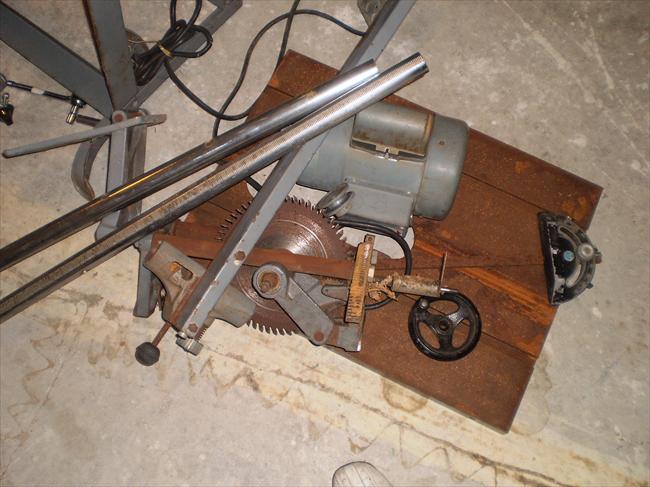 ![]() ![]() Not that I need another project, but how did they get the unpainted part of the table top to look so nice? I bought a link belt at HF yesterday and replaced the original dried V belt and the unit sings nicely. No vibration and the motor runs smooth. I need it to cut wood filler pieces to support my floor repair. Cheers, Rod |
|
|
|
Post by bigbill on Jun 17, 2018 7:02:29 GMT -8
Try WD 40 and steel wool to clean the rust.
|
|
|
|
Post by Teachndad on Jun 17, 2018 7:35:14 GMT -8
Try WD 40 and steel wool to clean the rust. Thanks Bill. 000 or 0000 steel wool grade? Cheers, Rod |
|
mel
Senior Member
 1964 Shasta Airflyte
Posts: 1,729 
Likes: 523
Currently Offline
|
Post by mel on Jun 17, 2018 7:46:53 GMT -8
I watched a you tube video where he soaked his metal in a 50/50 vinegar water mix for 24 hours and the rust came off so much easier. I dont know if your saw top comes off or not, but it might make it easier.
|
|
kudzu
Active Member

Posts: 344
Likes: 84
Currently Offline
|
Post by kudzu on Jun 17, 2018 16:07:24 GMT -8
I have restored a bunch of old machines mucht worse than that. Here is a 12" joiner before and after photos just to show you I am not crazy for what I am about to say. This one was the day I picked it up. LITERALLY it was hauled out of the woods, laying on it's side before it got here. 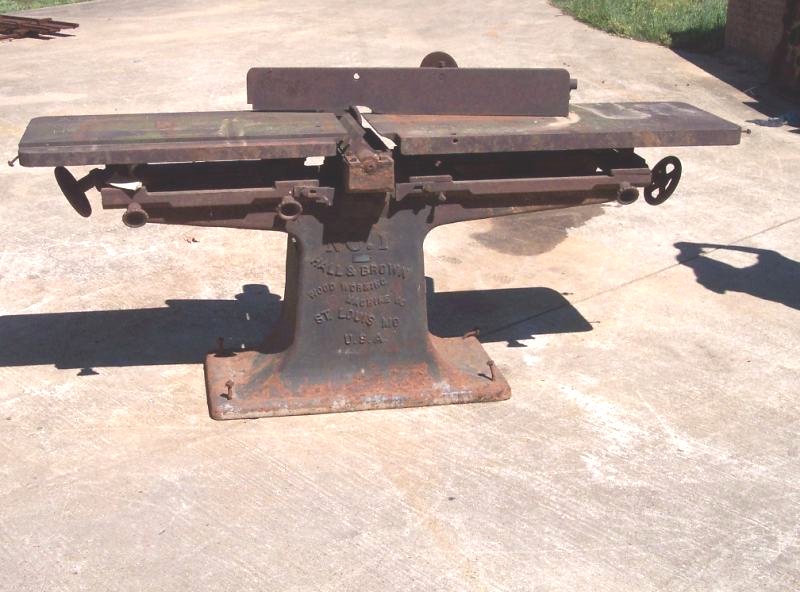 Here she is after it's first test session. Yes that is oil stains on bottom. It is has babbit bearings and I put a bit to much oil on them to be safe. I got lucky and found an antique motor in working condition too. 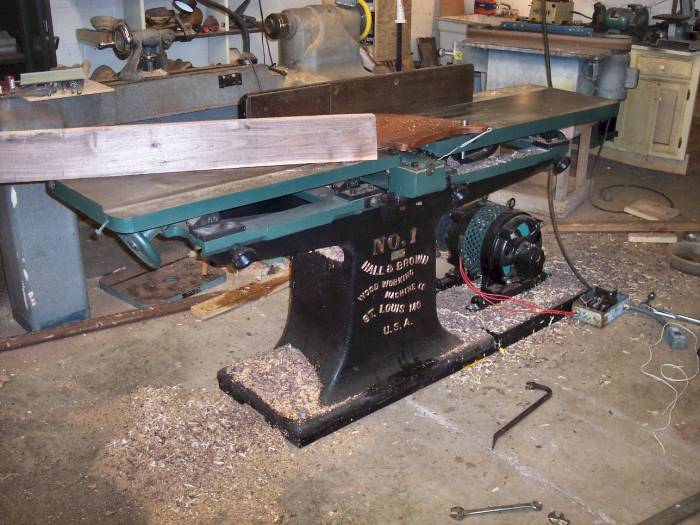 What I do on most tops and I did a lot of it on this one is use a wire cup brush on an angle grinder and knock most of the rust off. Then I sand the cast iron with a Random Orbital Sander. People will say it's a bad idea but cast iron is hard. It is what auto engines are made of it. On this one I started with 80 grit and worked to 180 grit I think. Leaves a perfect working surface. If I were doing yours I would just start with 120 grit. Let the sander do the work. Don't apply a lot of pressure. Do not tilt it up and use the edge. Just lay it flat and take your time. The paper will wear and it may leave scratch marks at first but as it wears down it gets smoother and smoother. I have done them with nothing but 80 grit. By the time I am done it is probably more like a 220+ grit and leaves a nice finish. I have never tried to make mine shiny factor new looking. I make it look good, smooth and leave any discolorations, then coat it with Johnson's Paste wax (for furniture) and use it. To make one shiney new usually means taking it to a machine shop and having it ground. I just want to them to look good and work perfect. |
|
|
|
Post by bigbill on Jun 17, 2018 16:59:58 GMT -8
Try WD 40 and steel wool to clean the rust. Thanks Bill. 000 or 0000 steel wool grade? Cheers, Rod Your choice, depends on how bad, finish you desire, and effort you wish to extend.  |
|
charliemyers
Active Member
Posts: 181 
Likes: 58
Currently Offline
|
Post by charliemyers on Jun 18, 2018 5:32:18 GMT -8
then coat it with Johnson's Paste wax (for furniture) and use it. I'll 2nd that! All of the cast iron in my shop get this treatment. I leave a piece of cloth sitting in the container so that I don't have to look around for a rag when I need to use it. Save |
|
|
|
Post by Teachndad on Jun 19, 2018 5:54:58 GMT -8
Hi Friends,
Great Ideas! Like Big Bill posted, I need to chose what level of energy and time I want to put into this and decide what the end result needs to be. I will let you know what I do.
Kudzu, that's amazing work on your joiner! That thing must weigh a ton - no pun intended.
I was looking at the oval section that surrounds the blade on the table top. I noticed it was sunken below the surface of the table top. Not knowing what caused it, I removed the four mounting screws and voila' found 4 soft rubber bushings. They were compressed, so I flipped them upside down and reinstalled. It works, but I really should have new ones. What are they called and where can I get them?
Thanks,
Rod
|
|
charliemyers
Active Member
Posts: 181
Likes: 58
Currently Offline
|
Post by charliemyers on Jun 19, 2018 6:15:59 GMT -8
It works, but I really should have new ones. What are they called and where can I get them? If it's what I think it is, it's a "throat plate". If you have a router, make a copy of your existing throat plate out of MDF or something similarly stable. Drill holes where necessary and drive some headless hex head screws to use as levelers. Probably where the rubber feet you found are located. After you have it installed, clamp it down, turn on the table saw, and slowly raise the blade up through it to create the slot for the blade. You'll then have a "zero clearance throat plate" which will help reduce tear out on the bottom side of the materials that you cut and prevent small cutoff pieces from falling down through the slot. Edit: I guess you were talking about the rubber feet. I still stand by my answer though! Save |
|
kudzu
Active Member
Posts: 344
Likes: 84
Currently Offline
|
Post by kudzu on Jun 19, 2018 8:11:11 GMT -8
Kudzu, that's amazing work on your joiner! That thing must weigh a ton - no pun intended. I think it would in the 800-900 lb range. With the motor, base and everything else it was probably pushing 1,000 lbs. I traded it for a smaller one. I found it just took up to much space and I didn't use the anywhere near the 12" capacity but once or twice. I miss that one but I am much happier with the 8" I traded for. The rubber spacers under the throat place are not probably not original. As charliemyers was saying you want to be able to adjust the plate so that it is levei with the table. Check and see if there isn't some small threaded holes in the table of ot the plate. |
|
|
|
Post by bigbill on Jun 19, 2018 16:42:59 GMT -8
The suggestion charliemyers made about the zero clearance plate is an excellent idea I was getting ready to make the same suggestion when I saw his post. The only thing is if you want to cut an angle you have to either cut another slot or make a new plate. Another thing you could do is replace rubber bushings with alum washers, possibly buy the ones sold for pop rivets they are thin so you could use how ever many you need to make it level.
|
|


