|
|
Post by Teachndad on Jul 24, 2017 15:03:39 GMT -8
Hi Friends,
I began my journey to a new experience. I want to replace the cylinder of my Bargman L-66 door handle on my Rod and Reel. I loosened the 4 mounting screws and I was able to separate the exterior part from the interior part. However, the exterior part is stuck in the door. The slide end that fits into the door jam is the side that won't come out. I coaxed it every which way and it seems to be caught up on something.no other mounting screws are visible.
Innards : 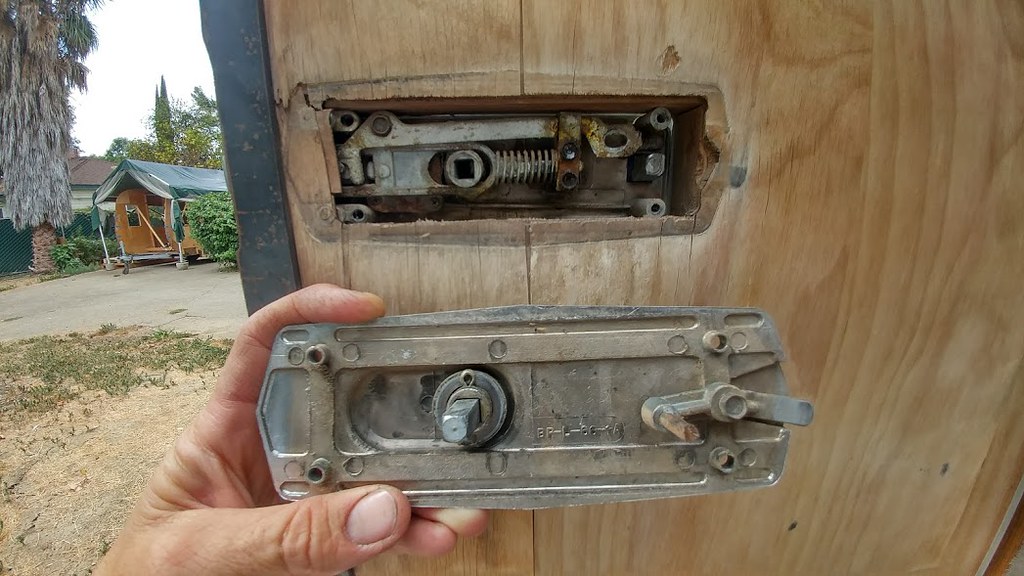
I tried extracting the handle when the handle was pulled out as if to open the door, but still no luck.
For those researching swapping your cylinder because you don't have a key, check out NCCamper's tutorial
Cheers,
Rod
|
|
Ten
3K Member

Posts: 3,432
Likes: 1,467
70 Shasta 16SC + 1964 Airflyte
Currently Offline
|
Post by Ten on Jul 24, 2017 17:05:32 GMT -8
Two screws at the latch, in the edge of the door.
|
|
|
|
Post by Teachndad on Jul 24, 2017 18:36:26 GMT -8
Two screws at the latch, IN the edge of the door. Hey Ten,
Yep, I finally found them hidden under the edge of the door. And how do we get to it? Don't tell me I have to take the door apart? 
Here is the edge of the door.
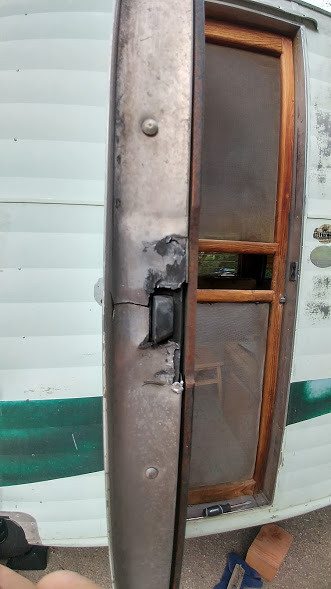
It's chewed up and I didn't want to start with the door, just yet. What happens if I cut away the edge so I can see the screws?  Can I change the cylinder while it's in the door? Can I change the cylinder while it's in the door?
For the uninitiated, the screws are covered by the edge aluminum strip of the door just above and below the latch. In this picture, they are covered and inaccessible.
The four screws you see in the image below show the mounting screws for the face plate. These were covered by the trim.
Cheers,
Rod
|
|
nccamper
Administrator 
Posts: 7,744 
Likes: 2,871
1962 Forester- 1956 Shasta
Currently Offline
|
Post by nccamper on Jul 24, 2017 18:51:16 GMT -8
So they put the door hardware on then folded the aluminum over it? These two screws are under the aluminum? That's really odd.  If that's the case, you may have to carefully fold the skin around the bend up a little. I'd go that route before butchering the skin. Especially if you plan to reuse the door skin. |
|
|
|
Post by Teachndad on Jul 24, 2017 19:02:40 GMT -8
Hi Fiends,
Thanks Kevin,
Yes, they are hiding.
Arrows mark the hidden screws.
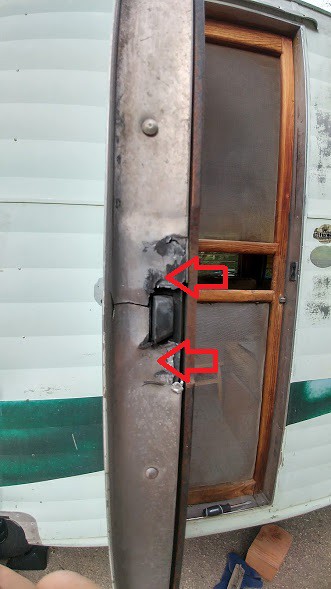
Nope, don't want to touch the skin. Maybe a Dremel to cut away the chewed up aluminum edging? It's "gone" anyway. If I fold it back and then refold it down, I wonder if the aluminum will sit without getting jammed when the door closes?
In the image below, you can see the 4 screws that were covered by the trim.

Rod |
|
nccamper
Administrator
Posts: 7,744
Likes: 2,871
1962 Forester- 1956 Shasta
Currently Offline
|
Post by nccamper on Jul 24, 2017 19:13:13 GMT -8
Drilling/Dremel may work if you don't damage the screws.
The door skin looks cracked. If yes, you may be able to pry it gentle up to get to the screws.
|
|
|
|
Post by Teachndad on Jul 28, 2017 12:51:20 GMT -8
Hi Friends,
Well, I did it!
I used a Dremel,to cut away the area between the arrows in the photograph above. Then. I could loosen the top and bottom screw. Next I used NcCamper's tutorial,to remove the cylinder. The pin was loose in the hole, but it wouldn't drop out. I poked and prodded with a large paper clip. Not optimum, but its all I had with a few light taps with a hammer removed it!
I got the new cylinder in the handle by wiggling and jiggling, and it suddenly popped home.
Some graphite was added to the cylinder and I cleaned up the innards a bit. I just need to add some grease to the moving parts, which btw, showed little wear.
Cheers,
Rod
|
|
Ten
3K Member
Posts: 3,432
Likes: 1,467
70 Shasta 16SC + 1964 Airflyte
Currently Offline
|
Post by Ten on Jul 28, 2017 14:28:53 GMT -8
This little bit of TLC done as regular maintenance can make a huge difference in the performance of the latch and the workings of the mechanical parts. Just don't overdo it with heavy grease, graphite works wonders. Found out the hard way that a little too much penetrating oil can be a drippy mess on new paint for quite a while...
|
|
|
|
Post by Teachndad on Jan 23, 2022 7:27:22 GMT -8
Hi Friends, I am now repairing the inner framing of the door with help from trailer buddy Dave. The door is now disassembled.  That brings us back to an issue with the trim. It's got a split in it. As seen below, part of the trim is missing and you can see the split in the trim near the door latch. I hope that a new trim can be made by a sheet metal shop. In addition to the split there is a thin section of the trim that appears missing between the blue arrows. Here is a close up of the missing section. I opened up the gap with the dremel to access the screw heads on the wide flat section of the trim, but I did not cut the thin vertical section of the trim between the blue arrows.  Shouldn't that gap between the blue arrows be closed off? Hence the need for new trim along with the split. Thanks, Rod |
|
nccamper
Administrator
Posts: 7,744
Likes: 2,871
1962 Forester- 1956 Shasta
Currently Offline
|
Post by nccamper on Jan 24, 2022 5:45:44 GMT -8
Yes, I think the piece needs replaced. I’m still in Mexico and having trouble linking photos but in my Airflyte album you’re find photos of trim I made from leftover skin using a Handbrake I rented from Home Depot. It’s really easy to make with the 8’ handbrake.
|
|
|
|
Post by Teachndad on Feb 8, 2022 15:58:37 GMT -8
Yes, I think the piece needs replaced. I’m still in Mexico and having trouble linking photos but in my Airflyte album you’re find photos of trim I made from leftover skin using a Handbrake I rented from Home Depot. It’s really easy to make with the 8’ handbrake. Hey NC, How much did the 8' handbrake weigh? Thanks Rod |
|
nccamper
Administrator
Posts: 7,744
Likes: 2,871
1962 Forester- 1956 Shasta
Currently Offline
|
Post by nccamper on Feb 8, 2022 18:31:32 GMT -8
I don't know the exact weight but two people made easy work of setting it up. Set the stand (legs) up first than slide handbrake off the truck. I experimented with small pieces of scrap skin to get the brakes figured out.
|
|


 Can I change the cylinder while it's in the door?

