Frolicking
New Member
Posts: 7  Frolic
Currently Offline
|
Post by Frolicking on Jan 30, 2017 11:29:36 GMT -8
After much research here and watching some of mobil's videos, we started in on trying to repair our Frolic this weekend. Our original plan had been to "gut" everything from the inside and replace any rotted framing and all of the interior walls and ceiling, but it seems all you guys think that's a bad plan.  So we changed gears and began by taking the skin off the front of the trailer. So, after removing the J rails and window we started pulling the skin off. Come to find out the skin is glued to the foam insulation. There is practically no frame. Window frames are held up by insulation and everything is glued together.... I mean everything!!! Our plan now is to basically build an entirely new frame from scratch. The problem is that we are very unsure as to what order we need to do things in. The whole ceiling has to go and we are hoping to buy a new roof as long as we can find something we don't have to pay almost $300 in shipping! We are amateurs and only wanted to do a section at a time since we are afraid we wont be able to get it back together properly. We also don't have a covered work space, so that makes things tricky. I know the walls sit on the floor and I'm 98% sure there is rotted floor under the wall by the wheel well. Is there a way to replace that flooring without taking off the entire wall? We also just need help knowing what order we should go in. Any and all advice is much appreciated! |
|
mrmarty51
Leading Member

Posts: 1,787 
Likes: 423
1972 HOMEMADE
Currently Offline
|
Post by mrmarty51 on Jan 30, 2017 11:51:10 GMT -8
Wow Frolicking, It appears that You have quite a project on Your hands.
Welcome to VTT.
This is theeee site that You will get all the help that You will need.
Another camper trailer with foam board insulation. that is rare. What is even more rare is that the siding is glued to the foamyboard.
If You have a heat gun then heat the siding from the outside, do not blister the paint. the glue should let loose and the siding come right off.
I am not sure what spacing to use on the framing, My camper is based on 16" centers but it is home made and I dont know if that is the norm or not.
You got it right by removing the skin first.
Other members will climb aboard and give You a lot more detail than I can.
Good luck with the project.
|
|
gary350
Full Member
 We should have gone camping today it is going to snow 6" tonight.
Posts: 573
Likes: 170
1964 FAN
Currently Offline
|
Post by gary350 on Jan 30, 2017 13:03:49 GMT -8
I bought a used $2 clothes iron at a yard sale it works good on siding. Set the dial for the amount of heat you need to get the siding loose. Clothes iron works good to get ride of old putty tape heat the metal on the back side of the putty and most of the time it just falls of on its own. Turn the clothes iron heat setting all the way up this is about 650 degrees F it will remove silicone and burn off old paint. You can not damage aluminum siding with 650 degrees.
|
|
|
|
Post by vintagebruce on Jan 30, 2017 13:27:37 GMT -8
Wow  to VTT. You sound like you might have been lucky to get your Frolic home...the previous owner must have used gorilla glue. VTT is a great source for rebuilders. It is a bit more difficult starting from scratch, to build a new frame (without patterns). I would suggest that you keep gathering info here and also check out the Facebook Frolic thread. You might identify someone in that Facebook Group that is rebuilding or has rebuilt a similar model and year Frolic as yours and has photos to document the basic design of the frame and construction. Here is the thread I suggest you follow, along with staying with us here on VTT and continue asking questions as you encounter problems. Good Luck! www.facebook.com/pages/Frolic-Travel-Trailers/324809707536567There may also be a Frolic Yahoo Group. I do not Facebook or Yahoo, so I am not sure how to access any Yahoo Frolic Group. I think maybe you open a Yahoo acct, and once you become a Hooter then you can roam freely amongst their Groups. |
|
Frolicking
New Member
Posts: 7
Frolic
Currently Offline
|
Post by Frolicking on Jan 30, 2017 14:50:03 GMT -8
Thanks for the tips everyone! I posted in the Facebook group, but it seems pretty inactive so I'm not expecting a response. I love the iron idea since I was gonna have to borrow a heat gun, but I have an old iron. I'd still welcome any advice on the order in which we should do things.
|
|
|
|
Post by vikx on Jan 30, 2017 23:33:06 GMT -8
Welcome Frolicking! We don't have a Facebook group, at least I don't think we do... and hope we DON'T. We are all here to help you.
|
|
ruderunner
Active Member
Posts: 472
Likes: 97
Currently Offline
|
Post by ruderunner on Feb 1, 2017 9:52:02 GMT -8
Is this foam panel insulation or the spray in kind?
If its spray in, you are going to have a big mess. And I fear it may be hiding/substitution for the original framing. I hope I'm wrong..
|
|
Frolicking
New Member
Posts: 7
Frolic
Currently Offline
|
Post by Frolicking on Feb 1, 2017 11:13:25 GMT -8
It's not sprayed in. It's foam board.  Hopefully that picture shows up. I would love to take the walls off, but because I'm working outside with limited space, I don't see that as an option. I'm thinking that maybe if I have both the back and front pieces off then we may be able to jack up one wall at a time to replace the flooring in the center. I know that's not ideal, but it's all I can come up with at this point. I'm also wondering when we do the ceiling/roof. The idea in my head (which I'm sure will change many times) is to replace the areas rotten flooring (front and back would be open), rebuild framing for walls (I'm hoping to do this from the inside since the walls sit on the floor, but I haven't looked at how they attach to the ceiling yet), rebuild both ends, then tackle the roof/ceiling. I'll be peeling back the bottom part of the skin on the side panels to replace framing and I'll do the same at the top since I can't take them completely off. Thoughts and suggestions??? |
|
mrmarty51
Leading Member
Posts: 1,787
Likes: 423
1972 HOMEMADE
Currently Offline
|
Post by mrmarty51 on Feb 1, 2017 12:37:15 GMT -8
If the camper is under 20` then one of those poly tarp garage things from Harbor Fright might work well. the ceilings in them are fairly tall. The floor on My camper was stuck to the frame with carriage bolts. It was a real pain to get the body separated from the floor. I used 2X6s in each corner and used those for stilts after I gor the body loose from the floor. I used an old simplex jack and slightly lifted the camper while loosening fasteners, Had to do a lot of sawing too, using the saws all. there were a lot of hidden nails, bolts and screws in this unit. here is a pic. of it on the stilts. Extra bracings were aed to keep the walls from spreading and separating. Thats the boards across the ends. 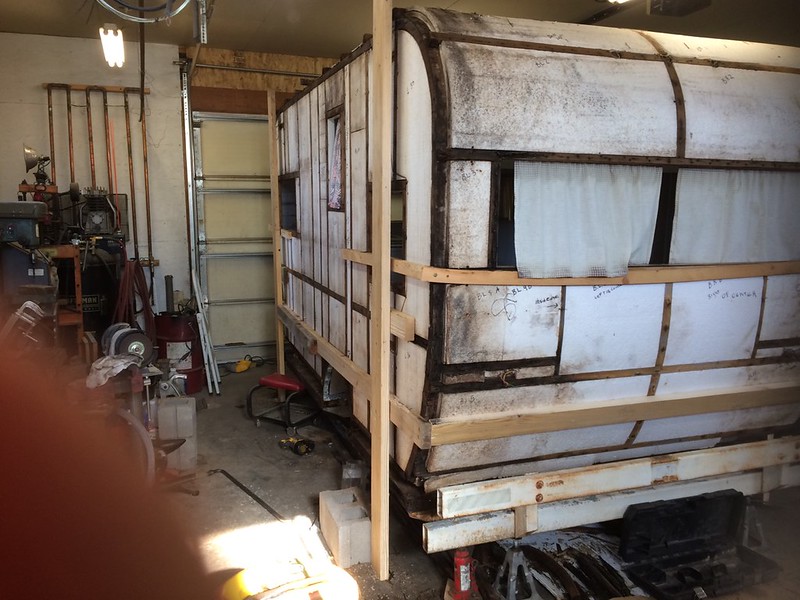 IMG_2826 IMG_2826 by Martin Draper, on Flickr |
|
ruderunner
Active Member
Posts: 472
Likes: 97
Currently Offline
|
Post by ruderunner on Feb 1, 2017 17:15:29 GMT -8
Those pics are a relief to me, at least from my newbie standpoint. The framing that is present doesn't look bad, a couple spots but OK IMHO. Its the lack of framing is what I find surprising.
The foam panels can be trimmed to fit new framing in. Marty has some creative id was of how you can accomplish repair, check his build thread.
|
|
mrmarty51
Leading Member
Posts: 1,787
Likes: 423
1972 HOMEMADE
Currently Offline
|
Post by mrmarty51 on Feb 1, 2017 21:44:47 GMT -8
I eventually lifted the body high enough that the floor structure was slid off the frame, out the front and discarded.
A new structure was put together and slid back into position. The lower deck was laid on top of the
structure, went around as many of the 2X2s, as I could get to, with a pencil then those plywoods were removed and cut then mocked back in to make sure that they fit.
I then looped a rope through four of the windows and lifted the floor structure, the top deck was slid under the structure and the structure lowered. Then the pencil came out again and lines were drawn around the 2X2s. Ropes were untied and the structure pulled out then the lower deck was screwed down, foam board insulation installed between the 2X2s then the top deck was screwed down and the completed unit slid back into position atop of the trailer frame and bolted down.
By drawing around the individual 2X2s I knew exactly where to power in the screws.
|
|
ericsfrolic
New Member
Posts: 16
Likes: 1
Currently Offline
|
Post by ericsfrolic on Feb 1, 2020 10:18:18 GMT -8
Hey Frolicking.
Just acquired my own Frolic and hoping to start work on it soon.
Any suggestions or lessons learned? Mine measures 21' on the overall length of the body and appears to be fairly decent for a 60s model. So although hoping for the best, I do know I have some wood issues in the walls and ceiling to fix.
Everyone seems to side with removing the skins first to access the exterior wood for repairs. My first thought, seemed to be like yours, and to gut the inside working from the inside instead. What is your thoughts now that you've been into yours?
Any thoughts you'd care to share would be greatly appreciated. And hope to hear back from you on how yours turned out with some photos maybe.
TIA.
Eric
|
|
|
|
Post by vikx on Feb 1, 2020 13:08:41 GMT -8
Frolicking was last online in August of 2017.
If your Frolic has foam board walls, beware! They are extremely difficult to work on. I did a Winnie MH with foam walls and ceiling and it was a nightmare. No wood framing anywhere. The cabinets had drooped and there was nothing to re-attach to. The windows and roof vent were "sandwiched" around the foam rather than anchored in wood. I would do some stealthy research before you begin. Maybe in a closet or? Also, see if you can find other threads online about foam walls. Winnibago motor homes in the to mid 60s-70s might give you a start.
The Winnie was eventually gutted and reframed with wood framing on the inside but it never really was a motor home again. The boss used it as a tool truck until it fell apart. There just wasn't any way to hold it together.
I would be very careful and do a lot of studying before beginning on your Frolic. To me, this a worst case scenario. If the skin is stuck to the foam, it could mean all new and a frame up build. Sorry about this.
|
|


 So we changed gears and began by taking the skin off the front of the trailer. So, after removing the J rails and window we started pulling the skin off. Come to find out the skin is glued to the foam insulation. There is practically no frame. Window frames are held up by insulation and everything is glued together.... I mean everything!!! Our plan now is to basically build an entirely new frame from scratch. The problem is that we are very unsure as to what order we need to do things in. The whole ceiling has to go and we are hoping to buy a new roof as long as we can find something we don't have to pay almost $300 in shipping! We are amateurs and only wanted to do a section at a time since we are afraid we wont be able to get it back together properly. We also don't have a covered work space, so that makes things tricky. I know the walls sit on the floor and I'm 98% sure there is rotted floor under the wall by the wheel well. Is there a way to replace that flooring without taking off the entire wall? We also just need help knowing what order we should go in. Any and all advice is much appreciated!


 to VTT. You sound like you might have been lucky to get your Frolic home...the previous owner must have used gorilla glue. VTT is a great source for rebuilders. It is a bit more difficult starting from scratch, to build a new frame (without patterns). I would suggest that you keep gathering info here and also check out the Facebook Frolic thread. You might identify someone in that Facebook Group that is rebuilding or has rebuilt a similar model and year Frolic as yours and has photos to document the basic design of the frame and construction. Here is the thread I suggest you follow, along with staying with us here on VTT and continue asking questions as you encounter problems. Good Luck!


