rbeguelin
New Member
Posts: 7 
Currently Offline
|
Post by rbeguelin on Jan 12, 2017 16:25:12 GMT -8
H'all
So we are renovating a 1600 SC. We have removed the paneling and flooring in the two rear corners due to bubbling of the birch wall panels and the plywood floor indicating water damage. We pulled the rear and side windows and reinstalled them with new glazing compound and are now monitoring the areas for any indication of water seepage....so far so ...!(dont want to say it!). We are sistering new floor joists and 1x3 wall studs where necessary.
We want to renovate the shower toilet area as it needs it...I cannot figure out how to remove the wall panels, let alone the shower mixing valve. Additionally, I do not see how to remove the original toilet...any suggestions in these regards would be very welcome!
Currently, I am working on rewiring the whole DC wiring in the trailer including the electric brakes. I will pull the hubs to inspect the brakes and likely have to replace them however the two wires coming from the brakes are not attached to anything nor capped. The PO spliced in a four prong plug that seems to work the markers, turn signals correctly. I guess I have to buy and install a 7 prong plug system - correct?
Finally, does anyone have an opinion about the propane fired Norcold which we have, vs installing perhaps a 12v dc/120 Ac mini fridge?
Thanks for your help!
Rob
|
|
msgoehring
Full Member
     Just call me Margaret the shellac, buff, sand an shine queen.
Posts: 860 
Likes: 303
1957 Westerner Deluxe
Currently Offline
|
Post by msgoehring on Jan 12, 2017 20:23:43 GMT -8
Hello Rob and welcome to VTT, there are lots of Shasta owners on here so you came to the right place. First it sounds like you're a little confused on the proper way to restore and repair a trailer. When restoring or repairing a vintage trailer, you must start from the OUTSIDE and work your way in. You must leave the cabinets, closets and other interior items in place because they provide the structural integrity of the trailer. And you won't be able to access where they have been tied into the trailer without removing the skin. In order to safely and properly repair rot or water damage in a trailer you need to start with removing the skins and shoring up the frame while it is still supported by the interior. You also need to check the boards that hold the body to the frame which are called skirt board (this one is the bottom board of the trailer body) and the sill board (which is attached to the frame to nail or screw the body to) as these are likely to be rotted also. Here is a thread that tells you the names of the trailer frame parts: vintagetrailertalk.freeforums.net/thread/1093/vintage-trailer-framing But before you even go any further please, please check out these following two resources that are available from members of this forum who restore and repair vintage trailers for a living. They have been a complete life saver not just for me, but for many others. You have no idea of what can happen if a trailer is not repaired correctly, but one thing is you can be driving down the road and the entire body of the trailer will come off the frame like this one did: 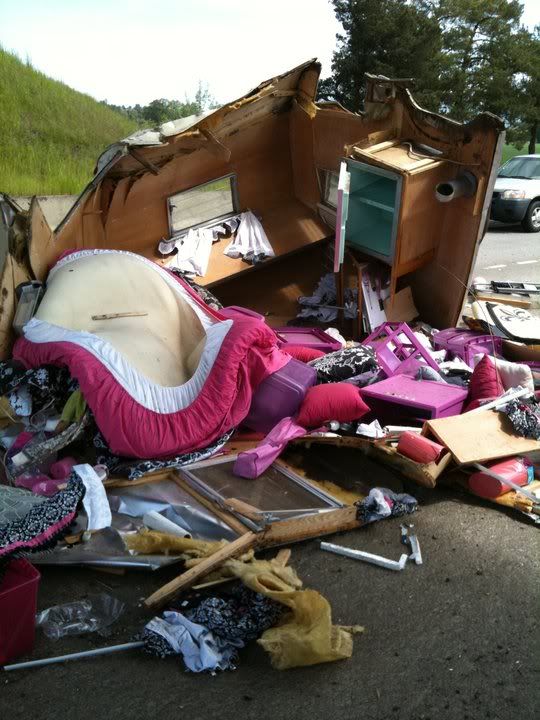 The first resource is mobiltec. He makes videos and posts them on YouTube of his work sharing how to do everything on a trailer from start to finish. His website is: www.cannedhamtrailers.com and I recommend you watch this video first so you better understand why these things have to be repaired from the outside in: www.youtube.com/watch?v=hDdpZgSD1JM . He does all these videos for free to help others who are interested in vintage trailers, but he does appreciate donations from his website if you feel he's been a help and are so inclined. Next is a wonderful repair manual put together by another long time member that restores trailers, whose forum name is vikx. You can find the manual here : vintagetrailerrepairmanual.weebly.com My husband doesn't do computers so this manual has become very important to him as we work to do a frame off restoration of our 57 Westerner Deluxe travel trailer. I am so glad you found this forum. There are so many wonderful people here who are very willing to answer any questions and help with anything you may come up against. I also want to mention how much useful information is on this forum. I'd start by looking through the tutorials and/or the exterior and interior repair threads. I know this probably isn't what you were hoping for, but it's the only way to get the work done. Also you should start a new thread with your questions about the electric system because there are members more knowledgeable that may pay closer attention to those questions if they are by themselves. |
|
|
|
Post by vikx on Jan 12, 2017 22:27:20 GMT -8
Welcome to VTT Rob!
Margaret is leading you in the right direction. Post individual threads on your wiring and fridge in the appropriate categories. That will get you more answers.
|
|
rbeguelin
New Member
Posts: 7 
Currently Offline
|
Post by rbeguelin on Jan 16, 2017 14:50:17 GMT -8
Thanks for the info Margaret.
While a I agree that a full blown restoration or even major work would require a skin off approach - for this trailer we are going to repair it without going that route. The sill boards are only rotted in the rear corners of the trailer and I have been able to clean out the rotted boards( about 3 inches) and sister new boards in place. The frame in the rear corners also suffered from some rot and again I will be able to sister in replacements. The young woman, (owner of the trailer) whom I am helping wanted to replace the melamine boards in the shower stall. She found someone on facebook who outlined how he did this. Seems straight forward enough though I am questioning how I get the board with the fixtures on it out.
I will post my questions about the fixtures, toilet, fridge, water heater, space heater and stove in the appropriate places. This trailer so reminds me of the sailboats, though the Alder Barbour fridges I had were electric not propane!
I am gald I found this forum and I will be sure to explore it further!
Thanks
Rob
|
|
mobiltec
5K Member
     I make mistakes so you don't have to...
Posts: 9,894 
Likes: 3,815
1954 Jewel In Progress...
Currently Offline
|
Post by mobiltec on Jan 17, 2017 20:54:33 GMT -8
All I'm going to say is you can't tell what's rotted if you can't see it. If you at least lift the lower skins on both sides you can inspect to make sure there is no other rot. The skirt boards are the only things besides the lower cabinets that hold the box up off the asphalt. You can't really piece in the skirt boards. They need to span from rear to wheel well and from there to the front of the trailer. Otherwise they play no part in structural integrity. All the pieces in a lightweight camper are very important parts of the structure and without any one of them you weaken the rest by a huge margin. These things were engineered this way to save on weight and costs so that they could be pulled by the vehicles of the day and be affordable. It's not hard and doesn't take long for an inspection like this...   |
|
msgoehring
Full Member
     Just call me Margaret the shellac, buff, sand an shine queen.
Posts: 860 
Likes: 303
1957 Westerner Deluxe
Currently Offline
|
Post by msgoehring on Jan 17, 2017 21:58:03 GMT -8
Rob, mobiltec is 100% correct and he has a lot of experience behind what he's saying.
Also you won't be able to get to the screws and nails that are keeping the walls of the bathroom and shower together without removing the skin because the trailer was built from the outside in. All of the cabinets and walls were attached from the outside to the framing and the roof. As mobiltec stated these pieces are integral to the stability of the trailer and are the only true support it has to the frame.
Please don't take this the wrong way, but that guy on Facebook doesn't sound like he has a clue about how to properly repair a trailer. This forum is full of people who have been where you are and can tell you that this is the only way to safely make any repairs or changes. At least give it a try.
|
|
Ten
3K Member
  
Posts: 3,432
Likes: 1,467
70 Shasta 16SC + 1964 Airflyte
Currently Offline
|
Post by Ten on Jan 18, 2017 16:37:14 GMT -8
Hi Rob, Just wanted to welcome you here. The above advice is all sound, and doesn't really answer your original question. I'll try to help a little if I can. I have been hobbying around these ole Shastas a while. If I am not mistaken you are working on something that looks like this: 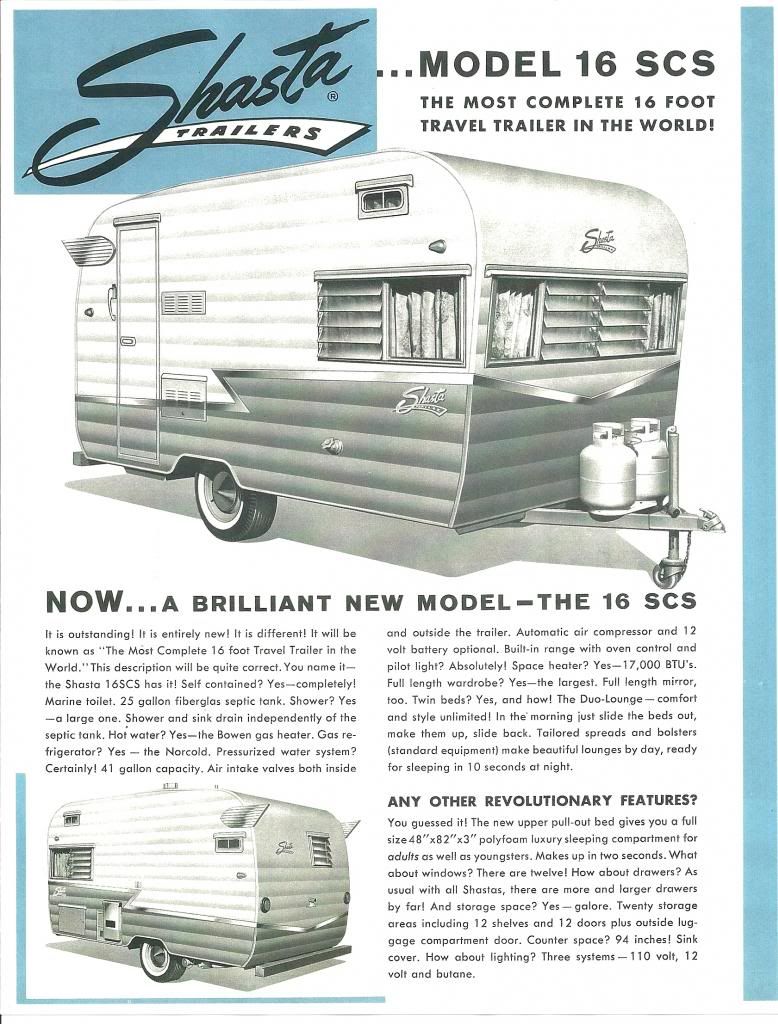 I've got a Deluxe model, with the bathroom and shower. I believe the shower walls were aluminum sheeting attached over the wood paneling.   On the backside of the faucet is a panel that looks like it should be removable and would give access to the fixtures from inside the wall.  The shower faucet should be held on with standard nuts like any other shower faucet would be. There were lots of fittings in these older trailers that mirrored the ones available in homes. There wasn't a lot of cheap plastic anything back then. I don't have any photos or direct experience with the toilet mount yet, but believe it is mounted with normal closet bolts. They were mounted directly to the top of the black water tank. The bolts are likely hidden with some sort of cover, and may be well disguised by time and dirt. I'll try to get some photos. This might not be the right model but maybe this will be of some help:    ------- You are almost always better off installing the 7-way plug on the trailer. It is for the most part standard installation on modern tow vehicles, and it accommodates the brakes as well as the lighting system. Since you are planning to pull the drums, you will be inside the system and can do the rewire for the brakes. While you are there, I would recommend packing the wheel bearings as well. Dried up grease can really ruin toeing in s hurry. Since you have the 4-prong plug already, locating the proper wires for the 7-way hookup for the lights should be easy. There are indications with the old propane refrigerators that they are failing. The odor of ammonia in the interior is a good sign of imminent failure. Once the coils leak out, there is no fix to the older ones. Propane refrigerators are not really as reliable in warmer weather either. They tend to not keep quite as cold. If it were me, I would keep it just for the originality, if it tests out that it works well. The option of 12-volt is nice, but drains a lot of power. However, depending on how you are planning to use the camper most, a dual electric fridge is not the worst choice you could make. It is difficult to make them fit and look good. Just my opinion though.... Hope this is any help at all. I am sure you will find more information looking around here. There are a lot of good restorations that have been done and a lot of experience. |
|
rbeguelin
New Member
Posts: 7 
Currently Offline
|
Post by rbeguelin on Jan 20, 2017 13:20:47 GMT -8
Thanks Ten, I was able to get the shower mixing valve out after removing the hot water heater. We removed the gold lame' melamine board and are considering new paneling...perhaps a sheet metal of some sorts, aluminum would be great, though pricey I imagine. I have replaced both roof vents, I did have to replace one of the shower roof vent support members but that was simple enough. I am interested in seeing if I can get the refrigerator working but I have told the owner that she would probably be as well served to buy a Yeti cooler with some dry ice...In order to take out the fridge we would have to peel back the skin so my thanks to mobiltec for the pics. It is something to consider as the refrigerator occupies prime real estate in the kitchen area. Her toilet is a Mono Chem which we have removed from the shower for the time being. It is not directly connected to the water supply so it appears to be a model A. I am encouraging the owner to reuse it though she is investigating toilets on Amazon. It is amazing technology! I have checked on the owners ride ( F250) and it looks to have a 7 point plug so I will rewire towards that end. We have to jack up the trailer and pull the wheels and check the bearings, brakes etc. I will remove any old grease and regrease...just have to find the time and good weather to get to them! After reinstalling the water heater I will be set to pressure test the propane line(s). Keeping fingers crossed. Overall this trailer is in pretty good shape for a 1969, however based on your photo her trailer is not a 1600 SCS, I have inserted a picture. 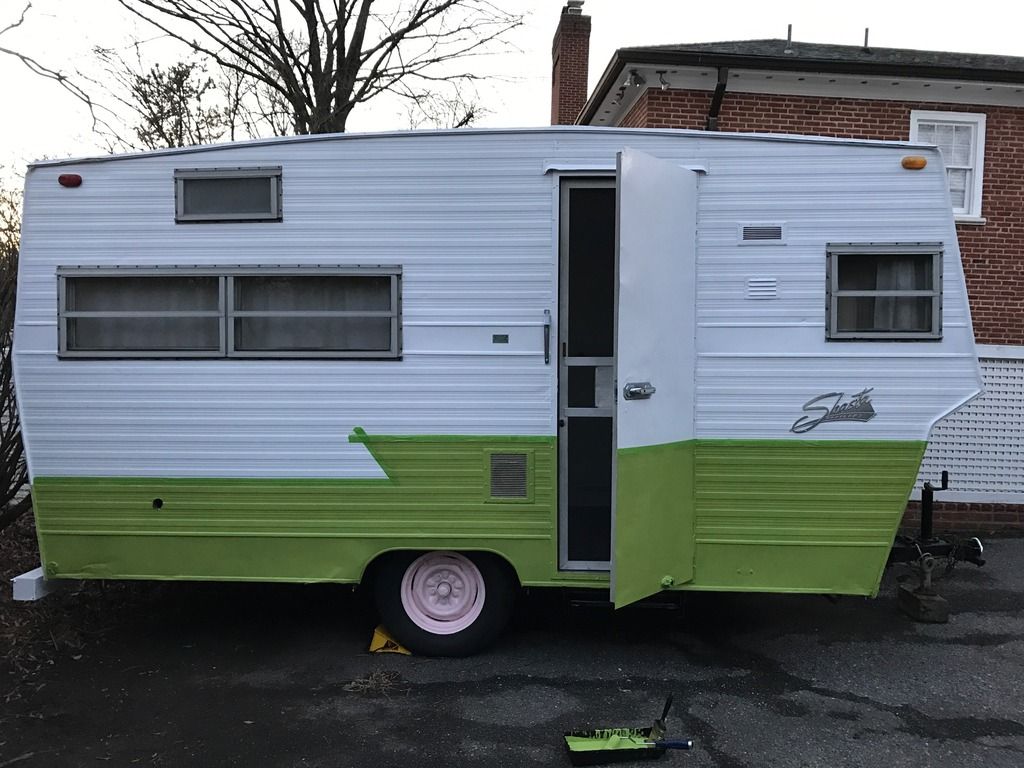 [img src="http://http://s682.photobucket.com/user/Rbeguelin/media/Allisons%20trailer_zpshflltsit.jpeg.html?filters[user]=146102132&filters[recent]=1&sort=1&o=1" alt=" "] |
|
Ten
3K Member
  
Posts: 3,432
Likes: 1,467
70 Shasta 16SC + 1964 Airflyte
Currently Offline
|
Post by Ten on Jan 20, 2017 16:26:16 GMT -8
I was wayyyyy off. For some reason I was picturing one of the canned-ham models. That is a 16SC. I own one just like it, a 1970. 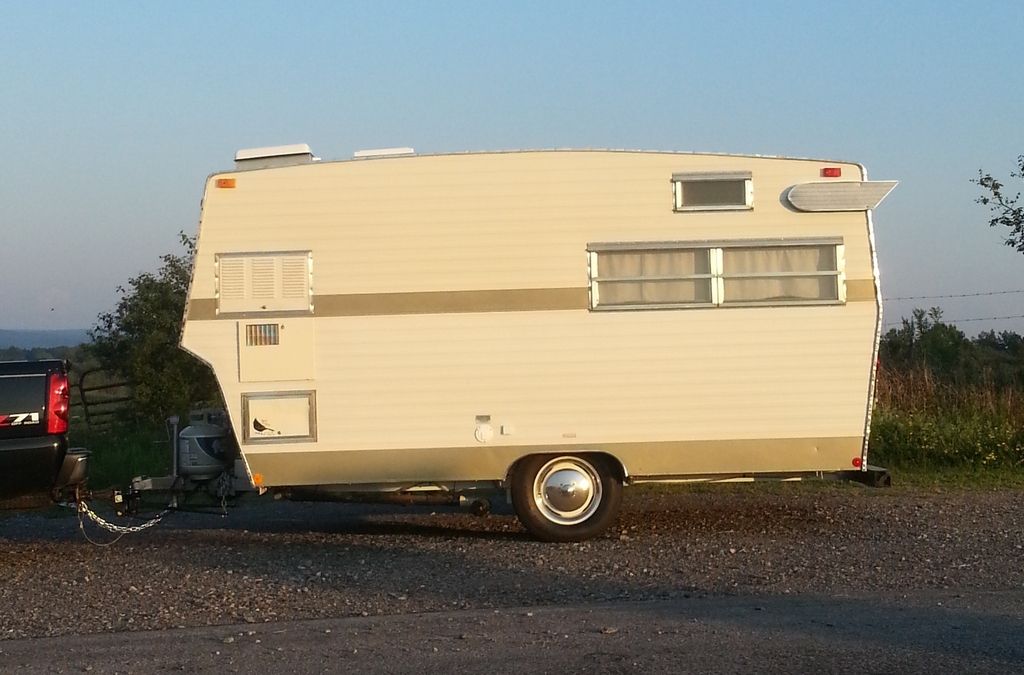 Is the refrigerator an electric/propane combination unit? Mine has an Instamatic brand, and works perfectly. I got really lucky I guess. The refrigerator will come out through the interior. It is accessible from the exterior hatch, top one in the photo. Assuming it is the original one, there are two screws in the base of it holding it to the shelf near the rear. The propane line (and electric plug) are in here also. From the front there should be an access panel that removes below the door. There are two screws that go sidewards into the cabinet frame to hold the unit in the cabinet. You have to be careful of the sink faucet and countertop surface, but it will slide out over the counter. (By the way, the shower valve is easily accessible with the refrigerator removed...) 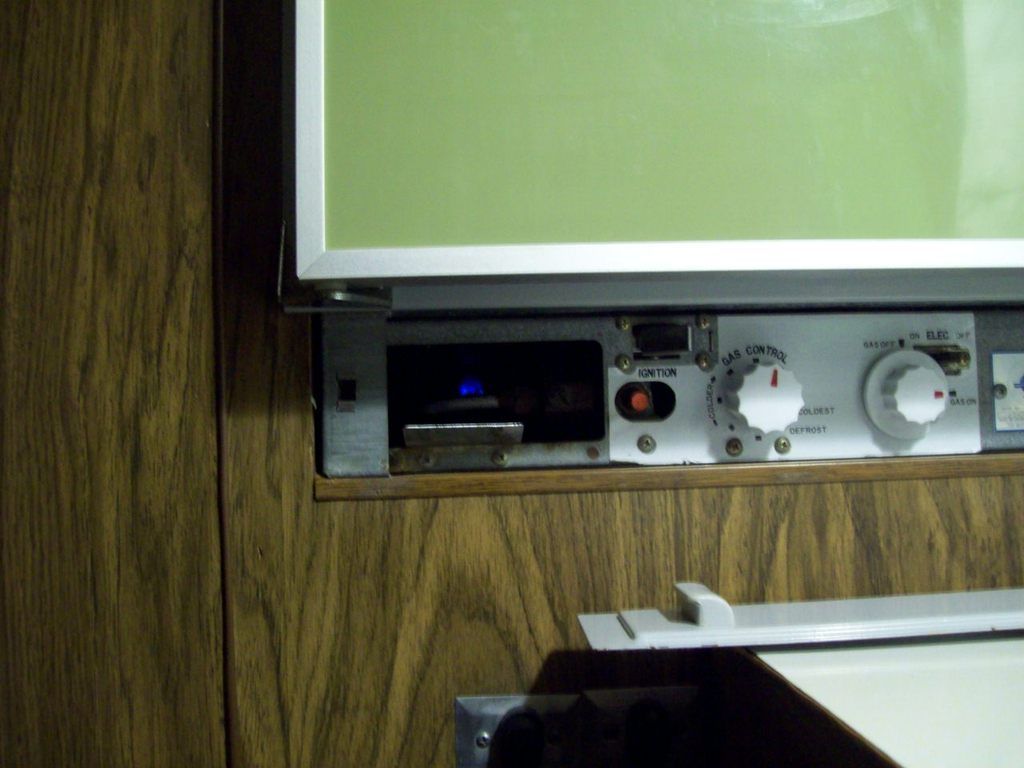 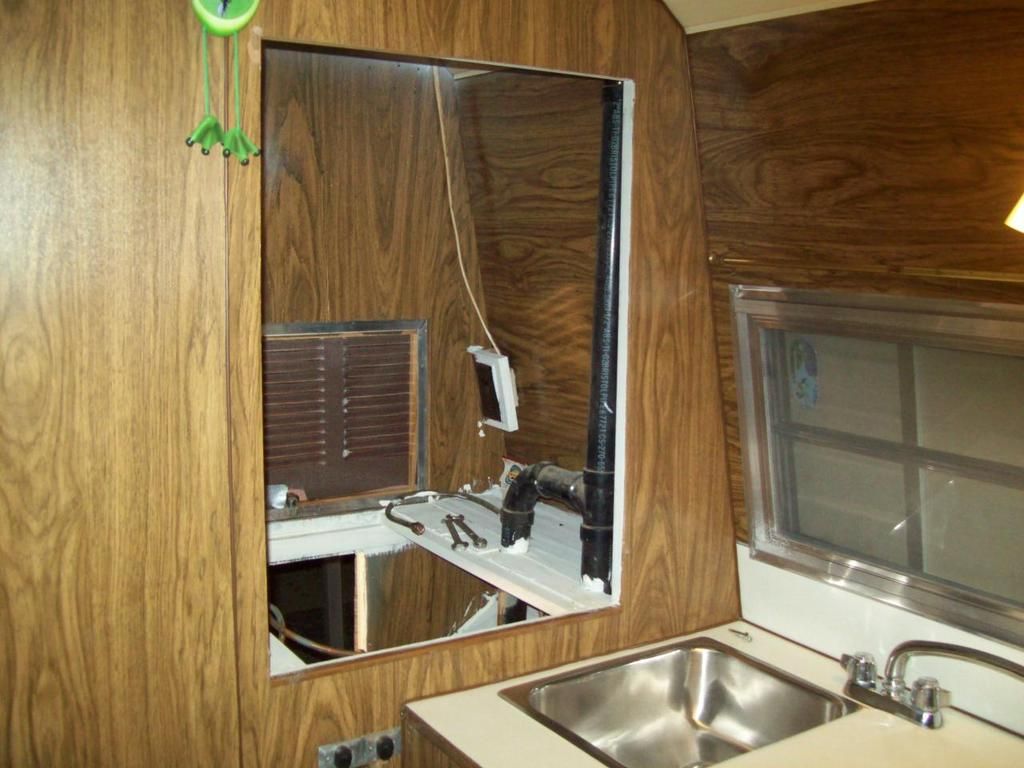 A warning: The roof vent for the propane fridge often allowed a lot of leakage in these models, and could cause a lot of rot in the front corner framing. 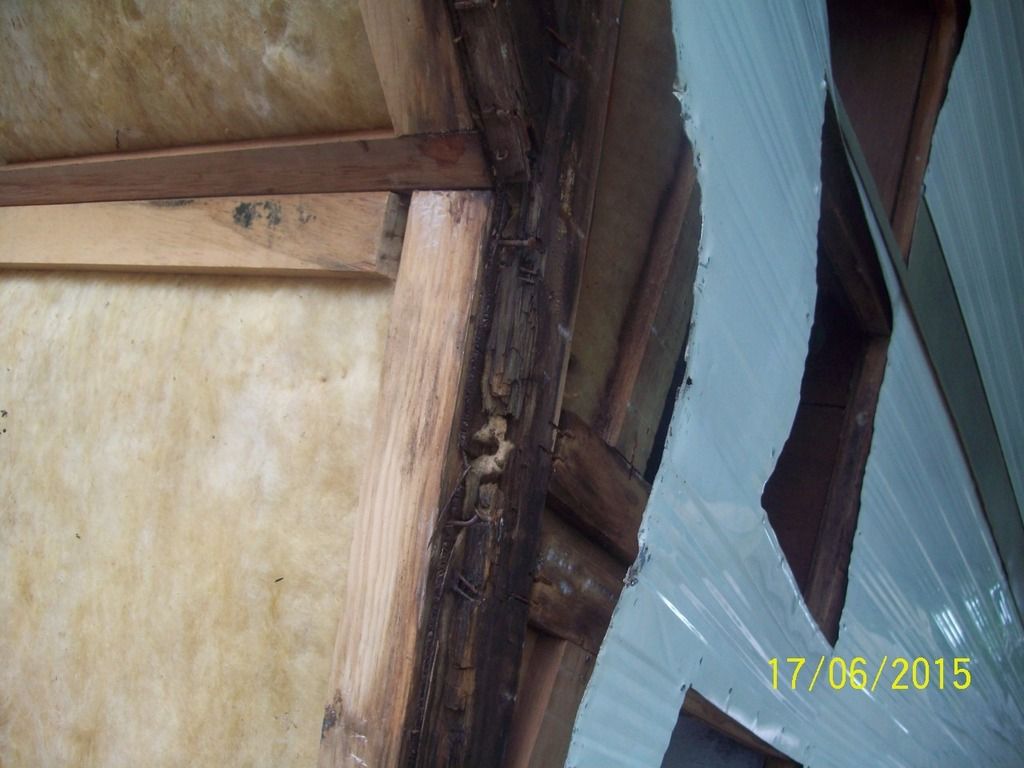 I ended up with a real problem with the holding tank in mine, and have removed the toilet (Ours is an Aqua Magic and was fed through the plumbing system ). I fitted a couple pieces of plywood over the flange. I still have all the original things, but we just have used the porta potty in place of the toilet and emptying the holding tank. There are a couple threads on the board with some discussion of the advantages of using a porta potty in place of the toilet. 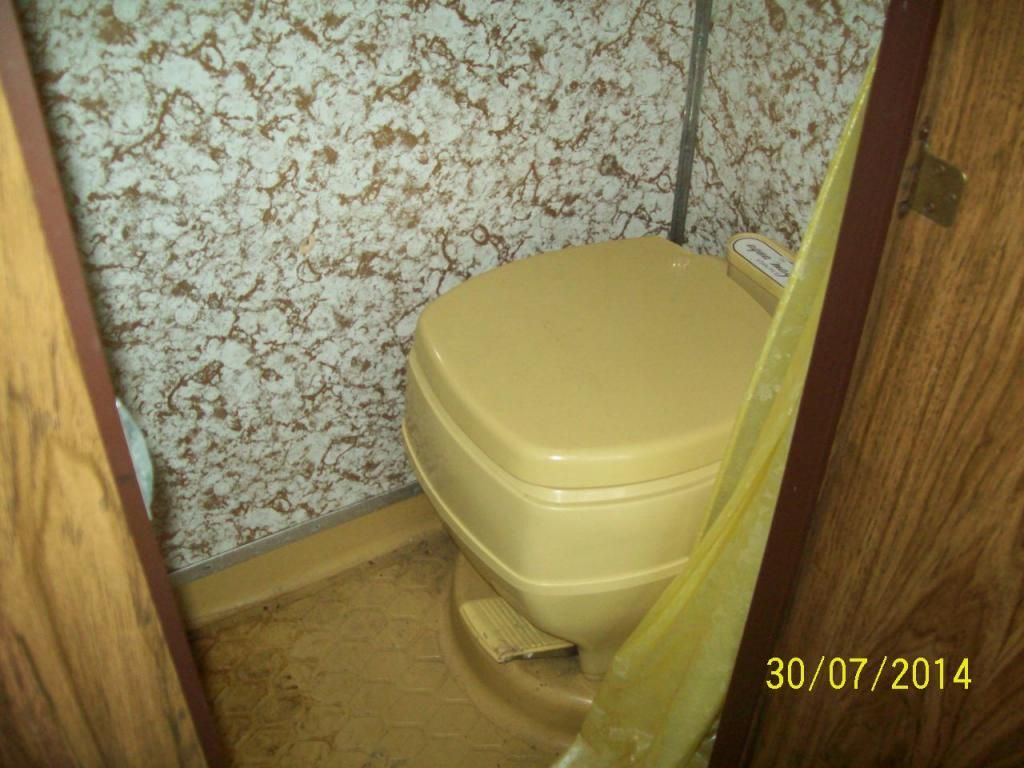 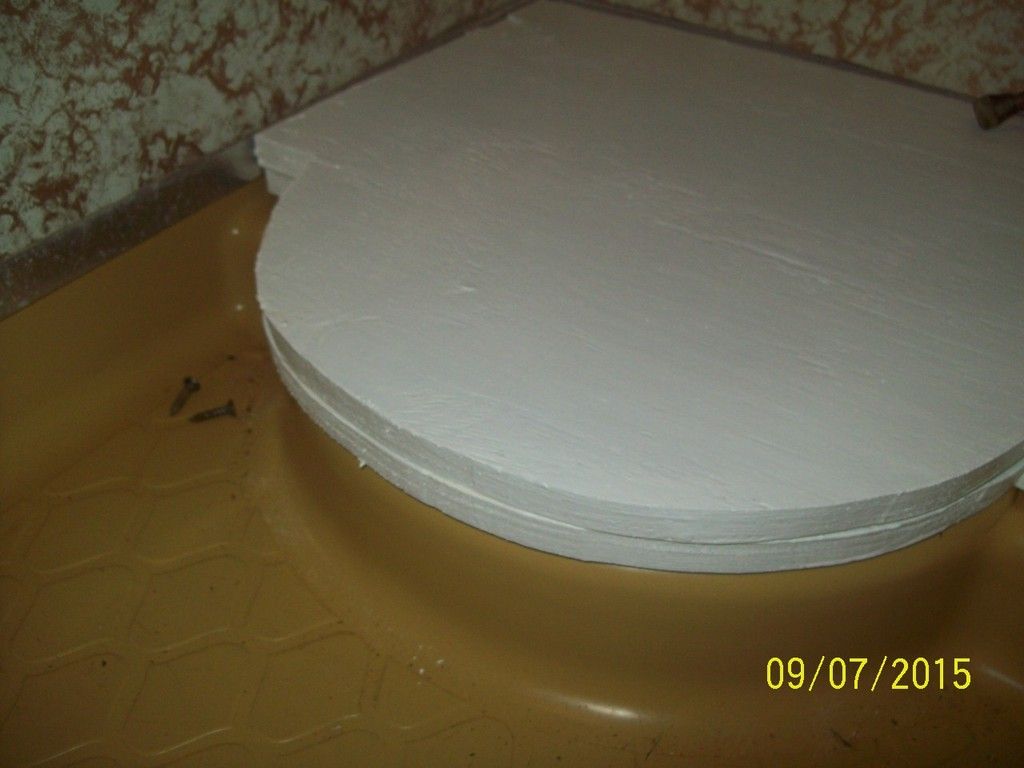 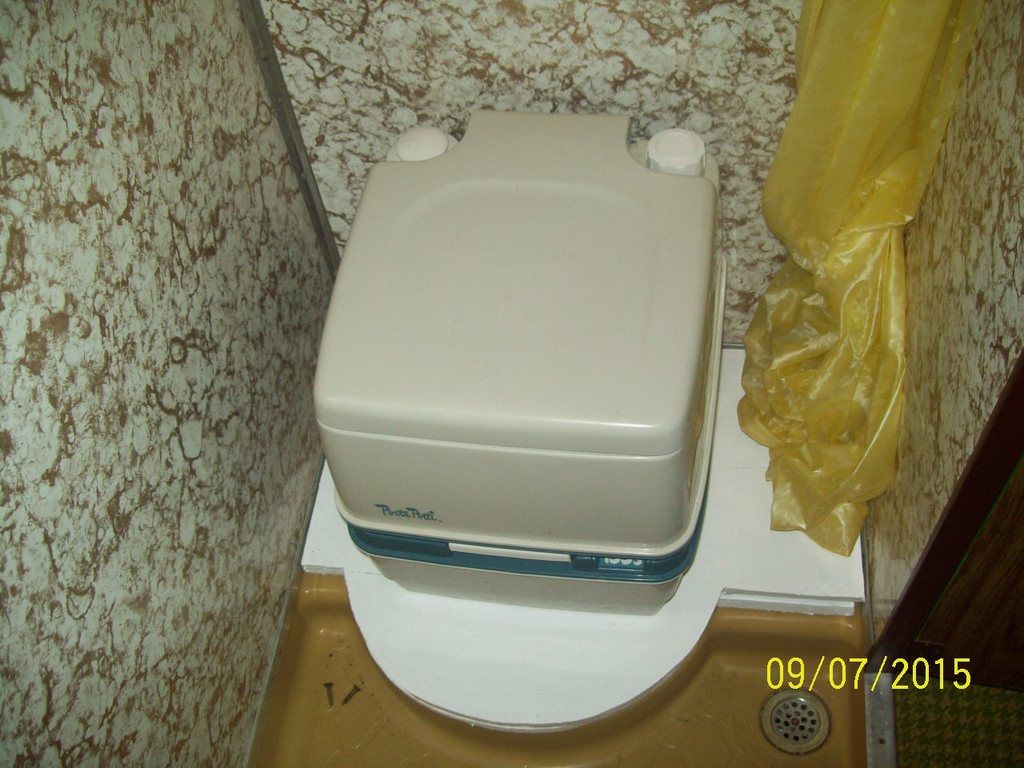 You might consider a showerboard paneling to replace the old, or perhaps a fiberglass shower surround kit. Remember that the walls of the bathroom are as important to the structure strength as any of the other cabinets. Also, weight is a factor, so maybe a sheet metal may be a bit too much. Here is my photobucket album, in case some more photos would be interesting, or better still, helpful... s1178.photobucket.com/user/crw2620/library/1970%2016SC?sort=3&page=1 |
|
rbeguelin
New Member
Posts: 7 
Currently Offline
|
Post by rbeguelin on Jan 21, 2017 7:38:19 GMT -8
Fantastic...thanks! Her shower looks like yours with a different shower pan as the Monomatic toilet attaches directly to the floor with two bolts and a wax ring just like a residential toilet. I will encourage her to look at the posts about a porta potty, though my feeling is that the Monomatic toilet is an early form of porta potty, blue liquid and all...the monomatic just is self emptying when the drain valve is opened.
After pulling the refrigerator I will look at the inside front corner...I could see that the vent if leaking would be a problem. Her refrigerator is a Norcold and I believe it is propane only but i will look further. I like the idea of removing it and thus removing the vent with any associated leaks. Do you have a recommended method of repairing the hole left by the vent?
Looks like i may have to do a mobiltec and look under the skin on the front of the trailer
|
|
|
|
Post by vikx on Jan 21, 2017 20:41:45 GMT -8
Monomatic toilets are particularly nasty IMO. They are self contained and have a small holding tank that drains to the exterior. Unfortunately, they flush with "used" holding tank water... And STINK. Fine when first used, but even pee stinks in a couple of days. Believe me, I've been there. Monos also swish the bowl with an alarmingly high liquid level. Scary. They are called Fecal Fountains for a reason.
|
|
Ten
3K Member
  
Posts: 3,432
Likes: 1,467
70 Shasta 16SC + 1964 Airflyte
Currently Offline
|
Post by Ten on Jan 21, 2017 21:14:09 GMT -8
I should point out also that the vent is not be the only place that water can make its way into the trailer. Any place there is an opening in the siding or roof can allow water inside the structure. If it has not already been done, all the windows, door frames, roof vents, vent covers, etc. should be pulled out and resealed with new putty tape. The putty hardens and dries up over time, and shrinks back from the metal, leaving gaps that can't be detected in most cases. Thus, the need for lifting the skins to find the extent of rot in the framework. 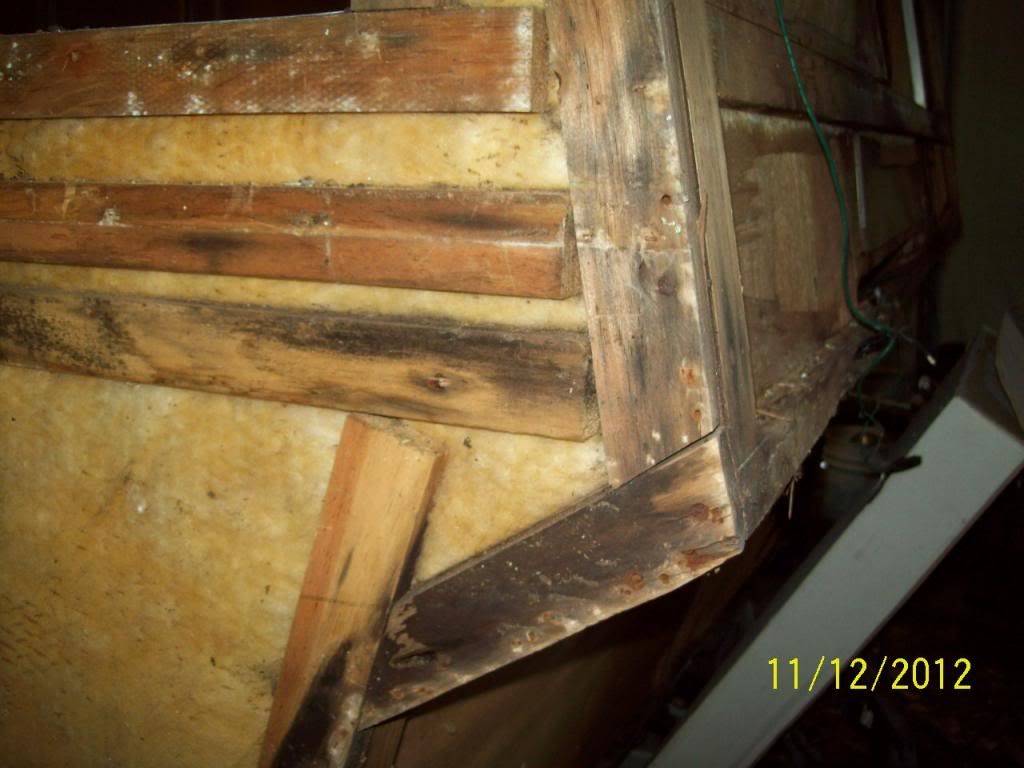 It may be nearly as easy to install a new vent cover over the fridge as it is to try to effectively patch up the hole. If you re-install a fridge in the space, it would allow for plenty of air circulation for the cooling coils. I really have no good method for patching, nothing tried and true. I have seen it done, but did not like the results. I believe it could be done with a piece of aluminum flashing, putty tape, and several stainless screws, topped off with a helping of Dicor. It would then be a lot like installing a roof vent or plumbing vent, only with no opening. I think the portapotty solution works well, because it eliminates a few inconveniences associated with a holding tank. In the case of keeping the toilet and tank, I would consider replacing the toilet with a more modern one. I think the Monomatic was the one that recycled the water to flush after a use, and sure is less that sanitary... If I remember rightly ... (@vikx ?) Adding a water line to feed is pretty simple, being as all the plumbing in the place is all in that one front corner. Our Aqua Magic was mounted the same way, regular closet bolts, and a rubber seal in a floor flange mounted to the pan floor. 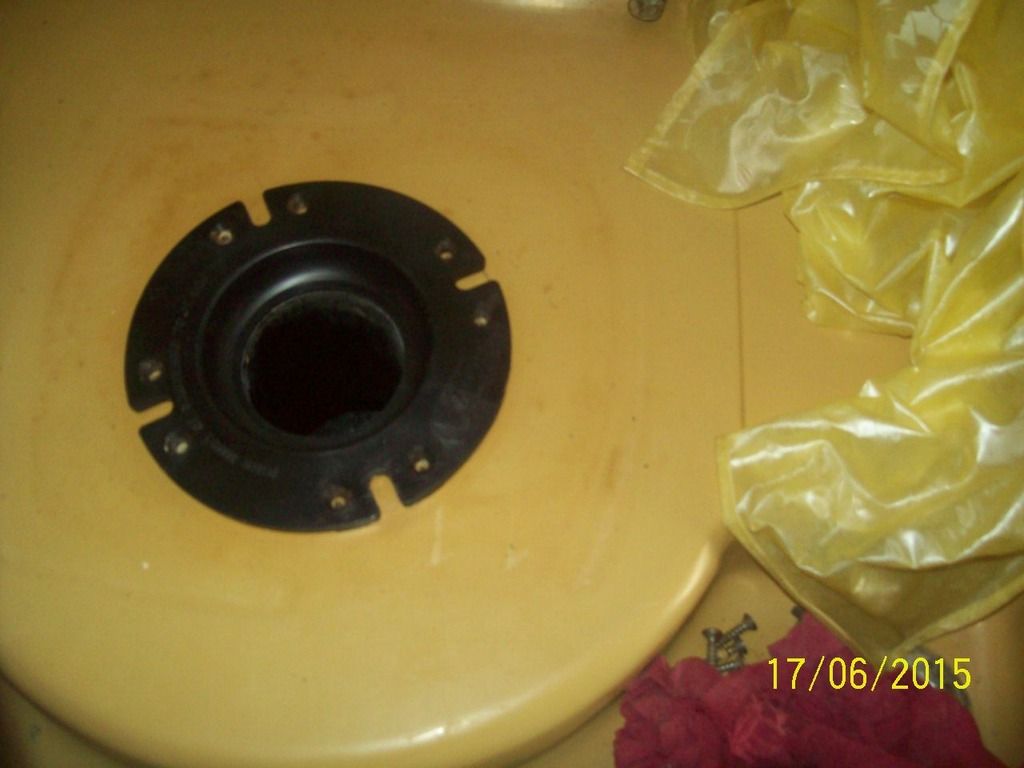 |
|
rbeguelin
New Member
Posts: 7 
Currently Offline
|
Post by rbeguelin on Jan 23, 2017 15:57:39 GMT -8
Hi Ten and vikx,
So the owner has been reading this thread...She is thrilled that the Monomatic appears to be a dead issue...Sooo what would you recommend in its place. A porta potty in whhich you carry out and dump the contents or some other toilet that connects to the floor flange and empties via the discharge?
I have briefly looked at the Norcold 323. The idea of propane when necessary, 12VDC while traveling, and 120v AC while connected to a camper pad is pretty cool. Is this a way to go for her?
Also...what would you recommend as a 12v DC battery charger coming from her truck. Additionally, she ( the owner) is planning on visiting a lot of the South Western National parks, Moab, Zion etc...should she buy a simple Honda generator?
Thanks for your insights!
Rob
|
|
|
|
Post by vikx on Jan 24, 2017 21:04:12 GMT -8
I would recommend a porta potti. There is no other RV toilet that will work without a holding tank and then you've got nasty sewer hoses and connectors. The Thetford Curve potti is popular. I'm sure some members can give you and the owner a report on how they like it.
I think the Norcold 323 is pretty tiny for the space it provides. Of course it depends on the size of the "hole" in the trailer. I've installed the 300N and the owners love it. More storage and very efficient. By the way, don't bother with 12 volt DC in a fridge, waste of money. They eat batteries for lunch, not to mention the 12 volt element barely keeps the fridge cool. It's meant for travel, not for cooling in a campground.
Any vehicle can have a charge line added. It is simply a "hot" fused line from the battery. A 7 way receptacle on the truck/car and 7 way plug on the trailer are required to charge the battery. There are quite a few threads in our 12 volt/tow wiring section and I'm always happy to answer questions.
I'd hold off on the generator until you are done. As the build goes along, you'll be able to discuss different ways of doing things. Generators are very handy but some campgrounds don't allow them, not even a Honda.
|
|
Ten
3K Member
  
Posts: 3,432
Likes: 1,467
70 Shasta 16SC + 1964 Airflyte
Currently Offline
|
Post by Ten on Jan 24, 2017 21:24:40 GMT -8
One of the things that I always seem to have to answer to is the "52% Purist" in me. I am all for updating systems that need it and modernizing things that are severely outdated, but I have a part of me that appreciates the simpler time these were built and the intent behind the original designs. That being said... The original self-contained design of the 16SC was to make it versatile enough to be completely livable in any type of camping situation. It will support full hookup including shore power, water and septic outlet; Partial hookups of any of the above; and dry camping with no hookups at all. In all the situations it will still provide lights, heat, hot and cold running water, toilet facilities, shower, and cooking facilities. The purist part of me would love to see all of the above in working order. I would love to see photos of the camper you are working on. If it is set up with a proper holding tank with dump valves in working order, then a fully working toilet is pretty easy. Any of the modern ones available through an RV dealer should work. They are all fairly standard as far as mounting. The holding tank function becomes the only real wild card in the plan. The outlet system is set up in these so that the grey water bypasses the tank. It would require a septic hookup or a portable tank for that side either way. One of the largest advantages of the transition to a porta potty is not having to deal with the cleaning and maintenance of a holding tank. The potty can be emptied easily into a regular facility at a campground or when back at home. It is no more invasive in the living space when treated properly than a regular toilet is. It is also not necessarily confined to usage just in camper. There are many to choose from in all sorts of price ranges but one of the most popular around here is the Thetford Curve. www.amazon.com/Thetford-92360-Porta-Portable-Toilet/dp/B006WPQNB2/ref=sr_1_1?ie=UTF8&qid=1485320660&sr=8-1&keywords=thetford+curveI think the Norcold could be a very good choice, because it really does fulfill the "self-contained" idea. The versatility is great and I always have liked being able to have every option available to answer to any situation. Some have gone to strictly 110-volt, usually in the form of a dorm fridge or equivalent, and made up the time that electricity isn't available with the use of coolers and ice chests. In my unit, I cut off the charging circuit coming form the tow vehicle and added a converter to the camper that has a built-in maintainer. This recharges the battery while it is plugged in, but does not while towing. I simply did not need it set up to charge, but in my plans I left the option open to revisit it if I ever do decide to add that as an option. I do also own a generator that can go with us if we ever needed to take it. Again, that is another of those options that add to versatility. Personally and in my opinion only, I feel adding a generator to the equipment is a great idea. Most all of these decisions are mostly dictated, though, by personal preference, and what will function the best for how the camper will mostly be used. My answers are not necessarily correct for anyone else. |
|