janesfaces
New Member
Posts: 21  1966 Shasta 1500-"Miss Shasty"
Currently Offline
|
Post by janesfaces on Sept 29, 2013 7:52:11 GMT -8
I have a 1966 Shasta 1500. I recently pulled the windows which had never been resealed and were COVERED with years of silicone, lapseal, and various other types of sealers and caulk and had rust from the old screws. I spend hours blading, scrubbing, brillo padding to get all that gunk off, got them all polished up, and resealed them with VTS 3/4 Butyl putty tape. ( I also removed and did the same to the brows.) I reinstalled everything using 3/4" #8 stainless screws. My question and concern is, when tightening the screws down, the putty tape squeezed out around the frame behind each screw location (to be trimmed down later with exacto knife) but the areas in between the screws the putty did not squeeze out, therefore there are slight gaps behind the window frames and side of trailer. Is the putty tape supposed to squeeze out evenly ALL the way around each edge? There is NO WAY I am putting any kind of caulk or sealer around them (after ALL THAT SCRAPING) but I am concerned that I should have used two layers of the butyl tape, so the tape squeezed out ALL THE WAY around? This didn't even occur to me, until after I installed the last brow, now I am concerned.  Thoughts, suggestions, advise? 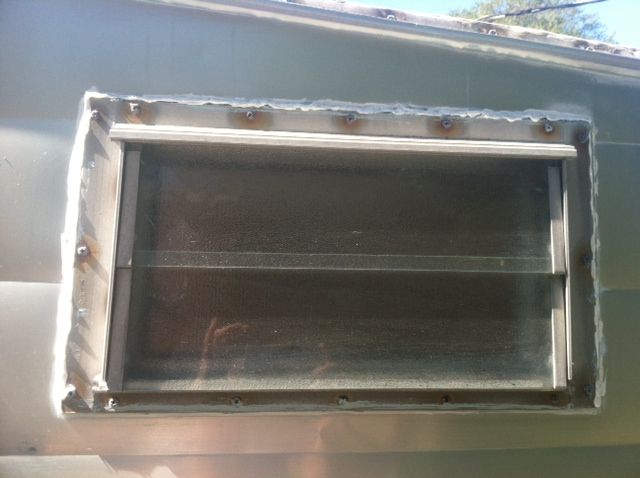 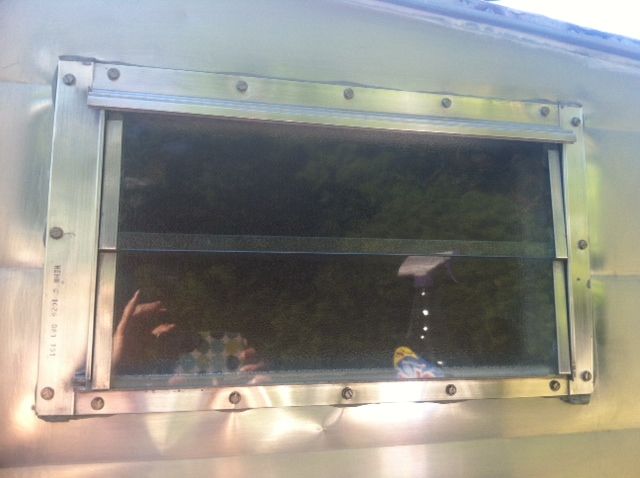 |
|
cowcharge
1K Member

Posts: 1,003 
Likes: 328
Currently Offline
|
Post by cowcharge on Sept 29, 2013 9:06:35 GMT -8
Edit: Just saw the second pic for some reason. I see it didn't squeeze out on the top or bottom as much between the screws. Is there literally a gap between the screws where the putty isn't touching the window frame? I'd wonder if the window frame was dented in where each screw went in and was overtightened over 50 years, and that the dents were acting as standoffs.
If it were my trailer, I'd also probably add two more screws per side on that window, but I'm not any kind of strict vintage purist, so I dunno if that's a crime against nature or not. Plus some folks abhor adding any more holes. I figure if you can seal 1000 holes, you can seal 1004.
Maybe it squeezed in instead of out...
|
|
janesfaces
New Member
Posts: 21
1966 Shasta 1500-"Miss Shasty"
Currently Offline
|
Post by janesfaces on Sept 29, 2013 11:10:17 GMT -8
The putty is touching both surfaces (I should clarify that), it just didn't squeeze all the way out flush to edges in those areas..so I don't know if it will pose a potential leakage problem or ?? I am sure a lot of it did squeeze "in".
I was wondering if there is a product that is like the putty tape, only in a squeeze tube. So you could fill in small gaps like that and it wouldn't be a complete nightmare to remove in the future. I thought about rolling tiny pieces of the putty and forcing it into the gaps? Just not sure how to proceed.
|
|
shastabear
Active Member
 '66 Model 1500 Shasta
Posts: 144
Likes: 14
Currently Offline
|
Post by shastabear on Sept 29, 2013 13:09:22 GMT -8
I think I would try putting on a pair of vinyl gloves, grabbing a piece of the tape and try rolling it into a 'string' and with a plastic squeegie, kinda push it into the 'low spots'...just a thought.
|
|
kirkadie
1K Member
Posts: 1,156
Likes: 556
'69 Serro Scotty Hilander
Currently Offline
|
Post by kirkadie on Sept 29, 2013 19:47:41 GMT -8
When I redid my windows I noticed the aluminum frames were bent in slightly at each screw hole.
I took a scrap piece of 2x2 and with the window outside down on the 2x on the bench, drove in an appropriatly sized pan head screw into each hole. It straightened up the aluminum perfectly.
Now, if I live long enough to get around to reinstalling them, they will present themselves to the skin like when the windows were new and straight. Worked much better than using a hammer to straighten the flanges. Try it on one; you'll be amazed.
If you have a screw gun with a clutch turn it way down, and if you don't have a screw gun, get a good one.
The point is to not tighten the window screws too much, but just enough to get a little bit of squeeze out when driven in, and not so much as to deflect the aluminum.
The putty tape is your friend, and a 1/16" gap between window (or any applicy) and skin lets the tape do it's job.
|
|
kirkadie
1K Member
Posts: 1,156
Likes: 556
'69 Serro Scotty Hilander
Currently Offline
|
Post by kirkadie on Sept 29, 2013 19:56:45 GMT -8
Addendum to myself.
The original tape, dark ages stuff in our modern world, worked great for it's expected life span. I see no reason to alter or question it's effectiveness. In a previous post I pointed out that our trailers are rotting mostly from neglect. I see no reason why we shouldn't get another generation's worth of seal out of that same grey butyl tape, and maybe, if we, unlike the POs, pull our windows every 5-10 years, that they shouldn't do their job just fine.
My 2 cents.
|
|
mobiltec
5K Member
 I make mistakes so you don't have to...
Posts: 9,822
Likes: 3,749
1954 Jewel In Progress...
Currently Offline
|
Post by mobiltec on Sept 29, 2013 21:14:34 GMT -8
The thing is still sealed as long as you can't see inbetween the surface of the skin and the putty tape down in there where it didn't squeegie out. This is the one and only place where you may think about using calking. But it has to be the right stuff and used sparingly. Just where those dips are and then smooth it out. From what Hamlet says is you can use Gutter Seal. It comes in clear and silver I believe. Or it may be gray.
I have been using the one inch tape lately and even though you have a little more waste and it costs a buck more, it really seals well and I don't have to worry about the problem you are having now.
Hopefully Hamlet will chime in or you could PM him.
|
|
|
|
Post by vikx on Sept 29, 2013 22:44:31 GMT -8
Good ideas above. I would poke a small putty roll into the gaps (called poking putty) and trim flush with the window flange. A very sparing layer of OSI micro gutter seal would be good as well. (Lowes) As learned above, CAULK IS NOT A GOOD IDEA unless you know what you are doing...
If your eyebrows are sealed, you shouldn't have to worry about the window flange unless you could see true gaps before installing the brows.
I tried the 1 x 3/16 tape Mobile suggests this week and like it very much for edge trim. The underside of the J rail tends to gap a bit and the one inch tape fills it nicely. Thanks Mobile!
OSI Micro Gutter Seal: Lowes, very clear and paintable
Geocel Instant Gutter Seal: Hardware stores or online, aluminum colored and paintable
|
|
cowcharge
1K Member
Posts: 1,003
Likes: 328
Currently Offline
|
Post by cowcharge on Oct 3, 2013 6:20:50 GMT -8
The tape I've been getting from the RV store is easy to mold into little ropes to stuff in the cracks. It's like 3rd-grade art-class clay. that's why I think it's the old style with no butyl in it (and why i like it).
|
|
|
|
Post by vikx on Oct 3, 2013 21:34:17 GMT -8
I like the old style putty as well. So Easy to work with....
|
|
mobiltec
5K Member
I make mistakes so you don't have to...
Posts: 9,822
Likes: 3,749
1954 Jewel In Progress...
Currently Offline
|
Post by mobiltec on Oct 3, 2013 22:00:09 GMT -8
It's all I use.
|
|


