windborn
Active Member

Posts: 339 
Likes: 70
1957 Sportcraft 15
Currently Offline
|
Post by windborn on Nov 15, 2016 10:12:10 GMT -8
|
|
|
|
Post by vintagebruce on Nov 15, 2016 11:29:02 GMT -8
Here is a good article to read regarding refilling those 1 pound cylinders. I believe that you could successfully and safely operate a vintage stove off of a contemporary 1 pound propane cylinder with the appropriate hose, regulator and fitting(s) combo. IMO the disclaimer for this article is just good common sense. kissurvival.com/refilling-1-pound-propane-cylinders/ |
|
|
|
Post by vikx on Nov 15, 2016 23:16:26 GMT -8
I find it hard to believe that your "one line" is pretty much toast. Almost all old propane lines are better than new (thicker walled) and do not need to be replaced. Exception to this is aluminum lines REPLACE, and crimped copper lines. A new regulator may be all that's needed to get your stove up and working again. Also, a trailers interior gas system is LOW pressure requiring a regulator at the tank. The little 1 lb cylinders are HIGH pressure. Not so good inside...
|
|
msgoehring
Full Member
Just call me Margaret the shellac, buff, sand an shine queen.
Posts: 860
Likes: 303
1957 Westerner Deluxe
Currently Offline
|
Post by msgoehring on Nov 16, 2016 0:12:31 GMT -8
Vikx is so right. There is not that much involved in bringing the propane system that is supposed to be there up to working order. Don't use a 1 pound cylinder on a stove or heater meant to connect to low pressure from a 20 lb cylinder. You're asking for trouble that way.
If your propane light has been removed and all you have to run on propane is the stove it is super easy to fix yourself. Take the tubing off the system and check it for leaks, kinks, bad areas. You can duct tape one end of the hopefully copper line (cause it's best for propane systems, definitely not aluminum, it's too easily damaged) to your air compressor and run air through it. As the air goes through use a leak detection solution on the line from top to bottom all the way around, also look for bulging areas, small slices, anything that can cause a future leak. If all tests out good then reinstall the line and hook up a new low pressure regulator at the tank. It's always better to buy new than trust the old one is still good. Make sure all of your connections are taught, burners off and go back to the tank and turn on the propane. First listen for any hissing noises or any other noises that could be coming from the propane line, second use your nose to see if you smell anything off, if both of those are good go to the next step.
Starting at the propane tank generously spray down every connection point with leak detection solution and search diligently for bubbles, don't rush this you might miss a slow leak if you do. Continue checking every connection following the line inside to the stove. Spray all of the valves on the stove for possible leaks before turning on the burners. You also want to see how tight the connections on the stove are because this next step needs to move a little quicker.
If you've found no problems so far it's time to test the stove itself. Start with the burner closest to you a barely allow any propane to enter the burner, spray the valves again with propane in them to make sure they don't leak. If they don't leak, turn the stove off and move to the next burner. Now you will make sure that if you didn't open all the windows before you do so now. Walk away for about half an hour to an hour letting the trailer air out. Go back and check you CO2, gas detector, if it isn't showing anything then it's time for the next step, lighting it up.
Start with one burner and start the propane while holding a long kitchen match, or aim n flame to the burner. This should get the burner going, if not, try giving a little more gas. Continue until all three burners are lit. Then I'd test with the gas detector to make sure no unused propane is getting by the burners. If that's happening you need to clean the burners and try lighting them again.
I will say one more thing. Since the stove, propane line are easily removed from the trailer and the tank is already outside . It's faster and easier to do this test outside the trailer on a table. You won't have to wait so long for the gas to dissipate and you won't risk burning anything inside if one of the burners isn't working right.
I think I got the process correct, but you can also search the propane safety websites for methods of diagnosing RV propane systems. They might have different ideas, just be safe no matter how you do it. Even if you paid to have the work done, I'd still test my system just as thoroughly before I used it. Then in the future you just need to test the connections and make sure nothing has happened with the line before using it again.
|
|
windborn
Active Member
Posts: 339
Likes: 70
1957 Sportcraft 15
Currently Offline
|
Post by windborn on Nov 16, 2016 6:21:44 GMT -8
Thank you everyone for your advice! I'll talk to my RV guy again today and ask exactly what's wrong with it. It's possible that he already did all that testing. (In his voicemail he mentioned something about something "has been dragged on the ground."  ) But I definitely won't be paying the $500 he quoted me to fix it so I may be doing it myself one day. Y'all are the best at inspiring DIY confidence! |
|
Ten
3K Member

Posts: 3,432
Likes: 1,467
70 Shasta 16SC + 1964 Airflyte
Currently Offline
|
Post by Ten on Nov 16, 2016 7:52:58 GMT -8
My first thought is that you need a regulator to run any appliance off any size bottle of propane anyway, so it is probably just as expensive to get one for the one-pounders as it is for the 20-pound tanks. So why go through the aggravation of having to refill the small bottle in the middle of baking cookies? The mention of something dragging on the ground brings to light the fact that any other line in the trailer is going to be secured, too short, or is too rigid (i.e. copper or iron pipe) to reach the ground to drag, so I suspect the damage done was to the regulator and connection hoses at the tank rack. In most cases these should be inspected carefully and likely replaced anyway. The next biggest piece of information needed is, "What will you want your propane system to support?" If you are going to cook, heat, and run a lamp, you may want to consider installing two tanks. Running out ain't no fun, and especially if it is the heater that runs you out...gets cold without it. You would need a two-tank rack. If it's already there, good. If not then may want to look into one. They are pretty easily found. When I changed my regulator, I found one that supports an automatic changeover. when the supply tank empties, the regulator will switch and feed from the full tank. The lever can be switched over and the empty tank replaced without shutting the whole system off. I highly recommend new pigtails...the lines feeding the regulator from each tank, I used the braided-stainless type. 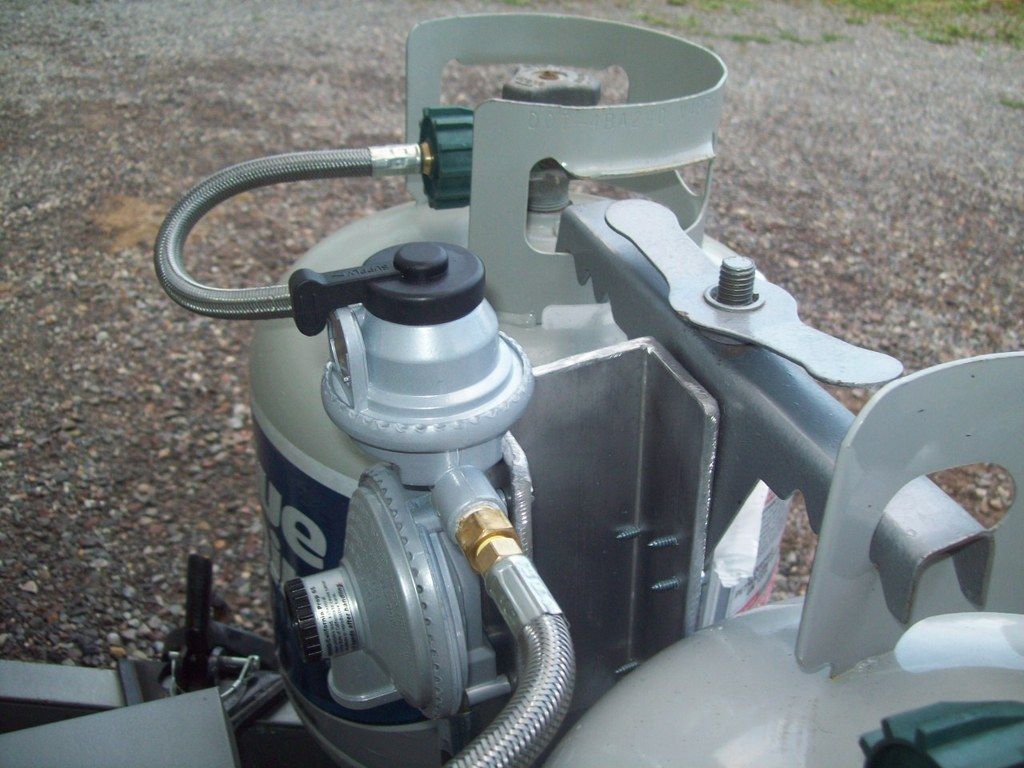 There will be a rubber lo-pressure hose, with fittings on the ends sized to the regulator and to the rigid pipe end feeding into the interior. I think I replaced all those items for about $80. 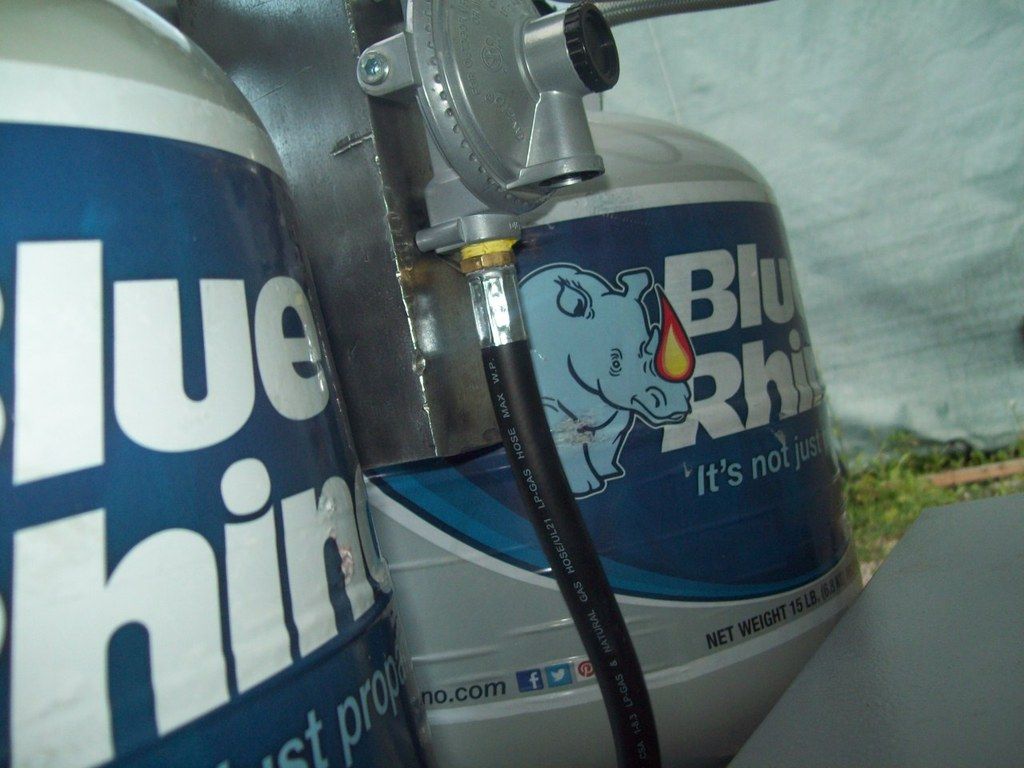 Once it is all hooked together then the system as a whole should be checked for leaks... I used Palmolive dish soap on all the joints from tank to stove and heater. There are leak detectors available also. Further, if you are not confident about your own leak detection process, a propane supplier company can pressure check the system for you. Extensive methods of testing appliances are already mentioned above or are available elsewhere in other threads. None of the above outlined requires anyone at all, besides yourself, that has any "RV" knowledge. Remember that the propane system is nothing more than glorified plumbing. "Hot is on the left, sh*t runs downhill, payday is Friday". The consequences are a little tougher if you have leaks, but the fix is just the same. Secure the joints. |
|
|
|
Post by vintagebruce on Nov 16, 2016 7:58:34 GMT -8
Have you considered converting a two-burner cast iron vintage Griswold table top stove to operate off of a 1# propane cylinder? They even have Griswolds on table height legs that you can use outside. It might be fun to experiment with using the right adapter and front air adjustment for the burners to have a cool vintage cooker. This comment has nothing to do with your vintage stove situation except that I hope the RV repair guy was wearing a mask when he quoted you $500 to repair your propane system/problem.  griswoldandwagner.com/cgi-bin/yabb/YaBB.pl?num=1243995662www.antiquesnavigator.com/ebay/images/2013/231028065913.jpg griswoldandwagner.com/cgi-bin/yabb/YaBB.pl?num=1243995662www.antiquesnavigator.com/ebay/images/2013/231028065913.jpg |
|
windborn
Active Member
Posts: 339
Likes: 70
1957 Sportcraft 15
Currently Offline
|
Post by windborn on Nov 16, 2016 10:03:59 GMT -8
Thank you thank you Ten! Great info there. $80-$150 is about what I was expecting for parts. So it blew my mind that the quote was $500! I also just found out that the $750 they're charging me for my "electrical system" didn't even include the exterior lights! I'm going in to chat with them on Friday because we're either having huge breakdowns in communication or they're royally ripping me off, and I'm beginning to suspect the latter.
That cast iron is so cool, Bruce! Luckily I have some camp stoves I can use if necessary. But right now I'm feeling pretty pissed off that a bunch of dudes think they can charge me a bunch of money just because I'm a 28-year-old woman and feeling really fired up to get the job done myself just to prove something. 💪
|
|
|
|
Post by vikx on Nov 16, 2016 21:26:41 GMT -8
Windborn, $750 sounds rather high for electrical. Most of the time, the original 110 system is in working order. It might need a new inlet or some fixture change outs, but I've only had one trailer that had to be completely rewired. It is a 53 Hanson and the original was knob and tube. LOL.
Pass on the propane "fixes" and post some photos here. We can help and you can still get a pro to check your work.
|
|
windborn
Active Member
Posts: 339
Likes: 70
1957 Sportcraft 15
Currently Offline
|
Post by windborn on Nov 18, 2016 15:03:05 GMT -8
Thank you vix! Once I get Willie back I'll do some research and probably come to y'all with lots of questions On the electrical, I made the mistake of ripping it all out when we rebuilt the walls. It was in working order, but when I first started I thought I was going to switch over to 12v and it was a whole lot easier to not try to leave the wires in place. I changed my mind later on and decided to have a 110v system, but by then it was too late to save everything. Oh well.... learning lots of lessons haha. I'll get it right on the next camper  |
|


 ) But I definitely won't be paying the $500 he quoted me to fix it so I may be doing it myself one day. Y'all are the best at inspiring DIY confidence!


