Deleted
Posts: 0
Currently Offline
|
Post by Deleted on Nov 7, 2015 16:52:27 GMT -8
Hello all, I try not to ask questions that have been answered on here before, but I got my new windows in and they're intentionally slightly larger than the existing Jalousies. I will have some framing insode to reroute, but not bad I don't think. What is the best method to cut out the rough opening and what kind of screws do I need to use for going into the trim ring? If I can figure a few things out I may be willing to try this myself and the wife. These are more modern type rv windows, Jalousies won't cut it driving in the rain which I am bound to be stuck in at some point here in the South summers. Haha. A friend would be willing to help but he is so busy. Such is life. Thanks friends.
|
|
nccamper
Administrator 
Posts: 7,743 
Likes: 2,870
1962 Forester- 1956 Shasta
Currently Offline
|
Post by nccamper on Nov 7, 2015 20:08:50 GMT -8
I wouldn't give up on the jalouise Windows. I have been caught in heavy rain and not much gets in if they have new seals. And putting in new Windows may decrease the value of your camper when it comes time to sell. Vintage sells. With that said, I don't see how you can expand the opening without exposing the inside framing. A Shasta 1500:  As you can see the framing is 3/4" and not very wide. For example, you will not be able to trim away an inch to expand the opening. You would need to redo it. Not hard, but impossible without either removing the skin or the inside panel. Does that make sense? Even if you are hoping to expand it 1/4" you would still need access. As Mobiltec just said on another thread, steel screws are fine for paint but not stainless steel. I've heard zinc plated can be painted but Mobiltec has much more experience than me on this subject. I use stainless steel pan head for polished Windows. |
|
Deleted
Posts: 0
Currently Offline
|
Post by Deleted on Nov 8, 2015 6:40:17 GMT -8
Hmm. I am gonna have to be a red headed step child and stick with putting in newer windows, since I just don't want the anxiety of water getting in. Even the thought of a couple drops is terrifying to me. And once we have the interior done I am not gonna want a single thing messing it up in any way. I have the insode down to the framing currently so I can see what I am gonna need to reroute. I understand what you're saying nccamper and appreciate the pic. The weather is so wet and ridiculous here in the South during the summer.
|
|
|
|
Post by bigbill on Nov 8, 2015 7:05:47 GMT -8
I am reading a few things here that make me nervous. You appear to be a novice at this and you are stating that you have pulled/cut the interior wall paneling off. If so you may have seriously weakened the structural strength of the trailer. I would suggest that you read everything you can find here about rebuilding your trailer and why it is done in a certain manor/order. Most trailers are much different than a house as they are built from the inside out. Also most trailers leak around the windows instead of through the glass areas.
I may have misunderstood what you have done or are planning to do but make certain what you are doing before you invest a lot of time and money in a project that collapses when you tow it down the highway.
Good Luck and please continue to ask questions even including adding pictures so that we can be certain what you have and what you are attempting. The people here will try to offer you advice as to the best way to accomplish your project.
|
|
Deleted
Posts: 0
Currently Offline
|
Post by Deleted on Nov 8, 2015 7:28:29 GMT -8
Hi Bigbill, sorry to make you nervous. I am definitely a novice and don't want to do anthing off. I have only taken the paneling that the po had on which was MDF cheap cardboard paneling. I doubt it had any bearing on structural integrity. All the framing is still up. I will surely adk questions and I appreciate you guys! I understand these were built from inside out so anything significant I do should be from outside in. But if I do reroute a couple parts of the framing can I reasonably do that from the inside if it's not an entire wall framing teardown? Also. My windows the frames themselves are actually really solid no leaks it's just that between jalousie slats you can't get a true waterproof seal. Can come close but I'm not willing to deal with that.
|
|
Deleted
Posts: 0
Currently Offline
|
Post by Deleted on Nov 8, 2015 7:37:20 GMT -8
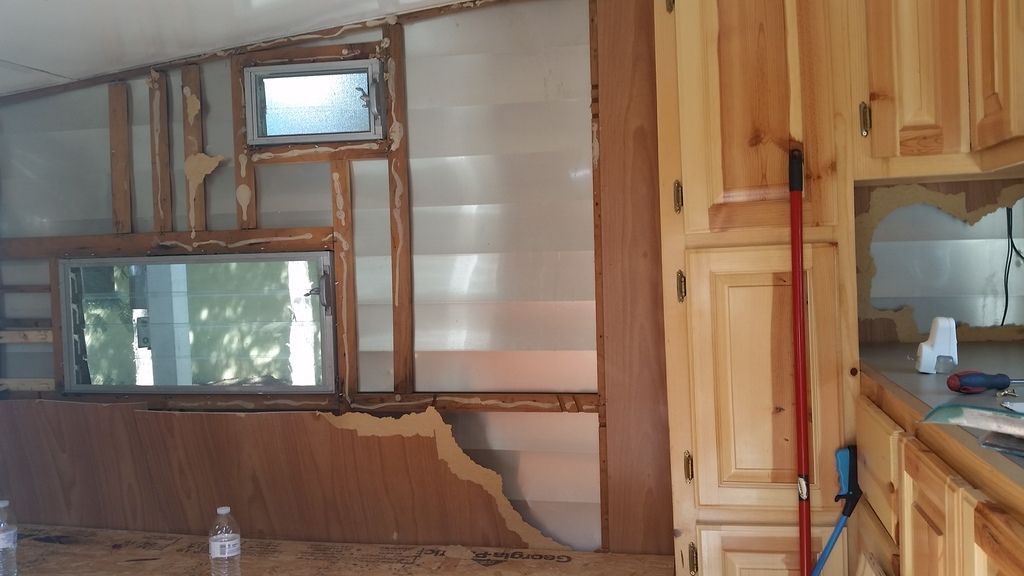 Ok friends so this is what I'm looking at on one side. Hold your colorful words, I know what an idiot to put that paneling up. There is a fair amount of framing around the window but it should be fine to reroute it I think. Ok friends so this is what I'm looking at on one side. Hold your colorful words, I know what an idiot to put that paneling up. There is a fair amount of framing around the window but it should be fine to reroute it I think. |
|
SusieQ
Global Moderator 
Posts: 4,781 
Likes: 1,197
'62 Shasta Compact
Currently Offline
|
Post by SusieQ on Nov 8, 2015 8:12:30 GMT -8
Rich, the paneling is sandwiched between framing and edge boards. The paneling, with the framing, gives the walls their strength. The only way you can properly replace the paneling is from the outside in by removing the skins. There are several threads which discuss this process on our forum. You might want to re-think how you are going about this. Replacing paneling from the inside is not a proper restoration. Removing the skins is not difficult and is the only way to truly assess the condition of your framing and skirt boards.
There's nothing wrong with putting in a different style window if that's what you desire in your trailer. There are a couple of reasons not to replace them. The number one reason would be that changing the vintage style decreases the value of your trailer. The second reason is that jalousie windows actually work very well. I'm from the deep south and recently pulled my trailer on its maiden voyage a thousand miles to Mississippi and even encountered rain. Not one drop of water entered my trailer. I think the genius part of the engineering of jalousie windows are how you can leave them open (when parked) and they shed rain. If jalousie windows are sealed properly, they do not leak. If you put a high powered pressure washer on them, sure, some water find its way through but under normal conditions, there is not problem with leaking, even when being pulled down the road in rain.
|
|
Deleted
Posts: 0
Currently Offline
|
Post by Deleted on Nov 8, 2015 8:27:40 GMT -8
Hi SuzieQ! Bear with me, I see what you're saying. Your original and stock interior panels will have the framing, the paneling, and then the edge boards securing the paneling in place and acting as clean looking borders. But this guy already had redone things, that mdf garbage was stapled to the framing. All I did was pull that stuff off and you have behind it what you see in the photo. So you're saying I have to remove the skin to properly reroute? Because it seems pretty accessible from the inside. Forgive me, I'm just trying to see what's practical but if that's a bad idea and I shouldn't thats ok too. Much appreciated.
|
|
nccamper
Administrator
Posts: 7,743
Likes: 2,870
1962 Forester- 1956 Shasta
Currently Offline
|
Post by nccamper on Nov 8, 2015 9:23:59 GMT -8
Side walls are tricky but can be done in sections from the inside. In the photo above I did that one section. I disconnected the skin (outside) at the bottom, tilted it up to replace the edgeboard. I then cut away the screws holding the wall framing in the one area to the camper frame (sawsall) so I could slide the new panel between the wall framing and the camper frame. I then rescrewed the sandwich (camper frame, panel, wall edgeboard) back together. Important...one small section at a time. I would say no more than a few feet.
Does that make sense?
|
|
SusieQ
Global Moderator
Posts: 4,781
Likes: 1,197
'62 Shasta Compact
Currently Offline
|
Post by SusieQ on Nov 8, 2015 9:28:59 GMT -8
I have seen people replace small sections by lifting the skins but an entire panel? I know the toasters are constructed a little differently the ham versions. We did have one member replace his ceilings in the tracks from the inside but looking at mine, I'm not even going to attempt that.
|
|
Deleted
Posts: 0
Currently Offline
|
Post by Deleted on Nov 8, 2015 9:54:40 GMT -8
Hi there guys, I kind of follow but not entirely. I don't know if this helps but once the framing is good I was planning on putting up the appropriate plywood and finishing it off with cedar closet lining planks. I think it will look awesome if only I could do it correctly. Pretty daunting for me.
|
|
SusieQ
Global Moderator
Posts: 4,781
Likes: 1,197
'62 Shasta Compact
Currently Offline
|
Post by SusieQ on Nov 8, 2015 10:07:06 GMT -8
|
|
Deleted
Posts: 0
Currently Offline
|
Post by Deleted on Nov 8, 2015 10:28:46 GMT -8
After seeing that thread I'm a little baffled that I don't have any issues since the interior paneling has been removed, before I got the trailer. One of the most resounding and repeated things I have seen on here is the emphasis to start from the outside and to NOT gut the inside. Will try my best to do it accordingly. And it's always nice to see the framing all at once after removing the skins so you can inspect it. We are getting there, still have to get the remaining screws out so the rails will come off.
|
|
Deleted
Posts: 0
Currently Offline
|
Post by Deleted on Nov 8, 2015 10:31:20 GMT -8
After seeing that thread I'm a little baffled that I don't have any issues since the interior paneling has been removed, before I got the trailer. One of the most resounding and repeated things I have seen on here is the emphasis to start from the outside and to NOT gut the inside. Will try my best to do it accordingly. And it's always nice to see the framing all at once after removing the skins so you can inspect it. We are getting there, still have to get the remaining screws out so the rails will come off. This camper is kind of like an unexpected child LOL I didn't realize what I was in for but hey I may as well fix it up the way it should be done so it can service us for years to come. |
|
nccamper
Administrator
Posts: 7,743
Likes: 2,870
1962 Forester- 1956 Shasta
Currently Offline
|
Post by nccamper on Nov 8, 2015 11:26:47 GMT -8
I lifted the aluminum skin and cut the edge board loose by slipping the sawsall between the wood camper frame and the wall framing. By doing a couple of feet at a time the wall stays in place and doesn't slip down. Tricky. It's the only way I know to do it and still have the wall panel sandwiched between the edge board and the wooden camper frame. It is either that or bring the wall completely down. Which is a total redo. I worked as a carpenter for a few years and renovated several houses so I would call myself a little above beginner level.  |
|


