windborn
Active Member

Posts: 341 
Likes: 70
1957 Sportcraft 15
Currently Offline
|
Post by windborn on Aug 30, 2015 17:52:57 GMT -8
Hi everyone, I'm back! Summer was a little busier than expected, so I'm only now getting started fixing up my Sportcraft. I hauled her to my dad's place (where we'll be doing the work) last week and started tearing in today. My dad and I were both pleased with how smoothly everything went, and were even pleasantly surprised at the shape of everything we uncovered. I already planned to have a few days of tears during this project, so maybe I just set my expectations low  The plan is to uncover the front and front 2/3 of the street side, fix that up, and then take it from there. We'll be replacing the roof and unbuttoning the back and the back 1/3 of the curb side at some point too. (The front 2/3 of the curb and the back 1/3 of the street are ok, but we'll probably fix up the skirts.) The first step was to get the front window and aluminum off. We took the smaller pieces off here after the photo was taken. We'll replace all the wood seen here, though the plywood was surprisingly only delaminated. (J-Rail on the right was broken when I bought it, so we weren't too careful taking it off.)  The curbing/edge boards had the most damage. They just crumbled away, which made it easy to take the aluminum off: didn't have to get all the nails out.   I thought my trailer was held together with rivets, but they were actually just twisty nails, which was probably our most exciting discovery since they came out with a crowbar.  We had 3 or 4 really tough screws on the windows and sides, but we got everything off with screwdrivers, vicegrips, a hammer, and a crowbar. No power tools yet... I was also pretty surprised to find out that there isn't anything other than 1/2in plywood on the sides of the trailer. That'll certainly save some time when we're replacing everything over here.  (The dogs were a big help, as you can see.) A lot of damage on the skirt, but that was expected.  This vertical delamination is one of the worst rotten spots inside the trailer, and I was expecting something terrible on the outside, but this isn't so bad. (Though we're going to replace this anyway, especially since it's an easier-to-find size.)  I know I've got a long road ahead, but so far so good! Thanks everyone for giving me the courage to dig in! |
|
kirkadie
1K Member

Posts: 1,157 
Likes: 556
'69 Serro Scotty Hilander
Currently Offline
|
Post by kirkadie on Aug 30, 2015 18:37:24 GMT -8
Hey windborn, don't let those Shasta people with their 1X walls scare you, plywood walls aren't so hard, just awful thin. Keep everything for templates. And onward through the fog, er, sawdust.
|
|
windborn
Active Member
Posts: 341
Likes: 70
1957 Sportcraft 15
Currently Offline
|
Post by windborn on Aug 31, 2015 4:39:08 GMT -8
Thanks, kirkadie. I think it actually boosted my confidence: a lot less things to mess up now and a lot less places for mice to make a home later. (They move so quick! I had a nest after leaving the trailer alone for just a month.) Do you know of any similar projects on here? It seems like it'll be a straightforward project, but I'd love to get some tips.
|
|
RinTin
Full Member
Posts: 760
Likes: 292
Currently Offline
|
Post by RinTin on Aug 31, 2015 6:33:33 GMT -8
Getting a project started is always exciting. Nice that your dad is helping, that will make things go a lot easier. I look forward to seeing more.
|
|
kirkadie
1K Member
Posts: 1,157
Likes: 556
'69 Serro Scotty Hilander
Currently Offline
|
Post by kirkadie on Aug 31, 2015 13:24:59 GMT -8
Here's a brief glimpse at my attempts to rebuild Scotty; www.flickr.com/gp/19442597@N08/A5s746I'm old and slow, and although I'm farther along than pictures show, slow non the less. There is another among us who started his in January and has already been camping. Have fun. |
|
windborn
Active Member
Posts: 341
Likes: 70
1957 Sportcraft 15
Currently Offline
|
Post by windborn on Sept 2, 2015 10:22:26 GMT -8
It's looking awesome so far! The cabinetry is especially beautiful. Thanks for sharing.
|
|
mountainsounds
Active Member
Posts: 314
Likes: 104
1957 Rainbow & 1955 Starfire
Currently Offline
|
Post by mountainsounds on Sept 2, 2015 13:11:42 GMT -8
I really like the ham shape of your trailer and 1957 is the same year as our Rainbow. Your Sportcraft looks to have the same/similar siding pattern as ours. I like your windows too. Good luck with the rebuild, I'm looking forward to reading your success story here!
|
|
bmrrwolfe
Member
Posts: 36
Likes: 3
Currently Offline
|
Post by bmrrwolfe on Sept 2, 2015 19:03:52 GMT -8
Welcome! I am in the process of rebuilding a 66 Scotty with the 1/2" walls as well. I was shocked as to how thin they were when I started tearing it apart. I added interior paneling (after putting up the walls, as to not change the ovetall width) and offset the seams. Really helped to add some strength. Here is my build (which I need to desperately update) vintagetrailertalk.freeforums.net/thread/4830/1966-scotty-sportman-rebuild |
|
windborn
Active Member
Posts: 341
Likes: 70
1957 Sportcraft 15
Currently Offline
|
Post by windborn on Sept 2, 2015 19:40:16 GMT -8
Thanks, mountainsounds. I just checked out your thread and you're doing a beautiful job! Lots of inspiration there.
I also checked out your rebuild, mbrrwolfe, and it's very helpful, thanks! Do you have any photos of the interior paneling you added? I'm not sure how much I'll be changing things because I wanted to keep most of the interior cabinets as is, but I'm curious to see your solution.
|
|
bmrrwolfe
Member
Posts: 36
Likes: 3
Currently Offline
|
Post by bmrrwolfe on Sept 7, 2015 11:45:54 GMT -8
Thanks, mountainsounds. I just checked out your thread and you're doing a beautiful job! Lots of inspiration there. I also checked out your rebuild, mbrrwolfe, and it's very helpful, thanks! Do you have any photos of the interior paneling you added? I'm not sure how much I'll be changing things because I wanted to keep most of the interior cabinets as is, but I'm curious to see your solution. Here are a few pics of the interior paneling: 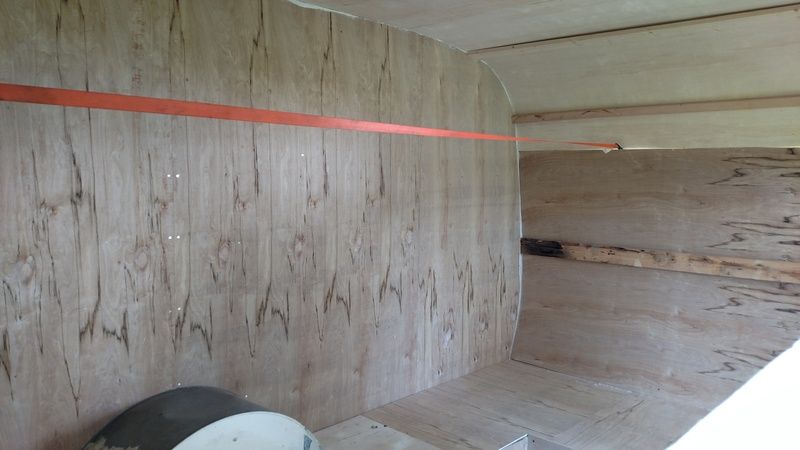 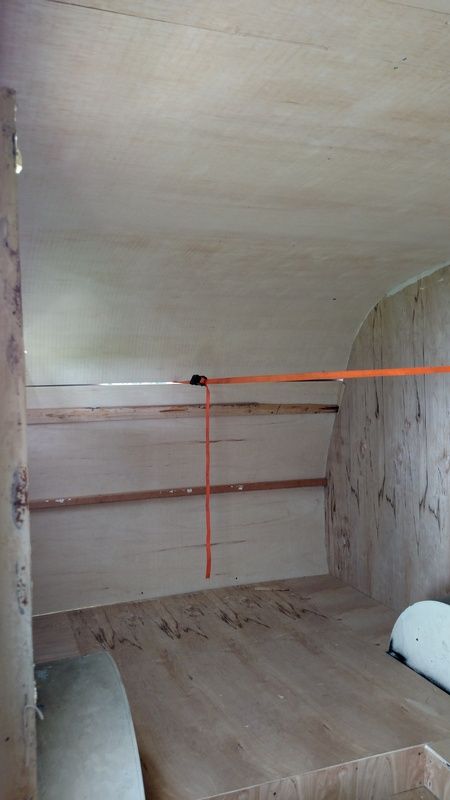 The side walls are actually Luan from Home Depot. Being on a low budget and they are only $13-14 for a 4x8 sheet. I am planning on painting my interior, so if your staining, then it may not be the best to use. The front/top/back had one sheet of luan (you can see the grain change) but when I realized that it does not bend easy, even with most of the techniques I have read about, so the rest was just a decent quality sanded ply. |
|
windborn
Active Member
Posts: 341
Likes: 70
1957 Sportcraft 15
Currently Offline
|
Post by windborn on Oct 24, 2015 4:17:52 GMT -8
I'm starting to realize why it takes so long to rebuild a trailer. It's not the hours, it's finding the time to put in the hours! It took me almost two months, but I finally got a full day to put in more work on Willie. To start, we popped out the front panel, which allowed us to better asses just how warped the street-side wall was. As you can see, all the cabinetry was dropped and titled.   Then we put in some bracing on the dinette cabinet to level the ceiling and lift it up a bit so we could get the street-side wall out. The curb-side on this end is fine, so we were hoping to keep everything over there in-tact. Leaving these upper cabinets in while we worked gave us a lot of confidence because we knew everything would need to line up the right way when we replaced it. We also plan on replacing all of the ceiling paneling, so it wasn't a problem to mess these up a bit.  You can see here that the ceiling on this side has been lifted to the proper height, plus one inch. The bracing hasn't been installed on this side yet, but we essentially cut the supports to the height the needed to be, then installed them on top of another piece of wood that we could remove when we needed to lower the ceiling to the proper height.  We then disconnected the cabinet above the kitchen using a crowbar and somehow managed to keep it in one piece. We also added support to the ceiling in the middle of the trailer which lifted the ceiling enough for us to work on the side wall. (The curbing is so rotten that we can just push all the walls apart: not helpful in most situations, but certainly made things easier in the demolition.) Next we disconnected the kitchen cabinets from the wall, and pushed off and hammered out the two panels on the street side. Here's where it started getting pretty scary, though with all the bracing everything was sturdy and more square than when we started. (Edit: this photo is actually from after we fixed the cabinets, but shows the supports well.)  After that we had to spend quite a bit of time getting the cabinets back to how they were supposed to be. It's hard to tell from this photo, but the bottom boards had slipped below the floor.  We hammered it all back in and straightened it out.  I don't have a lot of photos of the next steps, but we essentially traced the old side walls onto the new plywood. (I ended up splurging for some nice 1/2in birch.) We cut these out, then I held them up on the wall while my dad screwed them into the cabinets and the floor board. (skirts?) Heres the new wood next to the old wood:  We replaced the one interior "frame" piece that goes along the seams of the plywood, glueing it first then screwing from the outside in. It was hard to get a good photo since it was getting dark, but the wood looks so nice! We probably should have stained these first, but it's already chilly here in New England and today was too cold. It's also important that we get the structure ready before the snows hit, so maybe on my next trailer I'll make the time to do that the right way   There's a bunch of junk in the way, but you can see how everything's flush & lined up now. Feels so much better!  And here's on the exterior. No more rot.  Next we're hoping to replace the front panel. We measured a bunch of times, and we're pretty sure this is 1/4in plywood wrapping around the front, ceiling, and back. Has anyone found that in other trailers? It'll make finding the wood a lot easier (and less expensive) though I'm wondering how tough it'll be to bend it. We're also planning on getting the remaining j-rail off so we can replace some paneling in the back. We've got a long road ahead of us, but so far so good! |
|
kirkadie
1K Member
Posts: 1,157
Likes: 556
'69 Serro Scotty Hilander
Currently Offline
|
Post by kirkadie on Oct 24, 2015 4:37:21 GMT -8
I had a lot of trouble bending 1/4" stuff. 1/8" bends like a dream. Finding it though can be difficult, but check out the ongoing thread about where others have found it and hopefully there's a dealer near you.
|
|
windborn
Active Member
Posts: 341
Likes: 70
1957 Sportcraft 15
Currently Offline
|
Post by windborn on Oct 24, 2015 5:01:52 GMT -8
I had a lot of trouble bending 1/4" stuff. 1/8" bends like a dream. Finding it though can be difficult, but check out the ongoing thread about where others have found it and hopefully there's a dealer near you. Thanks, kirkkadie. I did find a few places that carry the 1/8" near me, but I'm trying to replace things rather than rebuild them and don't want the measurements to be off. The 1/4" is so cheap, maybe I'll just buy a sheet and see if there's any possibility of working with it, and if not, we'll try to figure out how to get the 1/8" to work. The curbing on the trailer also looks like it was made from 3 sheets of 1/4", so we'll need to find some solution there as well. |
|
SusieQ
Global Moderator 
Posts: 4,781
Likes: 1,197
'62 Shasta Compact
Currently Offline
|
Post by SusieQ on Oct 24, 2015 18:46:30 GMT -8
You are on roll! Glad to see you've tackled it. Look forward to seeing more of your progress.
|
|
windborn
Active Member
Posts: 341
Likes: 70
1957 Sportcraft 15
Currently Offline
|
Post by windborn on Nov 6, 2015 13:36:39 GMT -8
Still on a roll, though some inclement weather today is making it a little less fun. (Heavy mist all day. I don't know how people in the Pacific Northwest do anything!) Our next steps were to remove the skins on the back of the curb side. We didn't notice before going into it that doing so entailed removing the door frame, which was not easy.  Lots of rot up there. This was the spot that almost made me pass on this trailer, so I knew it would be bad.  We also got the back skins off. The previous owner started "repairing" by putting new panels in on the inside, though they weren't actually connected to anything. The hole to left of the window is a good example of why you need to repair from the outside.  We're working on this tomorrow too and plan to have the back curb-side wall up. I haven't ordered the 1/8" plywood yet (or finished it) so we made be at a stand-still after that but I'm sure we can find some things to do. |
|


