|
|
Post by reefdiver77 on Aug 4, 2013 13:27:12 GMT -8
We are heavily into the process of restoring this trailer that was gifted to us earlier in the year by my brother in law. We were wondering if anyone knows what we need to do to seal the roof. We see no signs of leaks and it had been sitting in a pole barn since 1984 and under cover every since it was purchased in October 1973. The roof appears to be painted aluminum, like the outside of the trailer. It does not have a rubber coating. How do we seal this roof ourselves? The interior is completed, the air conditioner blows as cold as it did in 1973, all electrical works. husband replumbed with cpvc this weekend, so all plumbing works. Still got to check out the 12v system, install and converter and check out the gas. We have been very pleased thus far with the condition of our new "toy" and hope to be camping in her in October. thanks. Vicki
|
|
Ten
3K Member

Posts: 3,432
Likes: 1,467
70 Shasta 16SC + 1964 Airflyte
Currently Offline
|
Post by Ten on Aug 4, 2013 13:33:30 GMT -8
Painted aluminum does not need sealing, and the application of a sealer coating will only promote the corrosion of the aluminum!
The correct way to seal would be to take the seams apart. Those would be the edge seams, thus removing the gutter channel from the corners, as well as removing and resealing any vents that pass through the roofline. This should all be done with putty tape, available from any reputable RV dealer, and possibly using a lap sealer over the screw holes when replacing the screws. It sounds like a lot but the process is really rather simple once you get past the idea that there are 8 million screws that must be carefully removed.
Whatever you do, pleasepleasePLEASE don't don't DO NOT put a seal coat over the entire roof. It really just screws things up in the long run!
|
|
keri
Active Member

Posts: 127 
Likes: 15
Currently Offline
|
Post by keri on Aug 4, 2013 14:19:03 GMT -8
You've forgotten about the 12 million little nails and staples these trailers have too. I have two entire butter bowls full of them from taking all the skins off mine. And at first, yes, it's a little overwhelming, but then you figure out the easiest way and it's a breeze. Still a pain, but a breeze.
|
|
|
|
Post by vikx on Aug 4, 2013 21:57:01 GMT -8
As above, the roof does not need to be sealed. Do not coat it with anything. Instead, remove the edge trim and re-install with new putty. The roof vents also need to be re-puttied, and any other roof protrusions. Sometimes thin layers of sealants are needed on the seams, but only if they are bent or there are gaps.
If possible, post some pictures so we can see what you are dealing with.
|
|
|
|
Post by reefdiver77 on Aug 5, 2013 19:21:53 GMT -8
I am unable to post photos. Even though it is 40 years old, the putty can still be indented with my fingernail. I knew it would need the putty replaced, but folks around here with travel trailers keep telling us to paint/coat it with something. Even the local RV place!!! Of course, they have not seen the trailer either. Thanks everyone for your help.
|
|
|
|
Post by vikx on Aug 5, 2013 22:11:10 GMT -8
The local RV place does not deal with vintage trailers. Coatings on the roof lower the value significantly...not to mention metal roof rot.
|
|
Ten
3K Member
Posts: 3,432
Likes: 1,467
70 Shasta 16SC + 1964 Airflyte
Currently Offline
|
Post by Ten on Aug 6, 2013 1:42:48 GMT -8
All you really need to do to answer this for yourself is to comb through as many rebuild blogs as you can find, and see how many owners and restorers have photos of their finished trailer that have all that goop all over the roof, and exclaim how important it is to cover everything up. If it were the only means of stopping a leak, then the walls would have to be done too, no?
Although the putty may seem pliable in one section that is visible, remember that is only takes one tiny section to harden up and leak, and leave you with a major problem. It may not leak now, but with the tremendous strains to the seams traveling over the road, it could start next week. I have heard that the tape usually will hold up for a 10-year term, so if you have not seen it replaced in the last 10 years with your own eyes, I sure would not trust its lifespan.
|
|
|
|
Post by reefdiver77 on Aug 6, 2013 3:53:28 GMT -8
Thanks everyone. The putty has not been replaced on this trailer ever. It was only used a hand full of times over a 3 year period, after my brother in law's parents purchased it in October 1973. The only thing we find that has been replaced was the vent over the tub. Apparently there was a leak there. We actually found the old vent in the pole barn where the trailer was housed since 1984. So, I guess on to pulling up the commode and redoing it, then checking out the gas and 12v prior to the putty. We have been very careful to keep it totally covered with a tarp since we got it.
|
|
|
|
Post by reefdiver77 on Aug 9, 2013 18:00:12 GMT -8
My husband just told me the paint on the roof appears to be flaking off the aluminum. What should we do about this.
|
|
Ten
3K Member
Posts: 3,432
Likes: 1,467
70 Shasta 16SC + 1964 Airflyte
Currently Offline
|
Post by Ten on Aug 10, 2013 7:21:05 GMT -8
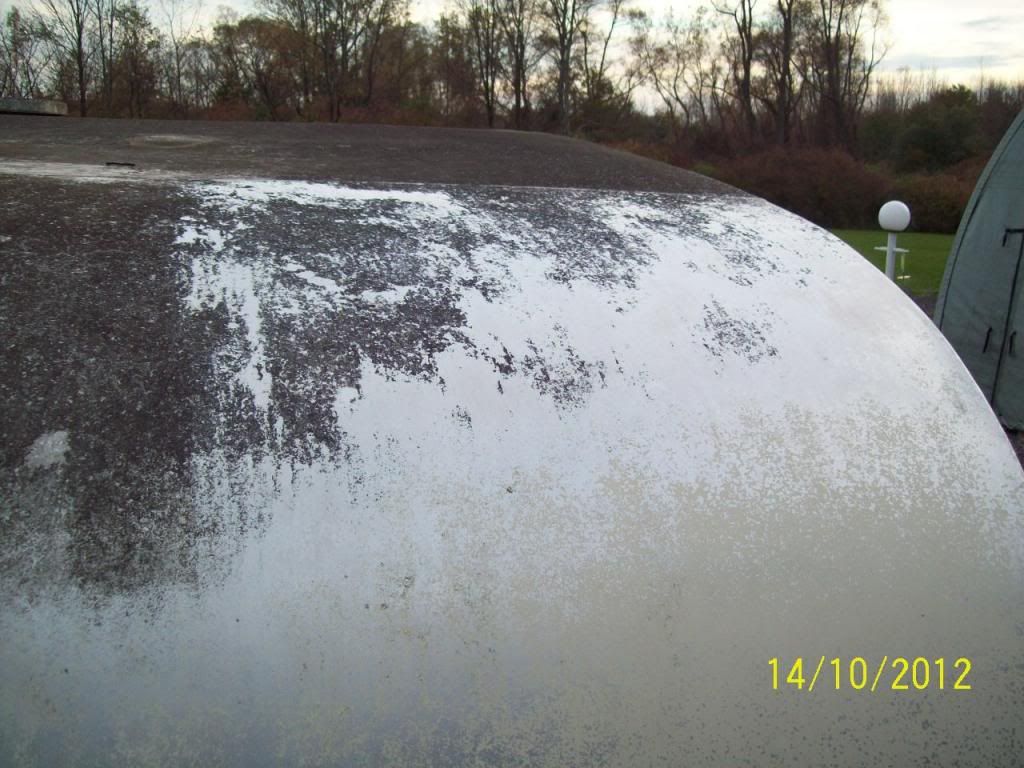 After my Airflyte got its initial bath, it showed the paint leaving it under all the dirt and rotted leaves. 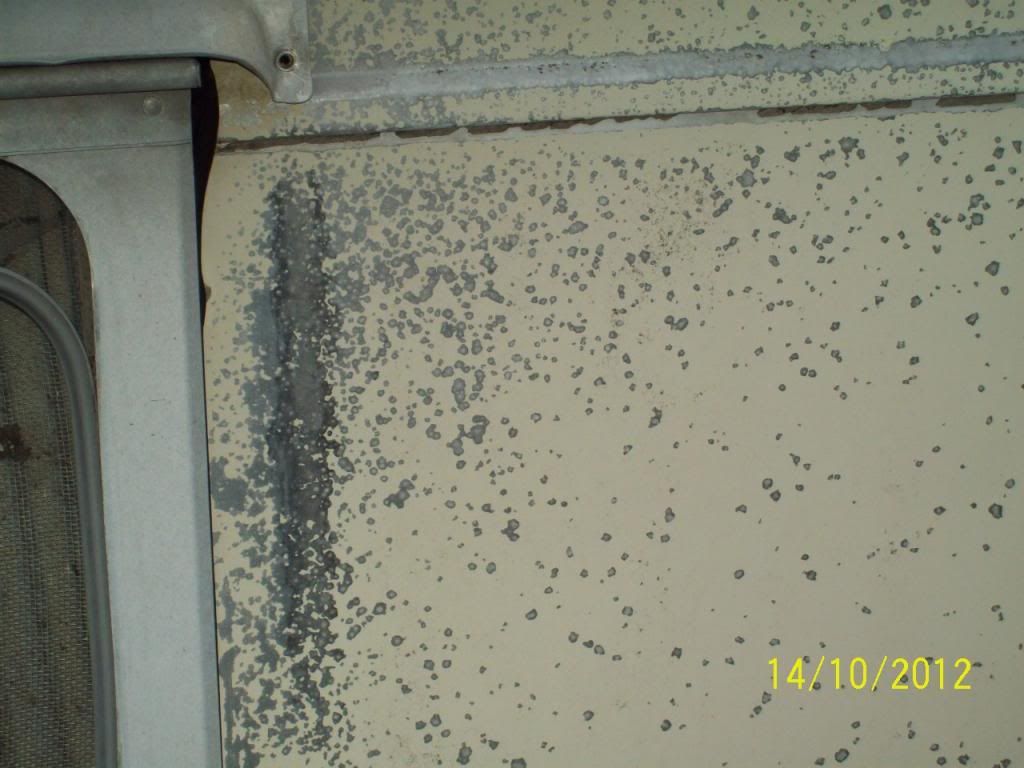 The short answer is, plan on doing a paint job. Now I am no expert on this subject, but there are some threads on the old forum that were quite helpful, and I know that member Soup has done a fair amount of painting. Initial preparation, sanding and smoothing, is labor-intensive and time-consuming, but without doing it properly, any paint job will fail a lot sooner. Any part that is to be painted where the aluminum has been left bare will require a self-etching primer in order for the paints to adhere properly to the metal. After getting past the prep, there are all sorts of acceptable paint types and application methods that work out well for these trailers, all the way from expensive automotive finish paints to Rustoleum right off the shelf at the hardware store. |
|


