John Palmer
Senior Member
 Hi, From a vintage trailer guy located in Santa Ana, CA. It's good to see lots of activity here.
Posts: 1,634 
Likes: 577
Currently Offline
|
Post by John Palmer on Apr 9, 2015 15:45:22 GMT -8
Yes, the frame has been welded and some additional supports added as well as an aluminum bumper. I checked with Chris regarding the Hadco latch, he has a 2" but I need a 1". If i can not locate one , i guess i could have a temporary one made? Or just thinking , Would the 2" work if i welded a new eye attachment to the front? Any suggestions??? Couplers are sold by "ball diameter". 2" is a common ball diameter, some smaller trailers use 1 7/8". I have never heard of a 1" ball size. |
|
|
|
Post by vikx on Apr 9, 2015 21:23:33 GMT -8
I agree with John. Do some more research before committing and go with the correct size. Most of my Hadcos are 1 7/8".
|
|
mitchell
Member

Posts: 35
Currently Offline
|
Post by mitchell on Apr 10, 2015 4:21:53 GMT -8
The 1" is not the ball size, it's the distance from the hadco release pin to the center of the eyelet . Apparently thier are a few different sizes, I don't not believe it correlates to the ball size.
On my frame the distance is 1" and the ball is either a 1-7/8 or a 2" ,
i have a 2" that seem to fit,
but I will check a 1-7/8" as well . No indication of size on the hitch.
any one know of a hadco bird for 1" ?
|
|
mitchell
Member
Posts: 35
Currently Offline
|
Post by mitchell on Apr 12, 2015 9:37:26 GMT -8
The frame was welded and added supports to help strengthen the chassis. The new bumper is aluminum and is detachable if necessary for any future adjustments. Although I did notice that the right side of the front part of the frame stands proud about 1/2" from the other side, as if the entire frame was twisted a little. I can push it down without much pressure,. Will the decking and walls help to take out some of this deflection? 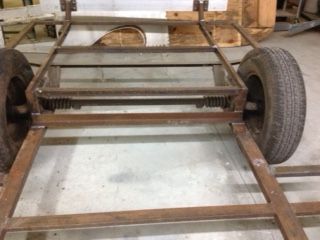 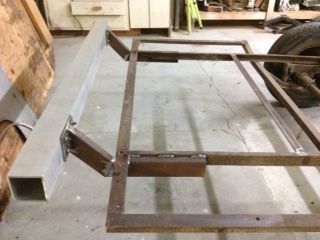 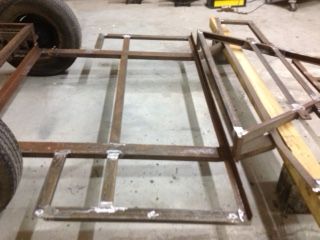  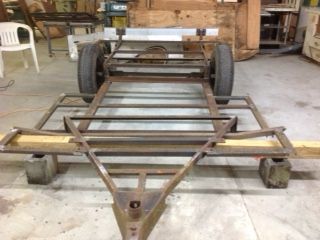 |
|
davek
Active Member
Posts: 173
Likes: 94
Currently Offline
|
Post by davek on May 4, 2015 21:10:40 GMT -8
Any progress on the build?
You might consider just using plywood for the floor with no framing or insulation (like it was originally built) other wise you will loose the headroom Little Caesars are knowen for.
Please keep the pictures coming as you progress
|
|
mitchell
Member
Posts: 35
Currently Offline
|
Post by mitchell on May 19, 2015 17:57:29 GMT -8
|
|
mitchell
Member
Posts: 35
Currently Offline
|
Post by mitchell on May 19, 2015 17:59:10 GMT -8
|
|
RinTin
Full Member
Posts: 760
Likes: 292
Currently Offline
|
Post by RinTin on May 19, 2015 20:43:30 GMT -8
Wow, you've been busy. That's a lot of wood, should be a stout little trailer. Did you ever resolve your coupler issue?
|
|
mitchell
Member
Posts: 35
Currently Offline
|
Post by mitchell on May 20, 2015 2:52:37 GMT -8
yes, will send pictures, picking up trailer frame today, had it sand blasted and powder coated.
|
|
davek
Active Member
Posts: 173
Likes: 94
Currently Offline
|
Post by davek on May 20, 2015 7:42:05 GMT -8
Wow great progress. Are you going to rebuild the orginal windows? Yours is the only Little Caesars I have seen with those early windows.
|
|
mitchell
Member
Posts: 35
Currently Offline
|
Post by mitchell on May 23, 2015 3:17:23 GMT -8
If you refer to the photo above of the trailer base, I used a marine grade plywood and 1x material glued and screw over the main supports of The frame,
I then installed 3/4" ridged form insulation between the 1x framing , and 1/2" subfloor over that ( which was not installed when this photo was taken). Based on what you have this system will only take up an additional 1/2" of headroom if you can live with that.
|
|
mitchell
Member
Posts: 35
Currently Offline
|
Post by mitchell on May 23, 2015 14:37:23 GMT -8
THE 1X'S ARE ALIGNED OVER THE METAL ANGLE OF THE TRAILER AND BOLTED THRU THE 3/4 DECKING. INSTALLED 3/4 INSULATION BETWEEN THE 1X AND SUB FLOOR OVER THAT.
|
|
davek
Active Member
Posts: 173
Likes: 94
Currently Offline
|
Post by davek on Mar 10, 2016 21:20:12 GMT -8
Any updates?
|
|
|
|
Post by danrhodes on Mar 11, 2016 9:00:43 GMT -8
That seems like such a unique floor design, with the tall "rim". How do the walls mount to the floor? Are they attached to the outside of the rim, or is the rim really the sill board of the walls? In that case, how is the rim attached to the thin plywood floor?
|
|


