|
|
Post by Teachndad on Oct 17, 2021 10:29:58 GMT -8
Hi Friends, Just a little posting today. I am trying to squeeze in little jobs in a busy schedule. Here is the latest. I wanted to reinforce the floor where you step into the trailer, so I chose this option. I glued and screwed a 11” x 26” piece of 1” plywood underneath that area of the floor. I was planning on blocking everything underneath, but this trailer when complete may be used just 4 times a year. If I blocked everything, I would never get this trailer finished. So I elected to keep the floor as it is with the underneath reinforcement added in this position. This picture shows the area I reinforced. I pre-clamped, measured and predrilled all 7 holes. 
I set the Titebond II glue.  All holes were countersunk. All holes were countersunk.
For good measure, I used a scissor jack underneath just to make sure the wood was compressed against the underside of the plywood floor as I had no clamps on that side. Once the screws went in, the jack was no longer needed.

Inching towards the walls, but first,
1. Fill in holes and gaps with body filler
2. Buy flooring and get it installed
3. Work on walls. But wait, carport is too low... 
Cheers,
Rod
|
|
PT
Active Member

Posts: 460 
Likes: 260
1964 Aloha & 1962 Holiday House
Currently Offline
|
Post by PT on Oct 21, 2021 8:37:30 GMT -8
Where is that odd chanting coming from........?Walls Walls Walls Walls Walls WALLLLLLLLLLLLLS !!!
Go get 'em Rod 
|
|
|
|
Post by Teachndad on Feb 26, 2022 22:09:59 GMT -8
LOL.  Thanks PT. I will get there, eventually. (knuckles) Hi Friends, The Marmoleum has been installed! I had someone install it for me. I chose Marmoleum Fresco Arabian Pearl 3861. Online samples show it more pinky. It’s not. It’s more a tan color. You have to order a sample to really get the best impression. I ordered samples directly from Forbo the manufacturer for free. They are small. I was able to order a larger sample for a modest fee from another online seller. That larger size made choosing much easier. The flooring store I went to had remnants, but they had nothing I liked, so I ordered the material. Before  After 
The photograph doesn't show the pattern. It's a very subtle marble pattern with tans and light browns. It should go well with any reds or yellows depending on which way I go with the cushions. I really believe it will go well with a nice warm amber interior. I also had new wheel wells made. The originals were damaged and splitting in spots.   That’s it for now. I have two other projects with my Rod and Reel that are taking up my time right now. Cheers, Rod |
|
Hamlet
2K Member

Posts: 2,819
Likes: 925
Currently Offline
|
Post by Hamlet on Feb 27, 2022 11:16:54 GMT -8
It turned out great and will look wonderful in the trailer.
|
|
mobiltec
5K Member
 I make mistakes so you don't have to...
Posts: 9,822
Likes: 3,749
1954 Jewel In Progress...
Currently Offline
|
Post by mobiltec on Feb 27, 2022 13:27:27 GMT -8
We should have a flat bed rally...
|
|
WhitneyK
Active Member
Posts: 492
Likes: 169
'67 Shasta Compact
Currently Offline
|
Post by WhitneyK on Feb 27, 2022 19:34:50 GMT -8
I'm in...
|
|
PT
Active Member
Posts: 460
Likes: 260
1964 Aloha & 1962 Holiday House
Currently Offline
|
Post by PT on Feb 27, 2022 20:44:47 GMT -8
Your WALLS are going to look crazy cool on that flooring!!!!!!!!!!
|
|
Hamlet
2K Member
Posts: 2,819
Likes: 925
Currently Offline
|
Post by Hamlet on Feb 28, 2022 8:25:49 GMT -8
We should have a flat bed rally... Hmm. I wonder if it’d be too hard to take Hamlet off his floor. My hubby did a wonderful job of doing an inlay of a red heart (matching the grain in the birch) in an off white Marmoleum tile. |
|
mobiltec
5K Member
I make mistakes so you don't have to...
Posts: 9,822
Likes: 3,749
1954 Jewel In Progress...
Currently Offline
|
Post by mobiltec on Feb 28, 2022 17:08:54 GMT -8
Here's my entry. I give you the 1954 Jewel... 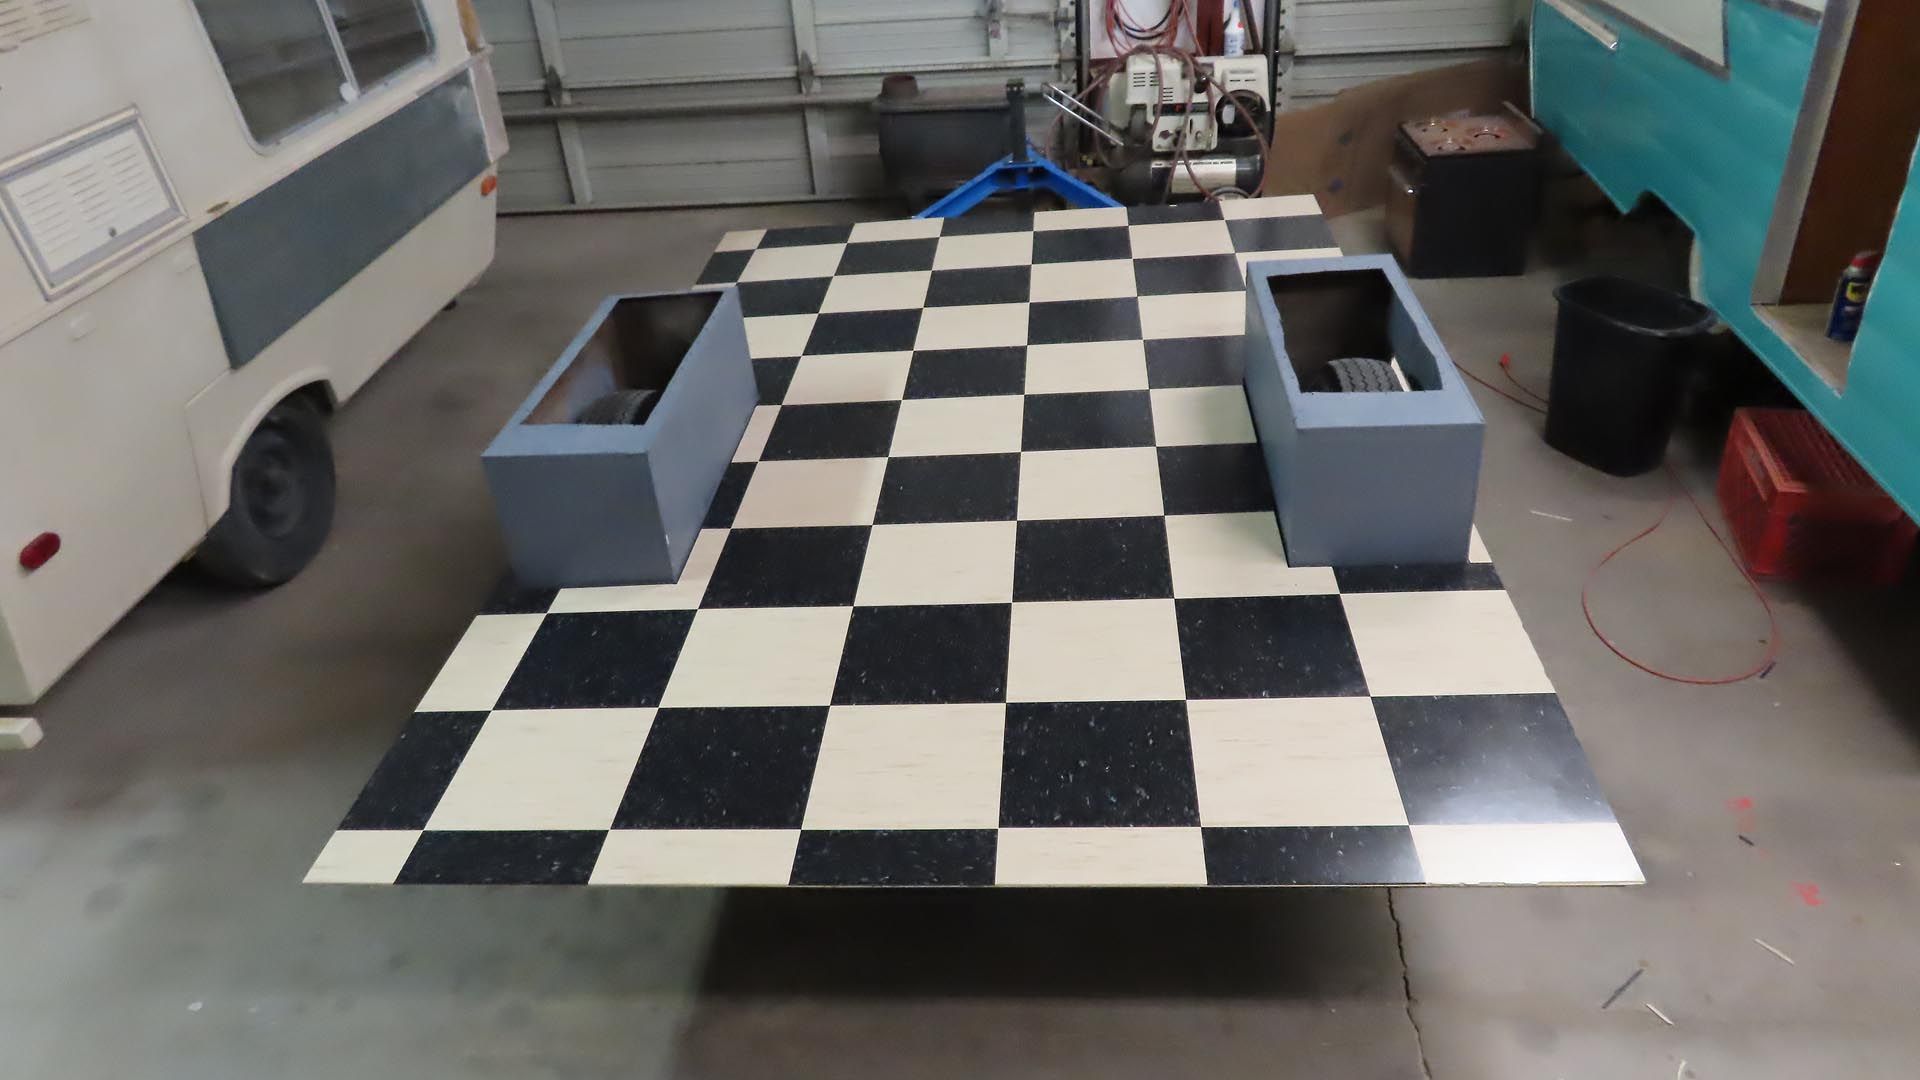 |
|
nccamper
Administrator 
Posts: 7,744
Likes: 2,871
1962 Forester- 1956 Shasta
Currently Offline
|
Post by nccamper on Mar 1, 2022 19:24:36 GMT -8
We should have a flat bed rally... VintageFlatbedTalk
I like it.
My flatbed doesn't hold up against Rod's.
|
|
mobiltec
5K Member
I make mistakes so you don't have to...
Posts: 9,822
Likes: 3,749
1954 Jewel In Progress...
Currently Offline
|
Post by mobiltec on Mar 2, 2022 7:12:05 GMT -8
No putty and paint allowed in this rally. With or without cabinets is OK.. 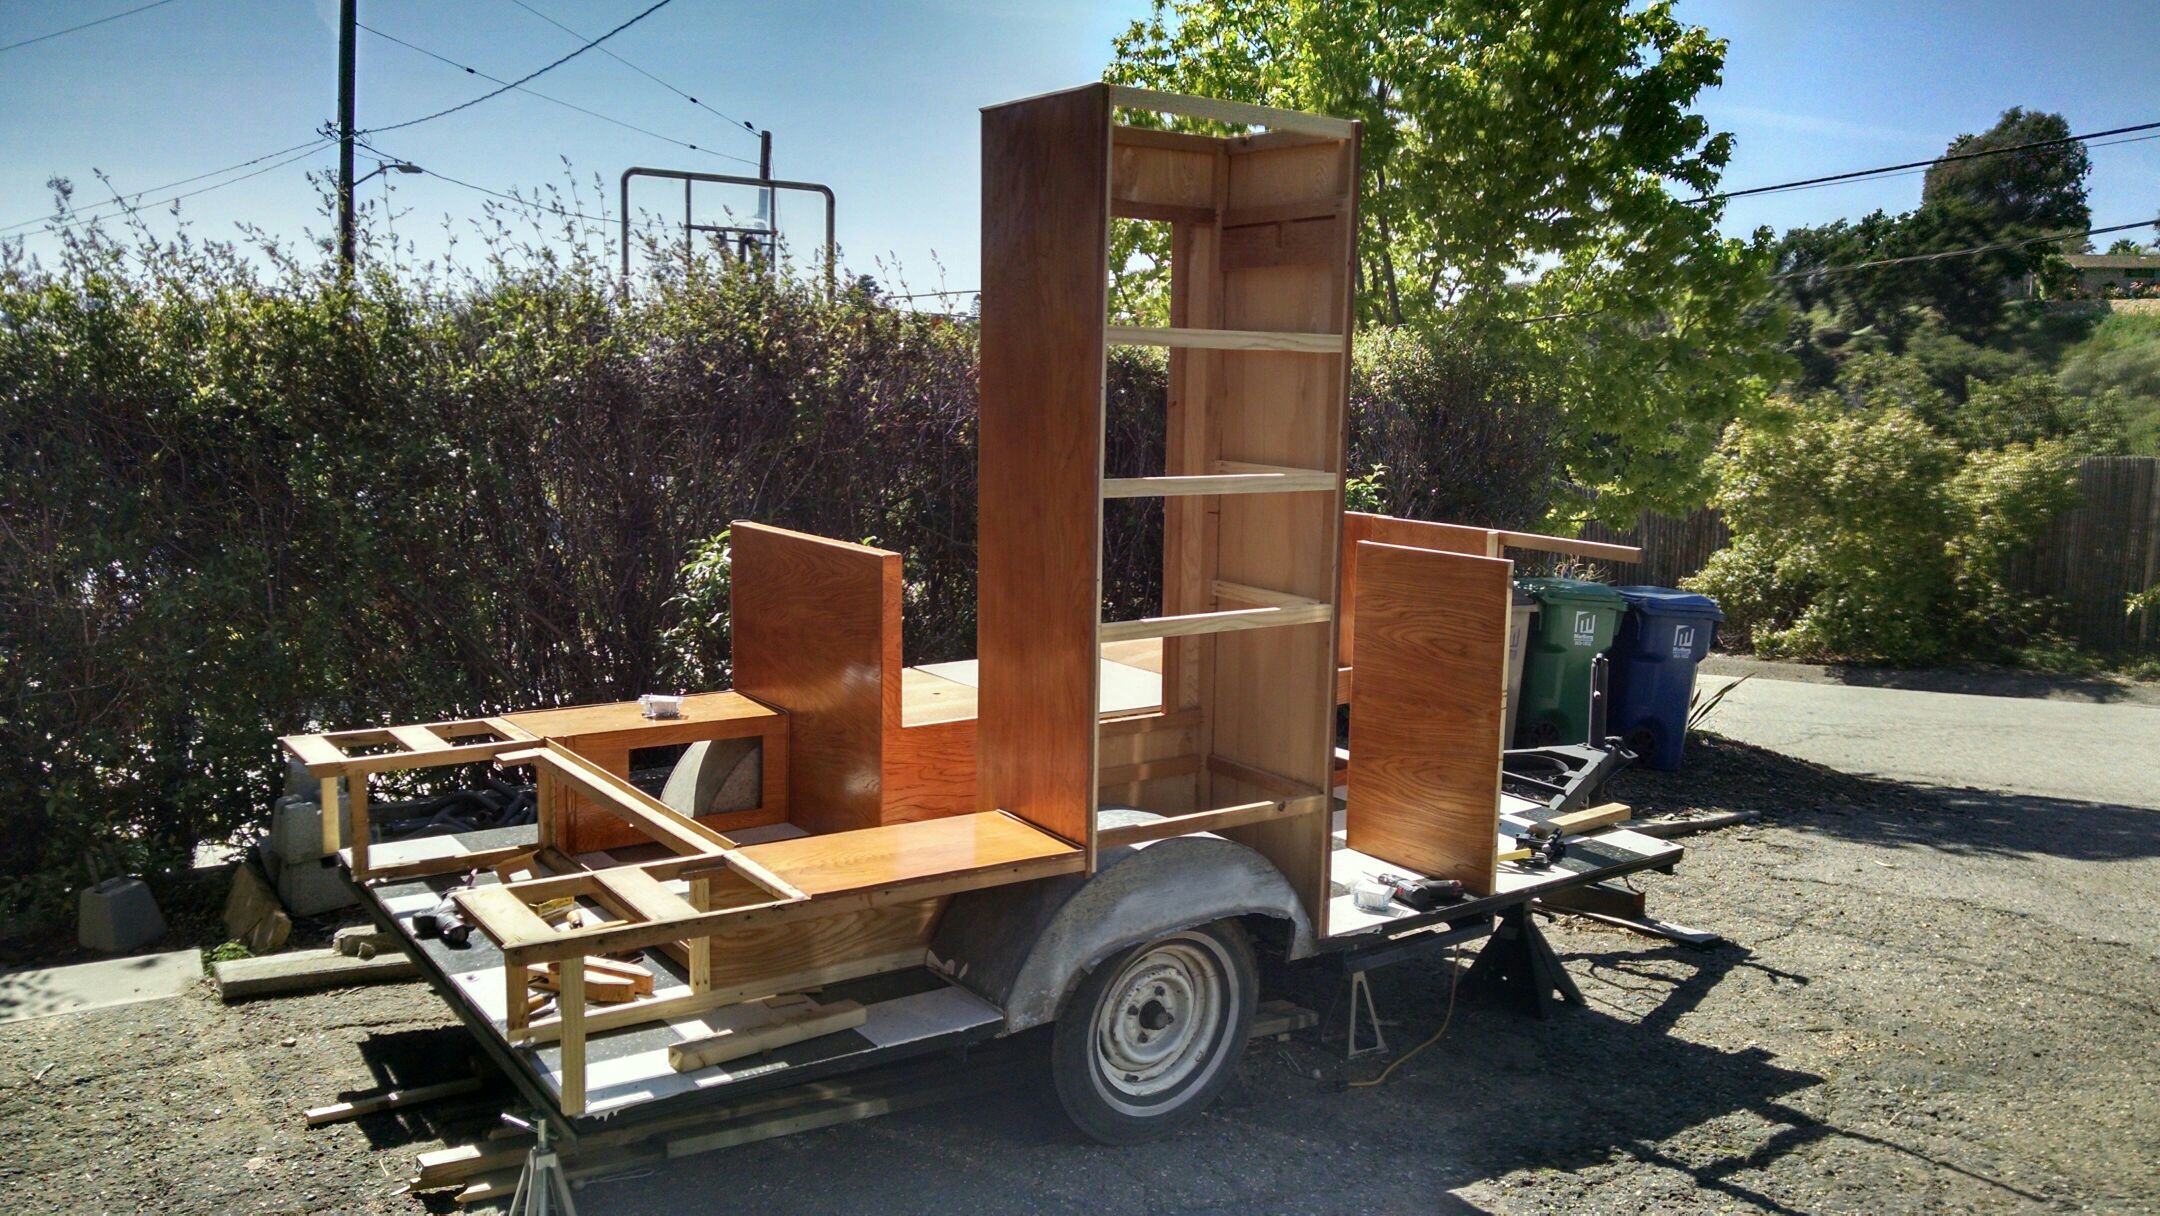 |
|
nccamper
Administrator
Posts: 7,744
Likes: 2,871
1962 Forester- 1956 Shasta
Currently Offline
|
Post by nccamper on Mar 2, 2022 8:15:10 GMT -8
That's interesting having all the cabinets in place before the walls..
I think I just hijacked your thread. Sorry
|
|
|
|
Post by danrhodes on Mar 2, 2022 19:33:26 GMT -8
I was about to ask what dumbass put a camper together like that then I recognized my driveway, lol. I did it that way because it was done outside in a windy time of year so needed the support but also wanted to make sure everything fit properly on the floor in case my measurements weren't great. The fact that it emptied my garage of old cabinets was a final bonus. Rod, feel free to delete this to keep your thread on topic. 1965fieldandstream.blogspot.com/2016/04/trailer-raising-day-1.html?m=1That's interesting having all the cabinets in place before the walls..
I think I just hijacked your thread. Sorry
|
|
mobiltec
5K Member
I make mistakes so you don't have to...
Posts: 9,822
Likes: 3,749
1954 Jewel In Progress...
Currently Offline
|
Post by mobiltec on Mar 3, 2022 7:22:30 GMT -8
I was about to ask what dumbass put a camper together like that then I recognized my driveway, lol. I did it that way because it was done outside in a windy time of year so needed the support but also wanted to make sure everything fit properly on the floor in case my measurements weren't great. The fact that it emptied my garage of old cabinets was a final bonus. Rod, feel free to delete this to keep your thread on topic. 1965fieldandstream.blogspot.com/2016/04/trailer-raising-day-1.html?m=1That's interesting having all the cabinets in place before the walls..
I think I just hijacked your thread. Sorry
LOL... And yes we're sorry about the hijack. |
|
Hamlet
2K Member
Posts: 2,819
Likes: 925
Currently Offline
|
Post by Hamlet on Mar 3, 2022 9:32:39 GMT -8
This is the only kind of hijacking that’s fun!
|
|


 Thanks PT.


/Campers/67%20Shasta?preview=2019-02-03+18.01.00.jpg)


