|
|
Post by Teachndad on Nov 21, 2014 23:35:12 GMT -8
Hi, I was looking at the profile of Andy and it looks as if the tongue is bent upward. Pix are below. It looks as if it was repaired once, but someone used re-bar in the repair.  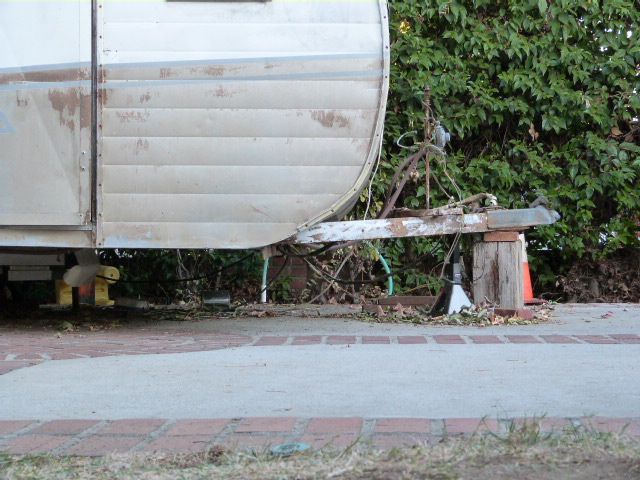 Here is a more close up view. 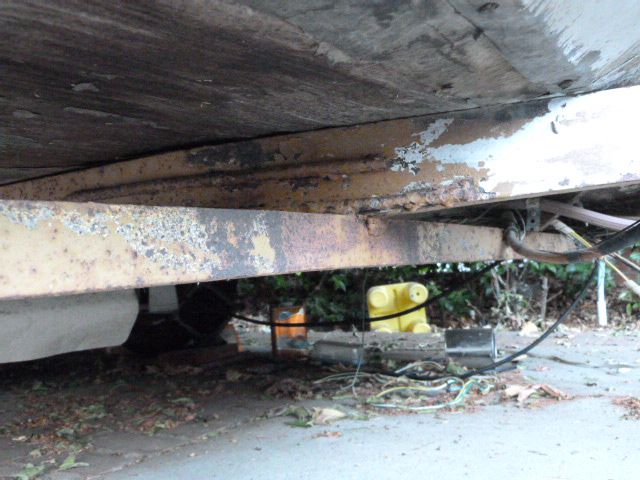 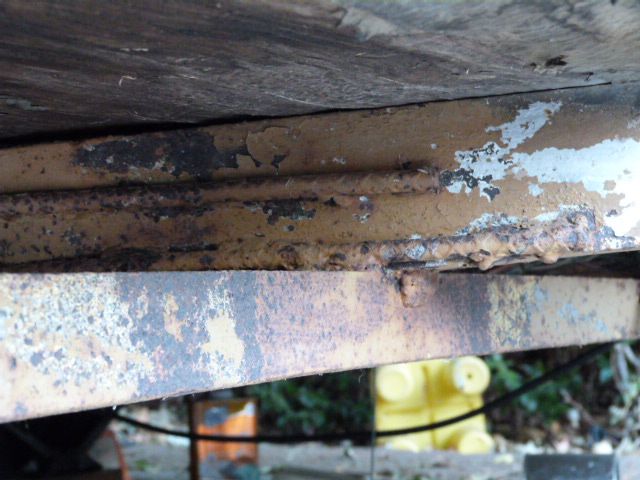 The large rectangular plate at the center of the photo may be original. I think I have seen the same one on another Westerner. Not sure, though. 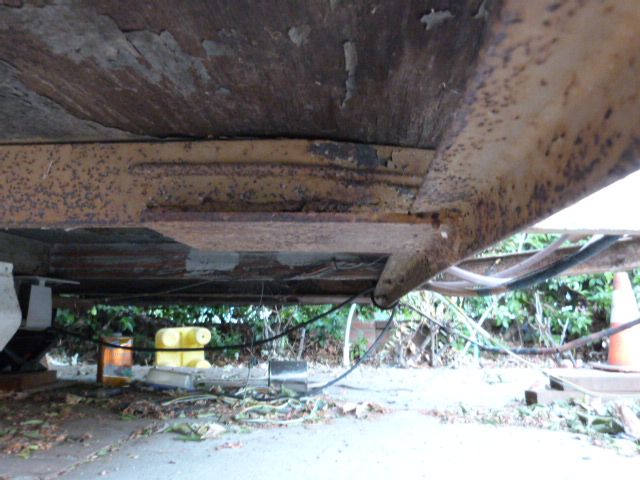 Cheers. Rod |
|
mobiltec
5K Member
 I make mistakes so you don't have to...
Posts: 9,821 
Likes: 3,745
1954 Jewel In Progress...
Currently Offline
|
Post by mobiltec on Dec 15, 2014 17:13:30 GMT -8
That looks suspicious to me. Got a welding friend? You could "box" the frame just to make sure it's safe...
|
|
John Palmer
Senior Member
 Hi, From a vintage trailer guy located in Santa Ana, CA. It's good to see lots of activity here.
Posts: 1,623
Likes: 574
Currently Offline
|
Post by John Palmer on Dec 15, 2014 19:34:43 GMT -8
That is not good.
It was bent/broken at some point in it's past life and received a bubblegum repair. The plates look too thick to be original, at least to me. Remember these were originally cheaply built trailer's and they did not use anything extra in their construction.
I have a '57 De Ville that has a cracked frame in the very same spot.
I'd suggest you cut it off, box the "C" channel like Larry suggested. I also like to add a strap under the frame bend point, because the stress is on the bottom of the frame rail.
Another thing, your going to want to straighten the frame after you get all of the re-bar off. Attach the trailer to your truck to anchor the tongue. Place a floor jack under the right side frame rail directly below the bend. Heat the top flange of the frame rail up to cherry red. Then raise the jack to the point that the frame bends up at the front edge of the trailer. It's a little tricky because you have to go past the point of spring back. Better to sneak up on it, and not over bend it. After both sides have been straightened, is when you will do the welding repair. To check for "up/down frame alignment", you can run a string tied to the rear of the frame, under the trailer, and up to the jack point. The measurement from the string to the frame should be the same at the rear, the middle, and again at the front, "if it's straight". Hope that makes sense? |
|
|
|
Post by Teachndad on Dec 18, 2014 10:18:33 GMT -8
|
|
soup
1K Member
"I hate cold Soup"
Posts: 1,237
Likes: 204
Currently Offline
|
Post by soup on Dec 20, 2014 3:57:59 GMT -8
Funny to use that in a stiffening repair, rebar is soft and bendable.
|
|
mobiltec
5K Member
I make mistakes so you don't have to...
Posts: 9,821
Likes: 3,745
1954 Jewel In Progress...
Currently Offline
|
Post by mobiltec on Dec 20, 2014 8:38:04 GMT -8
OK the video brings up a great point. When looking at a trailer that you are interested in purchasing, it is VERY important to check out every square inch of the frame. Get under there and look to see if there is any damage, any repairs, any bolts that have been changed or removed. Anything that looks different. Anything that looks modified. This can be a deal breaker for me because if you find damage to the underside of the trailer and the frame or axle itself, you have what could be a dangerous trailer. And damage to the frame usually means damage that has been transmitted to the wooden frame of the trailer also. If it's a metal frame it's even more important because wood framing is stapled together where as metal is welded.
This type of damage is usually a result of losing a wheel or could be from losing the entire axle. In the case of a Shasta I worked on the entire axle was lost while towing due to an axle flip. All the bottom frame members were replaced in the repair and the job done was shoddy at best. It explained all the other damage to the wood frame that I found once the skin was removed also. Had the buyer gotten down on his knees and looked under there he would have seen all the replaced members and been able to either talk the price WAY down or walked away from a potentially dangerous trailer purchase. I would have walked myself as this trailer will never be right again unless it get's a frame up and get's a new frame.
Moral of the story is INSPECT EVERY ASPECT OF THE TRAILER. Bring your ice pick and don't forget to look underneath.
|
|
John Palmer
Senior Member
Hi, From a vintage trailer guy located in Santa Ana, CA. It's good to see lots of activity here.
Posts: 1,623
Likes: 574
Currently Offline
|
Post by John Palmer on Dec 20, 2014 9:12:59 GMT -8
98.5% of all canned ham type trailer frames have a front cross member that is "slightly bent" down. It was that way originally. It's the result of metal shrinking due to welding on only one side of the steel. It's usually not a problem (if not severe), it just makes the floor have crown. None of these trailers were originally built flat/straight/square. Usually, if it was bent, one side will be twisted back due to the hit. In the photos (to my view) it does not appear to be severely bent. The 1/4" frame mounting carriage bolts being loose, are the result of the wood being rotted inside the wall.
On any kind of repair, you have to assess the damage/problem, and decide how best to repair it based on the time it takes, the cost of the materials, the tool resources your have, and your available skills. That said, it would be far easier/faster/cheaper to just "torch off" all of the previous owner bubble gum Band-Aid's he added, and install a new front cross member, box the "C" channel on the frame where it was obviously broken, and weld it up. It will take you tons of time and abrasive materials to just clean up this area, before you actually start the repair. Steel is relatively cheap, labor time, and fabrication consumables are not.
Just my view.
|
|
mobiltec
5K Member
I make mistakes so you don't have to...
Posts: 9,821
Likes: 3,745
1954 Jewel In Progress...
Currently Offline
|
Post by mobiltec on Dec 20, 2014 9:45:37 GMT -8
98.5% of all canned ham type trailer frames have a front cross member that is "slightly bent" down. It was that way originally. It's the result of metal shrinking due to welding on only one side of the steel. It's usually not a problem (if not severe), it just makes the floor have crown. None of these trailers were originally built flat/straight/square. Usually, if it was bent, one side will be twisted back due to the hit. In the photos (to my view) it does not appear to be severely bent. The 1/4" frame mounting carriage bolts being loose, are the result of the wood being rotted inside the wall.[/p]
On any kind of repair, you have to assess the damage/problem, and decide how best to repair it based on the time it takes, the cost of the materials, the tool resources your have, and your available skills. That said, it would be far easier/faster/cheaper to just "torch off" all of the previous owner bubble gum Band-Aid's he added, and install a new front cross member, box the "C" channel on the frame where it was obviously broken, and weld it up. It will take you tons of time and abrasive materials to just clean up this area, before you actually start the repair. Steel is relatively cheap, labor time, and fabrication consumables are not.
Just my view.
[/quote]John... What do you think is up with those flat metal additions welded on to the bottom of the members? |
|
John Palmer
Senior Member
Hi, From a vintage trailer guy located in Santa Ana, CA. It's good to see lots of activity here.
Posts: 1,623
Likes: 574
Currently Offline
|
Post by John Palmer on Dec 20, 2014 10:32:36 GMT -8
Larry, I don't think they are original, the steel is too thick on the plates, and they would have been too expensive for just gussets. The plate should be the same thickness as the "C" channel 1/8" to 3/16" would be plenty. It's lots easier to weld metals of similar thickness and get the weld temperature up for good penetration.
|
|
nccamper
Administrator 
Posts: 7,743
Likes: 2,870
1962 Forester- 1956 Shasta
Currently Offline
|
Post by nccamper on Dec 21, 2014 15:52:21 GMT -8
Teachndad,
When my camper needed new leaf springs there was welding that needed done. Although I'm old school and want to do everything myself, I brought it to an old time welding shop in town. They do a lot of heavy trucks. A place like that would be able to repair your frame without breaking a sweat. They've seen it all, done it all, and they usually work fast and cheap.
If I were you, I would pay a few hundred and let a welder who has been doing it for 30 years get the job done in a few hours. There is one in every town.
That's my two cents.
|
|
|
|
Post by Teachndad on Dec 22, 2014 7:06:44 GMT -8
Teachndad, When my camper needed new leaf springs there was welding that needed done. Although I'm old school and want to do everything myself, I brought it to an old time welding shop in town. They do a lot of heavy trucks. A place like that would be able to repair your frame without breaking a sweat. They've seen it all, done it all, and they usually work fast and cheap. If I were you, I would pay a few hundred and let a welder who has been doing it for 30 years get the job done in a few hours. There is one in every town. That's my two cents. NCCamper, It's a good idea, but I had already started opening up the back previously, so now it's not really towable at this stage.  |
|
|
|
Post by bigbill on Dec 22, 2014 12:41:54 GMT -8
It doesn't matter when you have it properly reenforced as long as you do it before towing it very far. There are several ways to strengthen it so take it to a qualified shop and let them choose the best way.
|
|
mobiltec
5K Member
I make mistakes so you don't have to...
Posts: 9,821
Likes: 3,745
1954 Jewel In Progress...
Currently Offline
|
Post by mobiltec on Dec 22, 2014 14:09:36 GMT -8
On the subject of installing new leaf springs. I've never had to do any welding to install new springs. I just go to a spring pack builder with the measurement between the perch eye holes and one of the old packs and they build me new packs. My spring packs with all new hardware and shackles usually runs little over $100 per pack. Just saying how I do it.
|
|
John Palmer
Senior Member
Hi, From a vintage trailer guy located in Santa Ana, CA. It's good to see lots of activity here.
Posts: 1,623
Likes: 574
Currently Offline
|
Post by John Palmer on Dec 22, 2014 17:20:01 GMT -8
It doesn't matter when you have it properly reenforced as long as you do it before towing it very far. There are several ways to strengthen it so take it to a qualified shop and let them choose the best way. BigBill, I think he was talking about the "trailer body" being taken apart, not the frame.
I agree that the frame could be towed short distances "as is".
|
|
John Palmer
Senior Member
Hi, From a vintage trailer guy located in Santa Ana, CA. It's good to see lots of activity here.
Posts: 1,623
Likes: 574
Currently Offline
|
Post by John Palmer on Dec 22, 2014 17:27:41 GMT -8
On the subject of installing new leaf springs. I've never had to do any welding to install new springs. I just go to a spring pack builder with the measurement between the perch eye holes and one of the old packs and they build me new packs. My spring packs with all new hardware and shackles usually runs little over $100 per pack. Just saying how I do it. Agree that it's best to have them assembled, and not buy the internet generic springs currently sold.
The old springs used on the 1950's era trailers were built with war surplus parts because they were available and dirt cheap. The springs originally were built for Jeeps and do not have the same measurement from eye to eye, or spring center as the current trailer spring replacements. If your welding new mounting brackets on your trailer it's OK to use the new shorter springs. But if you just need a springs re-arched, and do not want to weld new hangers, go to a spring shop and have them rebuild your existing springs, or make new springs to your original specification as Larry suggests.
|
|


