


Post by Teachndad on May 29, 2022 21:51:22 GMT -8
Hi Friends,
I have been very busy of late. One of the reasons was an ever looming deadline to repair the entry door on my Rod and Reel before a rally this past weekend. Work started 5 months ago and had to be done between family and work. A year ago, the entry door was flapping in the wind when towing because there was no lower frame support inside the door. Rot had taken care of that. Luckily, someone had screwed in the lower trim piece into the skin of the door and that had yet to be lost. I had adorned it with blue painter’s tape as a band-aide. Clearly, the blue tape had reached its limit. It was time to repair. No more bandages.

For the short term, I wedged my ‘57 Westerner entry door into the opening to help keep critters out. I had a “plug” for the opening at the top because the Westerner door was shorter by 5 inches.
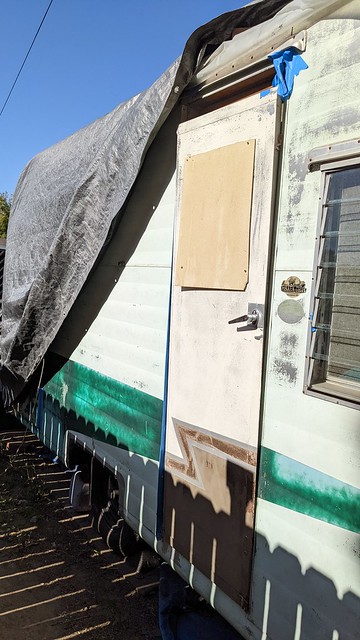
This is the before I completed the repair.

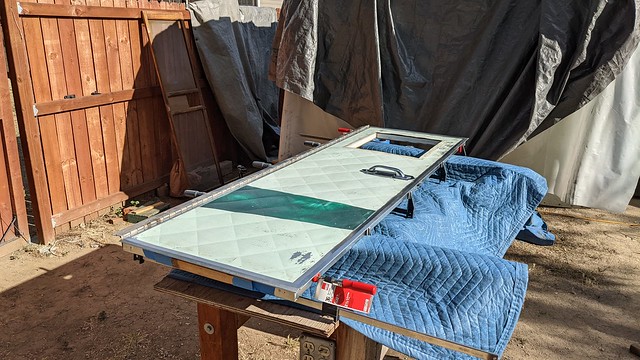
The easy part was pulling the door off the hinge. I would worry about how to hang and line up the door later. In a trade, a deal was struck. Trailer buddy Dave rebuilt the door after I pulled it apart. My offer to him was a stove I had from a 1955 Westerner. This will go into his 1942 Silverdome. He would later return the door to me with the skin nailed onto the outside of the door frame as well as the birch panel nailed to the frame.
Here is what the door looked like opened up. Note the missing lower support.

Dave would rebuild the door and add some extra supports into the door that I wanted.

Door frame with insulation

In the meantime, as he reconstructed the internal door frame with 7 year old closed fir lumber I had left over from my ‘57 Westerner floor rebuild, I found a local sheet metal shop to rebuild all the trim around the door as it was falling apart and or splitting. A bit pricey, but worth it in the end.
Here is the trim with a test fit and no nails.

The trim had to be opened up to allow the latch plate to be inset (mortised) into the door as well as be removed for door handle maintenance. In the original door, this was covered up leaving only an opening for the latch to go through. Here is a related thread I started in 2017 that was focused on accessing the latch plate for the door and the confirmation that the trim would have to be replaced. vintagetrailertalk.freeforums.net/thread/8780/66-bargman-handle-stuck-door?page=1&scrollTo=118291 Some things take a while.

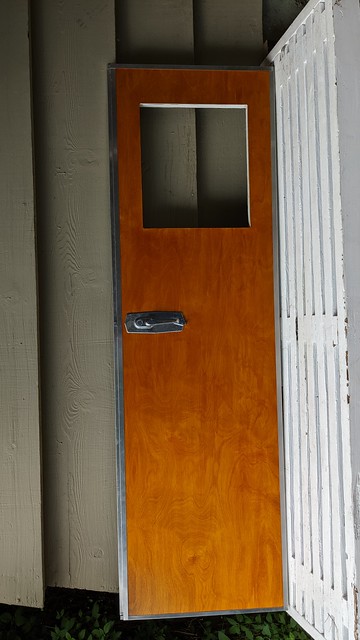
For the inside birch wood panel, I chose General Finishes water based dye and clear. I had to decide what color I wanted. I made a test sheet and then applied several clear coats. I chose three different combinations of clear with dye. I settled on the darker rather than trying to match the interior. Now, the door skin is darker than the original color of the paneling. I knew that decision would eventually require a lot more work and refinishing, but I now wanted something “warmer” than the color that was original. The General Finishes dye and clear are very very easy to work with. I used amber dye with 450 Exterior semi gloss clear.

Once the trim was complete, I did some dry fits in the door opening and the fit looked good. But… I was using the original hinge post to support the hinge which meant filling the holes with toothpicks before redrilling and learning to trust that it would hold. And then there was the ever looming thought of, “Can I get this door to hang…evenly?” I was on a float in a Self Doubt Parade. The door has the Rod and Reel stripe painted on it. So, I had to line that up as well. The door had to be high enough to clear the threshold. I taped with painters tape two paint sticks to the bottom of the door to be a spacer and that helped to set the door height. I watched one of Larry's Patreon class videos on the procedure. I sat comfy and watched portions several times and made notes. I would test the remounting another 4 or 5 times remeasuring and thinking about the hinge height and the “built in” drop of the hinge. Over and over I processed all of it in my head.
I had to remove the doorway trim to gain access to the hinge stud to fill the holes as the original screws were badly rusted. One had sheared during disassembly. They had to go.


Toothpicks were tapped in with a hammer and then cut flush with a multitool. The trim was reset and reattached to the hinge stud. I used 1/4" longer screws on the “interior” holes on the hinge stud.

I had initially installed the door trim on three sides only and left the lock side unmounted. This was a wise choice, as I screwed up on mounting the trim the first time. I didn’t have the inside lip of the trim fully flush against the interior wood panel. The result was a door handle latch that wouldn’t engage the strike plate without a firm push on the handle. Curses! I had to remove all the stainless steel nails and trim and start over.
I remount the trim this time with new holes. I do another dry fit and adjust and readjust and draw a pencil line for the hinge in a mock up. I used bar clamps to match and hold the trim to the pencil line with thoughts of doubt still sneaking in.

I do a final nailing of the lock side trim onto the door. Looks good, I think.
One more pencil line check.
I drive a few screws into the hinge post and a few into the door. Looks good I say. I continue to drill holes and gradually drive more screws checking adjustment along the way.
I install the door and close the door.
Well, it closes, so that’s good, but I still have to firmly push the door closed. Better, but I am not happy.
But wait,
I had the rear of the trailer partially supported by screw jacks when I did this operation. I pulled the screw jacks out and you know what? The door closed with a snick. YES! Eureka I found it! Click on the image below for the video that captures the moment.

That relief in pressure when I removed the screw jacks, did the trick. I drove 150 miles to the rally and the door still closes with a snick and the paint stripe lines up, TOO..
Beer me.
In the process, I worked on the door window. The putty tape was scraped, replaced with new putty tape. I cleaned and polished the interior aluminum window trim. The outside frame of the window will remain as it is to better blend with the rest of the trailer exterior at the present time. I should mention: Always insert the aluminum interior window frame trim FIRST into the opening before drilling new screws for the exterior window frame.

This is the before I completed the repair.
This was after I completed the repair.
And finally, here is the finished product all mounted - exterior and interior views of the door. The door lined up exactly as it had before I removed the door. And the stripe is lined up!


Cheers,
Rod
I have been very busy of late. One of the reasons was an ever looming deadline to repair the entry door on my Rod and Reel before a rally this past weekend. Work started 5 months ago and had to be done between family and work. A year ago, the entry door was flapping in the wind when towing because there was no lower frame support inside the door. Rot had taken care of that. Luckily, someone had screwed in the lower trim piece into the skin of the door and that had yet to be lost. I had adorned it with blue painter’s tape as a band-aide. Clearly, the blue tape had reached its limit. It was time to repair. No more bandages.
For the short term, I wedged my ‘57 Westerner entry door into the opening to help keep critters out. I had a “plug” for the opening at the top because the Westerner door was shorter by 5 inches.
This is the before I completed the repair.
The easy part was pulling the door off the hinge. I would worry about how to hang and line up the door later. In a trade, a deal was struck. Trailer buddy Dave rebuilt the door after I pulled it apart. My offer to him was a stove I had from a 1955 Westerner. This will go into his 1942 Silverdome. He would later return the door to me with the skin nailed onto the outside of the door frame as well as the birch panel nailed to the frame.
Here is what the door looked like opened up. Note the missing lower support.
Dave would rebuild the door and add some extra supports into the door that I wanted.
Door frame with insulation
In the meantime, as he reconstructed the internal door frame with 7 year old closed fir lumber I had left over from my ‘57 Westerner floor rebuild, I found a local sheet metal shop to rebuild all the trim around the door as it was falling apart and or splitting. A bit pricey, but worth it in the end.
Here is the trim with a test fit and no nails.
The trim had to be opened up to allow the latch plate to be inset (mortised) into the door as well as be removed for door handle maintenance. In the original door, this was covered up leaving only an opening for the latch to go through. Here is a related thread I started in 2017 that was focused on accessing the latch plate for the door and the confirmation that the trim would have to be replaced. vintagetrailertalk.freeforums.net/thread/8780/66-bargman-handle-stuck-door?page=1&scrollTo=118291 Some things take a while.
For the inside birch wood panel, I chose General Finishes water based dye and clear. I had to decide what color I wanted. I made a test sheet and then applied several clear coats. I chose three different combinations of clear with dye. I settled on the darker rather than trying to match the interior. Now, the door skin is darker than the original color of the paneling. I knew that decision would eventually require a lot more work and refinishing, but I now wanted something “warmer” than the color that was original. The General Finishes dye and clear are very very easy to work with. I used amber dye with 450 Exterior semi gloss clear.
Once the trim was complete, I did some dry fits in the door opening and the fit looked good. But… I was using the original hinge post to support the hinge which meant filling the holes with toothpicks before redrilling and learning to trust that it would hold. And then there was the ever looming thought of, “Can I get this door to hang…evenly?” I was on a float in a Self Doubt Parade. The door has the Rod and Reel stripe painted on it. So, I had to line that up as well. The door had to be high enough to clear the threshold. I taped with painters tape two paint sticks to the bottom of the door to be a spacer and that helped to set the door height. I watched one of Larry's Patreon class videos on the procedure. I sat comfy and watched portions several times and made notes. I would test the remounting another 4 or 5 times remeasuring and thinking about the hinge height and the “built in” drop of the hinge. Over and over I processed all of it in my head.
I had to remove the doorway trim to gain access to the hinge stud to fill the holes as the original screws were badly rusted. One had sheared during disassembly. They had to go.
Toothpicks were tapped in with a hammer and then cut flush with a multitool. The trim was reset and reattached to the hinge stud. I used 1/4" longer screws on the “interior” holes on the hinge stud.
I had initially installed the door trim on three sides only and left the lock side unmounted. This was a wise choice, as I screwed up on mounting the trim the first time. I didn’t have the inside lip of the trim fully flush against the interior wood panel. The result was a door handle latch that wouldn’t engage the strike plate without a firm push on the handle. Curses! I had to remove all the stainless steel nails and trim and start over.
I remount the trim this time with new holes. I do another dry fit and adjust and readjust and draw a pencil line for the hinge in a mock up. I used bar clamps to match and hold the trim to the pencil line with thoughts of doubt still sneaking in.
I do a final nailing of the lock side trim onto the door. Looks good, I think.
One more pencil line check.
I drive a few screws into the hinge post and a few into the door. Looks good I say. I continue to drill holes and gradually drive more screws checking adjustment along the way.
I install the door and close the door.
Well, it closes, so that’s good, but I still have to firmly push the door closed. Better, but I am not happy.
But wait,
I had the rear of the trailer partially supported by screw jacks when I did this operation. I pulled the screw jacks out and you know what? The door closed with a snick. YES! Eureka I found it! Click on the image below for the video that captures the moment.

That relief in pressure when I removed the screw jacks, did the trick. I drove 150 miles to the rally and the door still closes with a snick and the paint stripe lines up, TOO..
Beer me.

In the process, I worked on the door window. The putty tape was scraped, replaced with new putty tape. I cleaned and polished the interior aluminum window trim. The outside frame of the window will remain as it is to better blend with the rest of the trailer exterior at the present time. I should mention: Always insert the aluminum interior window frame trim FIRST into the opening before drilling new screws for the exterior window frame.
This is the before I completed the repair.
This was after I completed the repair.
And finally, here is the finished product all mounted - exterior and interior views of the door. The door lined up exactly as it had before I removed the door. And the stripe is lined up!
Cheers,
Rod


