


Working With Heavy 40 mil Aluminum
Oct 3, 2021 4:34:10 GMT -8
mobiltec, nccamper, and 1 more like this
Post by wisconsinjoe on Oct 3, 2021 4:34:10 GMT -8
Fabricating Heavy Aluminum
As it finally came time for the aluminum skins, I was torn between ordering slick new ones from California or heavy local stuff that I would have to fabricate. I decided to save almost $2,000 (on material and shipping) by doing it myself with the raw materials available locally. That meant I would buy raw material as rough 40 mil aluminum from a local trucking supply business that was sold by the foot from rolls measuring 108 inches wide. The stuff is used mainly for tractor trailer roofs and certainly has some flaws from scratches and other nicks. More about that later when I talk about finishing.
This material has some particular challenges beside the surface imperfections. Its heavy weight makes it more difficult to staple. And there is no way you can use an “S” lock or edge hem because of its thickness. That did not bother me because I am modeling this on the construction method of our old Friendship Vacationaire, which used simple flat overlaps with putty tape and surface screws. I like the industrial look of evenly spaced fasteners.
I carefully figured my needs and ordered 4 separate rolls from which I would have a local sheet metal fabricator cut to exact size (and square) and add in brakes to create the iconic horizontal lines. It was important to have those rolls separate because the largest one weighed about 80 pounds. If I had just one roll, it would have been so heavy that they would have handled it with a Bobcat and probably scratched it more or kinked it. This way everything was moved by hand.
By the third week after delivering to the fabricator (with a set of scale drawings and text narrative), I asked if there was anything I could do to speed along the work. To my surprise and delight the owner asked if I could lend a hand as an assistant. Get to work with these huge machines in a commercial shop? You bet. Over two days and 7 hours of work we positioned these unwieldy sheets that wanted to stay curled in their rolled form onto a cut-off machine, aligning along a fence to keep square. There is something satisfying to step on the pedal trigger switch to power the blade that chops the waste with a resounding thunk.
After that we positioned the pieces to receive brakes on another machine after carefully measuring and marking the 4” spans. It was a good thing I was there because when I saw how little the boss was going to bend the metal, I was able to advise to move to a steeper angle to produce a sharper edge and a “puff-ier” surface when held flat. Incidentally, because the brakes for the side walls were aligned 90 degrees from the roll direction, they served to flatten out the curve from the original roll. The ones that served to cover the lower sections of the roof plane kept their curve, which actually helped to hold the radius when that was strapped on. Finally I packed the trailer in the reverse order of assembly.
 20210804_195443 by Joe Mirenna, on Flickr
 20210831_110631 by Joe Mirenna, on Flickr
 20210831_105917 by Joe Mirenna, on Flickr
Assembly of the Flat Side Pieces
These go on first because the curving roof plane has proud edges that are bent over and secured to the two identical side planes. Hence the visual comparison to the “canned ham” that has grocery store meaning to us older folks.
Back home I started by clamping the first of the lower pieces. I quickly thanked myself for NOT gluing in the foam insulation because by temporarily removing pieces I created a surface to clamp the metal along the “curbing.” My design made it easy to register the pieces. The lower sides aligned with the top of the long horizontal 3 inch wide framing lumber and the upper pieces aligned with the top of the roof. This camper is basically a squared box with 4 different radius curves. A curved top would need careful alignment parallel to the lower pieces, and would need to be trimmed at the top curve. Once a piece was fitted and clamped, it was simple to mark with a sharpie the waste cut-offs at the end, radius, and wheel well. When removed and placed upon a horizontal work surface, those shapes were cut with a metal blade in a jigsaw. The 40 mil aluminum was too heavy to comfortably hand shear cut. There is a slick industrial electric hand tool that I did not have, so I was stuck with the jigsaw. This was NOT fun because the blade kept grabbing in the kerf and shaking everything violently. I learned to clamp the piece flat with the cut edge close to the work table, meaning I had to make several adjustments and re-clampings to complete the cut. Then I filed the sharp edges before final assembly onto the camper.
 20210904_110404 by Joe Mirenna, on Flickr
 20210904_114010 by Joe Mirenna, on Flickr
 20210904_104422 by Joe Mirenna, on Flickr
 20210904_105252 by Joe Mirenna, on Flickr
That went easy because the ¾” stainless steel staples penetrated the single layer of 40 mil aluminum. The lower pieces got a line of staples at both top and bottom because I will use a trim piece at the bottom edge. I did have to first cut out the openings for the fridge vents and shore power electric supply using a scrap plywood template screwed to uncovered framing above.
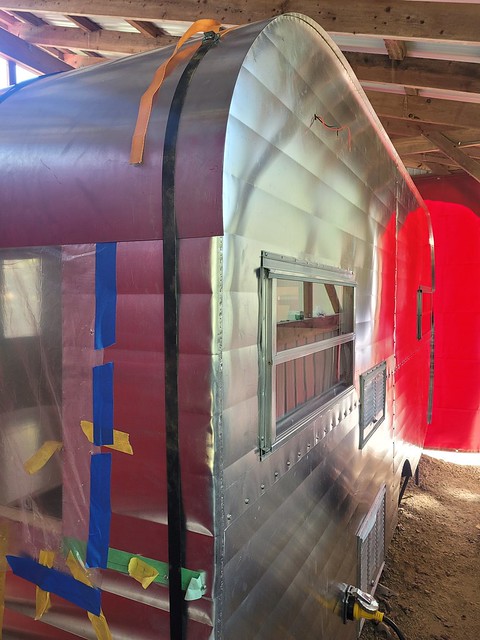
When I got to the upper pieces, I clamped the tops but did not staple in place because there were holes for marker light wiring to be cut later (...again using templates to align the holes precisely). Instead, I screwed in the bottom edge after first laying a line of masking tape, drawing a straight line ½” from the edge (adjustable square as scribe tool), and pre-marking my holes 3 inches on center with a “ruler” I made from scrap wood. Then another line of tape aligned with the bottom of the piece to guide the placement of the putty tape. It was easy to do that because the metal had a natural bend away from the body as it was clamped only at the top and far ends. Once the putty was stuck to the body (the lower piece of skin where it overlapped), the paper backing was pulled off the putty, the screw holes were punched and pre-drilled through both pieces of metal, and screws were driven. By the way, if I had been thinking ahead I would have used temporary regular steel screws instead of my more expensive yet softer finished stainless steel ones. That way I could remove them in stages as I finished the metal later without potentially stripping out the square drive. I did remember to do that on the roof plane pieces that followed.
 20210904_115500 by Joe Mirenna, on Flickr
 20210904_111557 by Joe Mirenna, on Flickr
 20210904_114137 by Joe Mirenna, on Flickr
 20210904_114449 by Joe Mirenna, on Flickr
 20210904_115736 by Joe Mirenna, on Flickr
 20210904_115940 by Joe Mirenna, on Flickr
 20210904_120154 by Joe Mirenna, on Flickr
After the finishing is done later, you can pull out the temporary steel screws and replace with nice new stainless steel ones.
 20210904_122910 by Joe Mirenna, on Flickr
It's a fun task to knife off the protruding butyl.
 20210904_130306 by Joe Mirenna, on Flickr
 20210904_164812 by Joe Mirenna, on Flickr
I cut out the windows as I went along. Using a long ¼” drill bit, I located the corners from inside the camper. I then drew straight lines on the outside to act both as stapling guide and a cutting guide with a jig saw, after first bordering with masking tape to avoid scratches from the saw rubbing on the skin surface. Also, because I wanted to avoid aluminum filings from the saw cut spraying all over my nice near-finished interior, I screwed on inside-mounted frames covered with plastic to catch the mess. I made them deep enough to avoid puncturing the plastic with the jigsaw blade. Now the windows were ready to be put in place with a few screws, held in temporarily until I was ready to add the butyl tape to seal everything up.
 20210908_160326 by Joe Mirenna, on Flickr
 20210908_160405 by Joe Mirenna, on Flickr
 20210908_165341 by Joe Mirenna, on Flickr
Finally, at the completion of the side skin assembly I was able to sit down with a cold refreshing beverage to have a satisfying look at a couple of day’s work.
Assembly of the Roof Plane
The roof plane was only a bit more difficult. The lower pieces go on first and would be overlapped by the final large top piece. For that it is important to hold them tightly against the body to lay flat against the curving plane. It was easy to send four long straps that wrap completely around the camper. I bought some inexpensive trucker straps on Amazon just for this purpose. These are not the ratcheting type, which I don’t like. Rather, they have a simple grabbing mechanism that pulls against itself powerful enough to get the needed snug fit. I use these all the time to hold loads on my truck, from lumber to my canoe.
I used the tape and pre-marking method for the edges that would be screwed. The aluminum was cut a bit oversize so I could trim the overhang accurately. I clamped in place using the straps, which held tightly along the radius curves of the body, making sure to leave between ⅝” to ¾” on one side proud of the side wall. Using an offset marking jig made from scrap wood that would register along the side wall, leaving the proper overhang, the remaining edge was cut using a hand held power metal shear. A great Harbor Freight tool that works well, particularly with mostly straight cuts in flat metal.
These lower (front and back) roof plane pieces went in with staples at the top and screws at the bottom. The overhanging edges were filed smooth and bent flat to the sides by hitting a 4 inch wide piece of scrap plywood with a hammer. I was surprised how well that worked (...again, thank you John Palmer). I started attaching along the straight edges first. This was a problem because the two layers of heavy metal caused about every third staple to fail or jam in the gun. After longer than I would like to admit, I followed my wife’s advice to use nails. One more trip to the building center and I returned with some small 1-¼” painted stainless steel ribbed nails used with cedar shingles. Each was pre-drilled through the two layers of metal. Although slower work, and many broken small drill bits, I liked how solidly those bend-over tabs went in.
The radius curves were not as difficult as I imagined. I first hammered with the wood backer to start the curves. As expected, there was buckling to contend with. I simply cut a small “V” in the metal about ⅜” into the edge with snips, spacing between 8” to 4” depending on the tightness of the radius. That allowed the metal to lay flat once bent and yet still maintain the covered edge over the side walls. I had worried that the metal would not lay flat across the roof plane because there was a slight bowing of the framing from the original attachment of the interior ceiling wood pushing upward. In fact, there was enough worrisome bowing toward the front that I snapped a line and planed it flatter to combat the problem to come. Sure enough, there were places where the metal seemed to have a ¼ inch gap off the side framing. But, that bending technique with the plywood and hammer took care of the problem. Whew!
Finally, the long top roof piece was ready. This one did not have any brakes put in because it would have been unwieldy to do that in the shop. With two buddies helping with the lift, the rolled up piece was put in place and unrolled there. The tendency to maintain the roll shape actually helped keep it in place as it lay against the radius front and back. Because the material is quite stiff, it was simple to manhandle and bang the edges with a wood block to make the proper overlap alignment on one side. Then the straps were put in place to hold everything down and flat. I did not seem to need any lumber pieces between the straps and metal to get it to flatten down over the long straight run. If I had designed the coach with a full curved top (...the “classic” canned ham style), those straps would have carried far more down clamping power.
I started in the middle of the top flat parts where I knew the bend over method would work without complications. I did not fasten the rear and front ends because I worried about the need to keep the flat section fully stretched along its length. I bent only a small section about 8 inches long and attached it with nails. Then, I went to the opposite side to do the same. I continued this way, spreading out toward the outward radius edges, skipping several feet at a time. Once the straight sections were secured, checking that the overlap did not move out of alignment, I made sure the radius parts lay flat against the framing from the strap clamping, using the method of cutting relief Vs where needed to avoid buckling at the bend over.
 20210916_120103 by Joe Mirenna, on Flickr
 20210916_120127 by Joe Mirenna, on Flickr
 20210916_120255 by Joe Mirenna, on Flickr
 20210916_120321 by Joe Mirenna, on Flickr
 20210916_121707 by Joe Mirenna, on Flickr
Before bending over the roof plane, I applied some gutter seal to the staples holding the side panels.
 20210917_143452 by Joe Mirenna, on Flickr
 20210925_091714 by Joe Mirenna, on Flickr
 20210925_091602 by Joe Mirenna, on Flickr
Finally, I attached the leading rear and front edges over a layer of putty tape permanently (...well, with those temporary steel screws to be replaced with stainless steel ones later). Most worrisome task completed.
Quitting time of day: Beer-Thirty.
Finishing That Scruffy Aluminum
This project is really starting to look like a camper now. But what to do about the noticeably ugly stained, scratched, and in some places gouged aluminum? Well, it looked so cool we immediately decided not to paint it. Oh, maybe a cool stripe or two; but that could be some time in the future. In the meantime we wanted to finish it up to look nice. Now this is where the discussion comes in about polishing aluminum. Apparently there is a thing about polishing it to a mirror finish, a completely do-able thing technically speaking. But it is easy to come up with so many arguments against it:
Do I want to spend literally hundreds of hours dedicated to such a tedious and physically demanding task?
Do I want to constantly walk in front of a Fun House mirror to notice some distorted old guy staring back at me?
How many hours of therapeutic massage can I afford?
No, what we wanted was a nice smooth “mill finish,” sort of like the hand buffed steel wool finish on all of the windows and other trim. Is it possible to do in a realistic amount of time and work? If you check YouTube you can find plenty of instructional videos with the mirror finish outcome. One presenter joked that it is “a simple 30 step process” while another estimated it was over 200 hours to polish up an Airstream. I could find very little content to address my query. Instead, I figured it out one mistake at a time, and I’m here to tell what worked best, including a few things to avoid.
 20210926_131717 by Joe Mirenna, on Flickr
 20210926_123544 by Joe Mirenna, on Flickr
First thing is to inspect the worst damage and start sanding with the grit that will take that out. There were several long parallel gouges deep enough to feel blind folded. With a random orbit sander I figured that I could take those out with a random orbit sander at 120 grit. Truthfully though, I should have started with 100 grit and been a bit faster and more successful. Nevertheless, always start with the finest grit that can remove the worst defect. For most of these skins that was 150 grit, and that was the slowest sanding step. That was because you really need to keep your eye on your work, watching for each defect line to disappear. The mildly satisfying part is that you can monitor progress by the white powdery scuffing changing through the grits.
 20210929_132701 by Joe Mirenna, on Flickr
 20210929_142721 by Joe Mirenna, on Flickr
I decided to pull out all of the surface screws for the finishing process. It seemed like the putty tape held everything pretty well. After the finishing/buffing process was done, the screws went back in, with some of them replaced with new because the soft stainless steel got boogered up easily.
The important next steps are to keep sanding passes through the line of grits, including 180, 220, and 320. Each one seemed to take a bit shorter time and amount of effort. When I got to 320, a slight reflection could be seen through the chalky surface. However, it was difficult to remove all of the swirl marks no matter how many times you might pass over or apply different amounts of hand pressure on the sander. I tend to use sandpaper a little longer than I should before switching to a new disk. Generally I used about two disks of each grit per side.
One trick was to use foam “interface pads” that velcro onto your sander, and in turn have a velcro surface to receive your sandpaper. That allows you to “bank” the rotating sanding surface to one side or the other of the slight convex curves of the brake lines. I did not worry at this point about getting all the way into those creases, thus leaving about a quarter inch of untouched aluminum along those straight lines.
I attacked that problem on the next grit and with the next tool. I bought a nice DA (dual action, like random orbit) 6,000 rpm 6-inch sander/polisher from Harbor Freight for about $70 (on sale at $40 for HF “members” with a fee that will probably have expired just a month earlier). I purchased on Amazon some of those inexpensive foam interface pads for this 6-inch machine. I started with 600 grit (...I know, I skipped 400...I was being lazy). Immediately 90% of those swirls got smoothed out. As I sanded, I made sure to run to the creases by tilting the sander surface even steeper. I hit all the easy surfaces first, avoiding the overlap edges, openings, and overlap edges until last because they will get chewed up on the outer edge of the circle of sandpaper.
Then came 800 grit where some of the scratches you thought you took care of at that first laborious sanding at 100 grit miraculously re-appear as fine lines. Will you go back to square one through all the grits to take care of that bad boy? If you are like me you will, for the first one or two, after which you declare yourself a fan of patina.
The bonus of all of these steps is that each one seems to go faster than the previous. Finally onto 1000 grit where you will notice that old guy reflecting back at you. This is where you can stop. Unless you want to polish to mirror, then go to 1200, 1500, and 3,000 grit AND three levels of compound buffing, and probably some more of polishing. No, I’ll stop at 1,000 and do ONE compound buffing.
For that I used the most coarse foam polishing pad for the Harbor Freight DA that was regularly charged with some fairly aggressive compound made by Turtle Wax, most likely the one you can find readily at most hardware stores. The trick is to load the compound in several globs applied with your finger to the middle part of the circular pad. Before turning the machine to its slowest speed, dab blot the aluminum surface a few times over a 5 or 6 square foot of area. Turn on the machine to evenly spread around the paste that will immediately look black (aluminum particles that have already been removed). Then crank her up to full speed and work the pad horizontally along the brake pattern. Stop, re-load, and repeat. It actually goes fairly fast. You’ll be left with a sort of smooth yet darkened (dirty) surface that you will need to clean off. Wiping with water and sponge was inconsistent and made a mess leaving ugly watermarks.
After about an hour of YouTube surfing to find the best product to clean up the compound mess, I finally found a guy who said, “just use mineral spirits,” which not only is the cheapest product but you probably have some lying around. But there is a trick. You need to have a lot of paper towels around. I stuff a full size one in both front and rear pockets, two more in my waist, and one in my hand. I dump a good splash into that one and quickly wipe out 5 or 6 square feet, like the buffing. Make sure you wipe into any cranny, surface edge, and crease. Then before the few seconds you have before the mineral spirits dry (and leave streak marks that are harder to remove), wipe clean with a new paper towel. It will immediately turn black. Don’t try to use a dirty towel to go over a wiped surface. Rather, throw it on the ground and reach for a clean one. Work as fast as possible until you notice an area that you thought you thoroughly cleaned suddenly turns dull. That is the fine film of liquid mineral spirits evaporating.
 20210928_121927 by Joe Mirenna, on Flickr
 20210926_123432 by Joe Mirenna, on Flickr
It's a good idea to mark off and photograph structural framing hidden under the skin. In this case I want to know where I can screw hardware for my rock guard later.
 20210922_164327 by Joe Mirenna, on Flickr
If you want, you can try further buffing, but I didn’t see any real improvement. But, what I did see is the finish I was looking for: even, shiny enough to highlight a dull reflection that splendidly defines the three dimensional effect of curving aluminum. I think Larry calls that the “puff factor."
 20210929_205029 by Joe Mirenna, on Flickr
Although still probably the hardest work yet on the trailer, it seemed worth it. Also at that point you know you are closing in on completion and that somehow makes the suffering tolerable. If this finish stays like this for a few years I’ll be happy. I expect it will oxidize no matter what, but I do plan to always store it under its comfy shed. It’ll probably get most of its use there anyway. It has already turned into my favorite place weekly to play music with my buddy, either out under the covered patio or inside where the acoustics are really cool (probably due to those curved surfaces).
I’m trying to decide on a next step to stabilize or give durability to the finish, possibly wax. I’m not a fan of a “clear coat” that could fail or need renewal in a few years. I never like to have to remove something before I add or repeat something later. If I have to re-buff with compound I’ll try to remember that was actually the easiest step.
Would I use this 40 mil aluminum again? Sure, why not? Yes, it was a little hard to handle and especially to finish. But it really looks cool now. And with that convex surface giving both strength and flexibility combined with the heavy metal, I know it will stand up well against the blows of the road or random attacks of falling branches or even an errant baseball or frisbee. And, I saved maybe $2,000 cash.
I'm happy that this most difficult task is almost complete. It's time to take a little break.
 20210930_115753 by Joe Mirenna, on Flickr
 20210930_150744 by Joe Mirenna, on Flickr
As it finally came time for the aluminum skins, I was torn between ordering slick new ones from California or heavy local stuff that I would have to fabricate. I decided to save almost $2,000 (on material and shipping) by doing it myself with the raw materials available locally. That meant I would buy raw material as rough 40 mil aluminum from a local trucking supply business that was sold by the foot from rolls measuring 108 inches wide. The stuff is used mainly for tractor trailer roofs and certainly has some flaws from scratches and other nicks. More about that later when I talk about finishing.
This material has some particular challenges beside the surface imperfections. Its heavy weight makes it more difficult to staple. And there is no way you can use an “S” lock or edge hem because of its thickness. That did not bother me because I am modeling this on the construction method of our old Friendship Vacationaire, which used simple flat overlaps with putty tape and surface screws. I like the industrial look of evenly spaced fasteners.
I carefully figured my needs and ordered 4 separate rolls from which I would have a local sheet metal fabricator cut to exact size (and square) and add in brakes to create the iconic horizontal lines. It was important to have those rolls separate because the largest one weighed about 80 pounds. If I had just one roll, it would have been so heavy that they would have handled it with a Bobcat and probably scratched it more or kinked it. This way everything was moved by hand.
By the third week after delivering to the fabricator (with a set of scale drawings and text narrative), I asked if there was anything I could do to speed along the work. To my surprise and delight the owner asked if I could lend a hand as an assistant. Get to work with these huge machines in a commercial shop? You bet. Over two days and 7 hours of work we positioned these unwieldy sheets that wanted to stay curled in their rolled form onto a cut-off machine, aligning along a fence to keep square. There is something satisfying to step on the pedal trigger switch to power the blade that chops the waste with a resounding thunk.
After that we positioned the pieces to receive brakes on another machine after carefully measuring and marking the 4” spans. It was a good thing I was there because when I saw how little the boss was going to bend the metal, I was able to advise to move to a steeper angle to produce a sharper edge and a “puff-ier” surface when held flat. Incidentally, because the brakes for the side walls were aligned 90 degrees from the roll direction, they served to flatten out the curve from the original roll. The ones that served to cover the lower sections of the roof plane kept their curve, which actually helped to hold the radius when that was strapped on. Finally I packed the trailer in the reverse order of assembly.
20210804_195443 by Joe Mirenna, on Flickr20210831_110631 by Joe Mirenna, on Flickr20210831_105917 by Joe Mirenna, on FlickrAssembly of the Flat Side Pieces
These go on first because the curving roof plane has proud edges that are bent over and secured to the two identical side planes. Hence the visual comparison to the “canned ham” that has grocery store meaning to us older folks.
Back home I started by clamping the first of the lower pieces. I quickly thanked myself for NOT gluing in the foam insulation because by temporarily removing pieces I created a surface to clamp the metal along the “curbing.” My design made it easy to register the pieces. The lower sides aligned with the top of the long horizontal 3 inch wide framing lumber and the upper pieces aligned with the top of the roof. This camper is basically a squared box with 4 different radius curves. A curved top would need careful alignment parallel to the lower pieces, and would need to be trimmed at the top curve. Once a piece was fitted and clamped, it was simple to mark with a sharpie the waste cut-offs at the end, radius, and wheel well. When removed and placed upon a horizontal work surface, those shapes were cut with a metal blade in a jigsaw. The 40 mil aluminum was too heavy to comfortably hand shear cut. There is a slick industrial electric hand tool that I did not have, so I was stuck with the jigsaw. This was NOT fun because the blade kept grabbing in the kerf and shaking everything violently. I learned to clamp the piece flat with the cut edge close to the work table, meaning I had to make several adjustments and re-clampings to complete the cut. Then I filed the sharp edges before final assembly onto the camper.
20210904_110404 by Joe Mirenna, on Flickr20210904_114010 by Joe Mirenna, on Flickr20210904_104422 by Joe Mirenna, on Flickr20210904_105252 by Joe Mirenna, on FlickrThat went easy because the ¾” stainless steel staples penetrated the single layer of 40 mil aluminum. The lower pieces got a line of staples at both top and bottom because I will use a trim piece at the bottom edge. I did have to first cut out the openings for the fridge vents and shore power electric supply using a scrap plywood template screwed to uncovered framing above.
When I got to the upper pieces, I clamped the tops but did not staple in place because there were holes for marker light wiring to be cut later (...again using templates to align the holes precisely). Instead, I screwed in the bottom edge after first laying a line of masking tape, drawing a straight line ½” from the edge (adjustable square as scribe tool), and pre-marking my holes 3 inches on center with a “ruler” I made from scrap wood. Then another line of tape aligned with the bottom of the piece to guide the placement of the putty tape. It was easy to do that because the metal had a natural bend away from the body as it was clamped only at the top and far ends. Once the putty was stuck to the body (the lower piece of skin where it overlapped), the paper backing was pulled off the putty, the screw holes were punched and pre-drilled through both pieces of metal, and screws were driven. By the way, if I had been thinking ahead I would have used temporary regular steel screws instead of my more expensive yet softer finished stainless steel ones. That way I could remove them in stages as I finished the metal later without potentially stripping out the square drive. I did remember to do that on the roof plane pieces that followed.
20210904_115500 by Joe Mirenna, on Flickr20210904_111557 by Joe Mirenna, on Flickr20210904_114137 by Joe Mirenna, on Flickr20210904_114449 by Joe Mirenna, on Flickr20210904_115736 by Joe Mirenna, on Flickr20210904_115940 by Joe Mirenna, on Flickr20210904_120154 by Joe Mirenna, on FlickrAfter the finishing is done later, you can pull out the temporary steel screws and replace with nice new stainless steel ones.
20210904_122910 by Joe Mirenna, on FlickrIt's a fun task to knife off the protruding butyl.
20210904_130306 by Joe Mirenna, on Flickr20210904_164812 by Joe Mirenna, on FlickrI cut out the windows as I went along. Using a long ¼” drill bit, I located the corners from inside the camper. I then drew straight lines on the outside to act both as stapling guide and a cutting guide with a jig saw, after first bordering with masking tape to avoid scratches from the saw rubbing on the skin surface. Also, because I wanted to avoid aluminum filings from the saw cut spraying all over my nice near-finished interior, I screwed on inside-mounted frames covered with plastic to catch the mess. I made them deep enough to avoid puncturing the plastic with the jigsaw blade. Now the windows were ready to be put in place with a few screws, held in temporarily until I was ready to add the butyl tape to seal everything up.
20210908_160326 by Joe Mirenna, on Flickr20210908_160405 by Joe Mirenna, on Flickr20210908_165341 by Joe Mirenna, on FlickrFinally, at the completion of the side skin assembly I was able to sit down with a cold refreshing beverage to have a satisfying look at a couple of day’s work.
Assembly of the Roof Plane
The roof plane was only a bit more difficult. The lower pieces go on first and would be overlapped by the final large top piece. For that it is important to hold them tightly against the body to lay flat against the curving plane. It was easy to send four long straps that wrap completely around the camper. I bought some inexpensive trucker straps on Amazon just for this purpose. These are not the ratcheting type, which I don’t like. Rather, they have a simple grabbing mechanism that pulls against itself powerful enough to get the needed snug fit. I use these all the time to hold loads on my truck, from lumber to my canoe.
I used the tape and pre-marking method for the edges that would be screwed. The aluminum was cut a bit oversize so I could trim the overhang accurately. I clamped in place using the straps, which held tightly along the radius curves of the body, making sure to leave between ⅝” to ¾” on one side proud of the side wall. Using an offset marking jig made from scrap wood that would register along the side wall, leaving the proper overhang, the remaining edge was cut using a hand held power metal shear. A great Harbor Freight tool that works well, particularly with mostly straight cuts in flat metal.
These lower (front and back) roof plane pieces went in with staples at the top and screws at the bottom. The overhanging edges were filed smooth and bent flat to the sides by hitting a 4 inch wide piece of scrap plywood with a hammer. I was surprised how well that worked (...again, thank you John Palmer). I started attaching along the straight edges first. This was a problem because the two layers of heavy metal caused about every third staple to fail or jam in the gun. After longer than I would like to admit, I followed my wife’s advice to use nails. One more trip to the building center and I returned with some small 1-¼” painted stainless steel ribbed nails used with cedar shingles. Each was pre-drilled through the two layers of metal. Although slower work, and many broken small drill bits, I liked how solidly those bend-over tabs went in.
The radius curves were not as difficult as I imagined. I first hammered with the wood backer to start the curves. As expected, there was buckling to contend with. I simply cut a small “V” in the metal about ⅜” into the edge with snips, spacing between 8” to 4” depending on the tightness of the radius. That allowed the metal to lay flat once bent and yet still maintain the covered edge over the side walls. I had worried that the metal would not lay flat across the roof plane because there was a slight bowing of the framing from the original attachment of the interior ceiling wood pushing upward. In fact, there was enough worrisome bowing toward the front that I snapped a line and planed it flatter to combat the problem to come. Sure enough, there were places where the metal seemed to have a ¼ inch gap off the side framing. But, that bending technique with the plywood and hammer took care of the problem. Whew!
Finally, the long top roof piece was ready. This one did not have any brakes put in because it would have been unwieldy to do that in the shop. With two buddies helping with the lift, the rolled up piece was put in place and unrolled there. The tendency to maintain the roll shape actually helped keep it in place as it lay against the radius front and back. Because the material is quite stiff, it was simple to manhandle and bang the edges with a wood block to make the proper overlap alignment on one side. Then the straps were put in place to hold everything down and flat. I did not seem to need any lumber pieces between the straps and metal to get it to flatten down over the long straight run. If I had designed the coach with a full curved top (...the “classic” canned ham style), those straps would have carried far more down clamping power.
I started in the middle of the top flat parts where I knew the bend over method would work without complications. I did not fasten the rear and front ends because I worried about the need to keep the flat section fully stretched along its length. I bent only a small section about 8 inches long and attached it with nails. Then, I went to the opposite side to do the same. I continued this way, spreading out toward the outward radius edges, skipping several feet at a time. Once the straight sections were secured, checking that the overlap did not move out of alignment, I made sure the radius parts lay flat against the framing from the strap clamping, using the method of cutting relief Vs where needed to avoid buckling at the bend over.
20210916_120103 by Joe Mirenna, on Flickr20210916_120127 by Joe Mirenna, on Flickr20210916_120255 by Joe Mirenna, on Flickr20210916_120321 by Joe Mirenna, on Flickr20210916_121707 by Joe Mirenna, on FlickrBefore bending over the roof plane, I applied some gutter seal to the staples holding the side panels.
20210917_143452 by Joe Mirenna, on Flickr20210925_091714 by Joe Mirenna, on Flickr20210925_091602 by Joe Mirenna, on FlickrFinally, I attached the leading rear and front edges over a layer of putty tape permanently (...well, with those temporary steel screws to be replaced with stainless steel ones later). Most worrisome task completed.
Quitting time of day: Beer-Thirty.
Finishing That Scruffy Aluminum
This project is really starting to look like a camper now. But what to do about the noticeably ugly stained, scratched, and in some places gouged aluminum? Well, it looked so cool we immediately decided not to paint it. Oh, maybe a cool stripe or two; but that could be some time in the future. In the meantime we wanted to finish it up to look nice. Now this is where the discussion comes in about polishing aluminum. Apparently there is a thing about polishing it to a mirror finish, a completely do-able thing technically speaking. But it is easy to come up with so many arguments against it:
Do I want to spend literally hundreds of hours dedicated to such a tedious and physically demanding task?
Do I want to constantly walk in front of a Fun House mirror to notice some distorted old guy staring back at me?
How many hours of therapeutic massage can I afford?
No, what we wanted was a nice smooth “mill finish,” sort of like the hand buffed steel wool finish on all of the windows and other trim. Is it possible to do in a realistic amount of time and work? If you check YouTube you can find plenty of instructional videos with the mirror finish outcome. One presenter joked that it is “a simple 30 step process” while another estimated it was over 200 hours to polish up an Airstream. I could find very little content to address my query. Instead, I figured it out one mistake at a time, and I’m here to tell what worked best, including a few things to avoid.
20210926_131717 by Joe Mirenna, on Flickr20210926_123544 by Joe Mirenna, on FlickrFirst thing is to inspect the worst damage and start sanding with the grit that will take that out. There were several long parallel gouges deep enough to feel blind folded. With a random orbit sander I figured that I could take those out with a random orbit sander at 120 grit. Truthfully though, I should have started with 100 grit and been a bit faster and more successful. Nevertheless, always start with the finest grit that can remove the worst defect. For most of these skins that was 150 grit, and that was the slowest sanding step. That was because you really need to keep your eye on your work, watching for each defect line to disappear. The mildly satisfying part is that you can monitor progress by the white powdery scuffing changing through the grits.
20210929_132701 by Joe Mirenna, on Flickr20210929_142721 by Joe Mirenna, on FlickrI decided to pull out all of the surface screws for the finishing process. It seemed like the putty tape held everything pretty well. After the finishing/buffing process was done, the screws went back in, with some of them replaced with new because the soft stainless steel got boogered up easily.
The important next steps are to keep sanding passes through the line of grits, including 180, 220, and 320. Each one seemed to take a bit shorter time and amount of effort. When I got to 320, a slight reflection could be seen through the chalky surface. However, it was difficult to remove all of the swirl marks no matter how many times you might pass over or apply different amounts of hand pressure on the sander. I tend to use sandpaper a little longer than I should before switching to a new disk. Generally I used about two disks of each grit per side.
One trick was to use foam “interface pads” that velcro onto your sander, and in turn have a velcro surface to receive your sandpaper. That allows you to “bank” the rotating sanding surface to one side or the other of the slight convex curves of the brake lines. I did not worry at this point about getting all the way into those creases, thus leaving about a quarter inch of untouched aluminum along those straight lines.
I attacked that problem on the next grit and with the next tool. I bought a nice DA (dual action, like random orbit) 6,000 rpm 6-inch sander/polisher from Harbor Freight for about $70 (on sale at $40 for HF “members” with a fee that will probably have expired just a month earlier). I purchased on Amazon some of those inexpensive foam interface pads for this 6-inch machine. I started with 600 grit (...I know, I skipped 400...I was being lazy). Immediately 90% of those swirls got smoothed out. As I sanded, I made sure to run to the creases by tilting the sander surface even steeper. I hit all the easy surfaces first, avoiding the overlap edges, openings, and overlap edges until last because they will get chewed up on the outer edge of the circle of sandpaper.
Then came 800 grit where some of the scratches you thought you took care of at that first laborious sanding at 100 grit miraculously re-appear as fine lines. Will you go back to square one through all the grits to take care of that bad boy? If you are like me you will, for the first one or two, after which you declare yourself a fan of patina.
The bonus of all of these steps is that each one seems to go faster than the previous. Finally onto 1000 grit where you will notice that old guy reflecting back at you. This is where you can stop. Unless you want to polish to mirror, then go to 1200, 1500, and 3,000 grit AND three levels of compound buffing, and probably some more of polishing. No, I’ll stop at 1,000 and do ONE compound buffing.
For that I used the most coarse foam polishing pad for the Harbor Freight DA that was regularly charged with some fairly aggressive compound made by Turtle Wax, most likely the one you can find readily at most hardware stores. The trick is to load the compound in several globs applied with your finger to the middle part of the circular pad. Before turning the machine to its slowest speed, dab blot the aluminum surface a few times over a 5 or 6 square foot of area. Turn on the machine to evenly spread around the paste that will immediately look black (aluminum particles that have already been removed). Then crank her up to full speed and work the pad horizontally along the brake pattern. Stop, re-load, and repeat. It actually goes fairly fast. You’ll be left with a sort of smooth yet darkened (dirty) surface that you will need to clean off. Wiping with water and sponge was inconsistent and made a mess leaving ugly watermarks.
After about an hour of YouTube surfing to find the best product to clean up the compound mess, I finally found a guy who said, “just use mineral spirits,” which not only is the cheapest product but you probably have some lying around. But there is a trick. You need to have a lot of paper towels around. I stuff a full size one in both front and rear pockets, two more in my waist, and one in my hand. I dump a good splash into that one and quickly wipe out 5 or 6 square feet, like the buffing. Make sure you wipe into any cranny, surface edge, and crease. Then before the few seconds you have before the mineral spirits dry (and leave streak marks that are harder to remove), wipe clean with a new paper towel. It will immediately turn black. Don’t try to use a dirty towel to go over a wiped surface. Rather, throw it on the ground and reach for a clean one. Work as fast as possible until you notice an area that you thought you thoroughly cleaned suddenly turns dull. That is the fine film of liquid mineral spirits evaporating.
20210928_121927 by Joe Mirenna, on Flickr20210926_123432 by Joe Mirenna, on FlickrIt's a good idea to mark off and photograph structural framing hidden under the skin. In this case I want to know where I can screw hardware for my rock guard later.
20210922_164327 by Joe Mirenna, on FlickrIf you want, you can try further buffing, but I didn’t see any real improvement. But, what I did see is the finish I was looking for: even, shiny enough to highlight a dull reflection that splendidly defines the three dimensional effect of curving aluminum. I think Larry calls that the “puff factor."
20210929_205029 by Joe Mirenna, on FlickrAlthough still probably the hardest work yet on the trailer, it seemed worth it. Also at that point you know you are closing in on completion and that somehow makes the suffering tolerable. If this finish stays like this for a few years I’ll be happy. I expect it will oxidize no matter what, but I do plan to always store it under its comfy shed. It’ll probably get most of its use there anyway. It has already turned into my favorite place weekly to play music with my buddy, either out under the covered patio or inside where the acoustics are really cool (probably due to those curved surfaces).
I’m trying to decide on a next step to stabilize or give durability to the finish, possibly wax. I’m not a fan of a “clear coat” that could fail or need renewal in a few years. I never like to have to remove something before I add or repeat something later. If I have to re-buff with compound I’ll try to remember that was actually the easiest step.
Would I use this 40 mil aluminum again? Sure, why not? Yes, it was a little hard to handle and especially to finish. But it really looks cool now. And with that convex surface giving both strength and flexibility combined with the heavy metal, I know it will stand up well against the blows of the road or random attacks of falling branches or even an errant baseball or frisbee. And, I saved maybe $2,000 cash.
I'm happy that this most difficult task is almost complete. It's time to take a little break.
20210930_115753 by Joe Mirenna, on Flickr20210930_150744 by Joe Mirenna, on Flickr/Campers/67%20Shasta?preview=2019-02-03+18.01.00.jpg)


