|
|
Post by vikx on Feb 22, 2021 15:39:36 GMT -8
I totally agree on a porta potti! The Thetford curve is very popular, but is HEAVY to dump. Unless there are strong arms to carry it, I suggest a smaller holding tank and more frequent dumps..
|
|
|
|
Post by Teachndad on Feb 22, 2021 21:09:49 GMT -8
Ohh Poop! No pun intended. I thought the Thetford curve was great according to the many posts here at VTT. Vikx has dumped my vision of the Thetford Curve. This is the first I had heard it was heavy to empty.
I have experience with one of the smaller boxier Thetfords. It's a bit short. I recommend something a little taller because you need to get up off the seat. The taller it is the less you feel like you are in nature. Make sure you get one with a floor mount.
The Thetford boxier models separate in the middle so when you purge the waste, you just carry the lower half away and leave the top half with the fresh water for flushing. That reduces the weight of your black water when you need to empty it.
Rod
|
|
|
|
Post by vikx on Feb 22, 2021 21:39:20 GMT -8
I've heard from the owners of the curve; never tried one myself. I say build a platform to set the lower boxier potties on and get comfy. We have always tried to be sparing on the potti; no poop, just pee.
Think about it: 5 gallons weighs 40 pounds...almost a sloshy sack of feed.
|
|
Hamlet
2K Member

Posts: 2,819 
Likes: 925
Currently Offline
|
Post by Hamlet on Feb 24, 2021 10:02:21 GMT -8
We have a boxy Thetford potty and it is easy to empty and clean. When we turned Hamlet’s closet into a wet room, the shower pan we bought had an area on one end that’s raised several inches, making it easy to get up and down. We have found that the weight of the unit, even when empty is enough to keep it from sliding around while traveling. We also keep a couple folding chairs, a folding table and the portable gray water tank in there when we’re traveling, so even if it did shift, there wouldn’t be anywhere for it to go.
One thing I don’t know is whether the boxy model is still available.
|
|
pdalber
Junior Member

Posts: 75
Likes: 37
Currently Offline
|
Post by pdalber on Feb 28, 2021 15:11:02 GMT -8
Weekend update - I made significant progress on the trailer project this weekend. After a trip to the lumber yard, and multiple trips to HD, I got to work on the floor. As with the rest of the build, I want stick to the original design, but with a some upgrades and modern materials. The original floor consisted of fiberboard-type paneling on the bottom, 2x2 framing with fiberglass insulation in the middle, and 5/8" plywood on top. I started by building the framing. I went with 2x3" lumber for increased strength and so I would have a little more room for glue and screws where the panels butted up against one another. After everything was squared up, I glued and stapled 3/16" masonite to the framing, then coated everything with fence post paint. 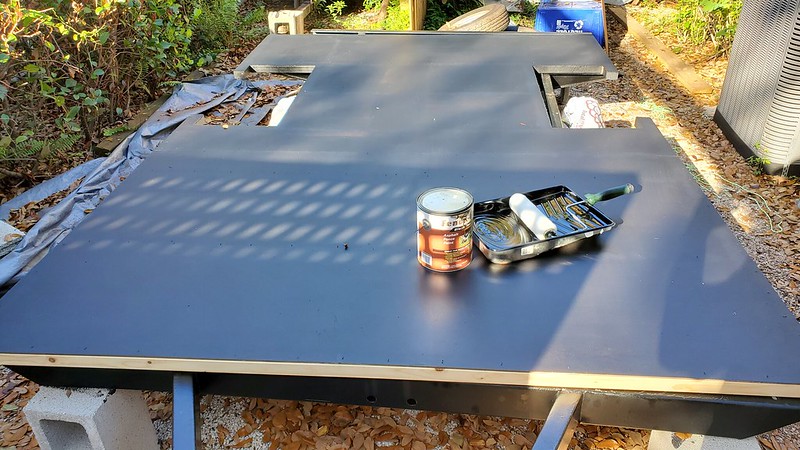 Once the paint had dried, I flipped the whole thing over and filled in the spaces between the framing with 1" rigid insulation.   Finally, I glued and screwed 3/4" marine plywood to the top. When installing the plywood, I made sure I had a square corner on the panel, lined it up along the edges of the framing, then used a track saw to cut along the other edge. The saw was quite possibly my best-ever Craigslist purchase. It's like having a portable table saw - nice, straight, and accurate cuts.   I used a jig saw to cut away most of the material in the wheel well area and then cleaned up the edges with a flush trim bit on my router. I had hoped to attach the wheel wells, but I ran out of steam.  The finished product is slightly thicker than the original, but we will be installing new skin, so the extra height won't be a problem. Now I just need the interior designer (my wife) to decide on flooring. |
|
|
|
Post by Teachndad on Mar 1, 2021 22:47:47 GMT -8
Lookin really good!
A track saw? Never seen one of those. I am really liking it!
Rod
|
|
pdalber
Junior Member
Posts: 75
Likes: 37
Currently Offline
|
Post by pdalber on Mar 14, 2021 18:18:26 GMT -8
It's been slow goinig on the Frolic lately, but progress is being made. I built the dinette seats and a new step was welded in place. The seats were made with 1"x2" framing with 1/4" birch on the front and 3/4" birch on top. I used maple to trim the front edge of the seat and I'll be adding a strip of maple to support the table (when the dinette is used as a bed). 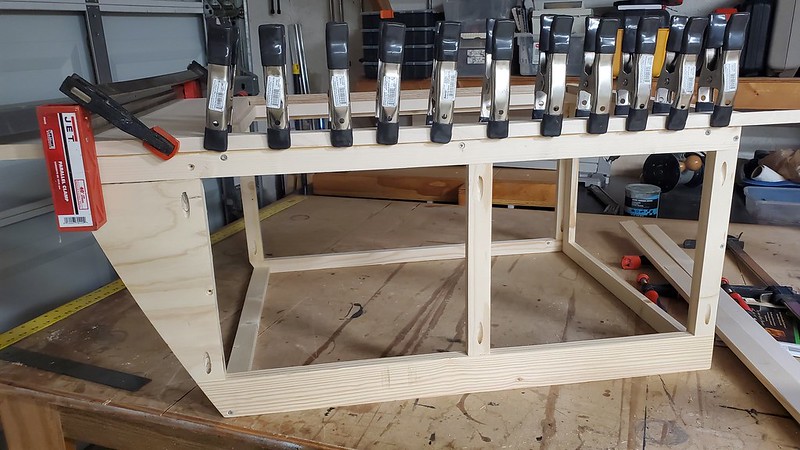 The ends will be finished off with a piece of birch plywood and aluminum trim.  I was able to cut the door into the top using a thin kerf blade on my table saw and finishing the cut in the corners with a jig saw. Birch edge banding helped tighten up the fit (and also made it look nice). 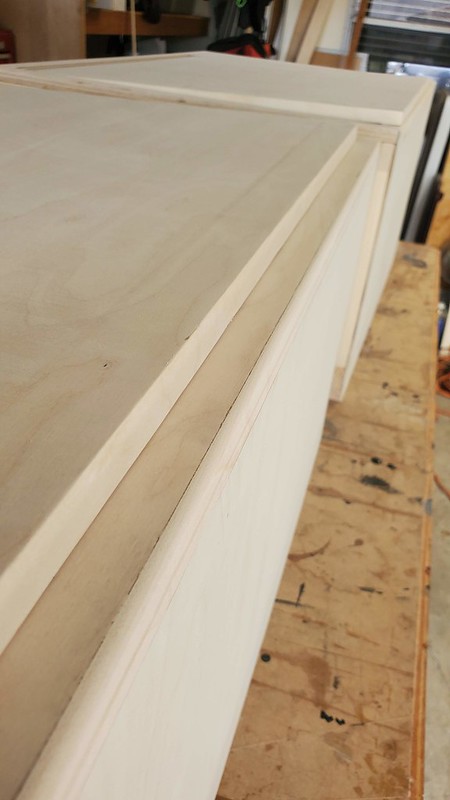 The original step was damaged beyond repair, so a new one was installed.    |
|
|
|
Post by vikx on Mar 14, 2021 20:00:34 GMT -8
Lookin' Good! I hope you are not working in flip flops...
|
|
WhitneyK
Active Member
Posts: 492
Likes: 169
'67 Shasta Compact
Currently Offline
|
Post by WhitneyK on Mar 16, 2021 16:31:06 GMT -8
Lookin' Good! I hope you are not working in flip flops... Looked like it to me... |
|
|
|
Post by vikx on Mar 16, 2021 20:36:41 GMT -8
We are used to seeing feet around here.
|
|
pdalber
Junior Member
Posts: 75
Likes: 37
Currently Offline
|
Post by pdalber on Mar 21, 2021 12:22:39 GMT -8
|
|
|
|
Post by Teachndad on Mar 26, 2021 4:47:53 GMT -8
That is some REALLY REALLY NICE WORK! You are making great progress!
I envy your skills. It's coming along swimmingly. Thanks for the detailed photos of how to's.
Were did you get the thin bendy plywood?
Rod
|
|
pdalber
Junior Member
Posts: 75
Likes: 37
Currently Offline
|
Post by pdalber on Mar 29, 2021 4:28:34 GMT -8
Thank you so much! I found the bendy plywood at a local specialty lumber yard that carries products for boat builders. It was a bit more than I wanted to spend, but it came out really nice. The bigger challenge has been finding 1/8" bending birch for the roof. I called all over S Florida looking for a source before finding a cabinet shop about an hour away that could order it. I hope to pick it up Friday.
|
|
|
|
Post by Teachndad on Mar 30, 2021 7:16:14 GMT -8
Glad you found the bendy birch.
So, were the strips of bendy plwood for the kerbing all pre-cut? At first, I thought you ripped them all, but now that you mention the boat building, I wondered if they were pre cut as it looks like what you would find in a self built canoe or boat. I expect Kirkadie to comment, now. He's a veteran boat builder.
Cheers,
Rod
|
|
pdalber
Junior Member
Posts: 75
Likes: 37
Currently Offline
|
Post by pdalber on Mar 31, 2021 17:37:49 GMT -8
No. I ripped them on my table saw. I needed help through - it wasn't easy holding that stuff straight and steady!
|
|


/Campers/67%20Shasta?preview=2019-02-03+18.01.00.jpg)


