


Post by wisconsinjoe on Oct 12, 2020 7:23:33 GMT -8
I know this is a controversial subject, so I thought I'd share my experiences here. Several skilled masters in this forum have recommended NOT doing this. I've come to find that in some ways their warning were correct. However, I think I found how to mitigate the problems.
First, I want to say how much I appreciate the wisdom, experience, and kindness in sharing that I've received from so many of these forum members. Although I've never met anyone (..except fellow Friendship Vacationaire owner Martha), I feel a kinship and warmth to all.
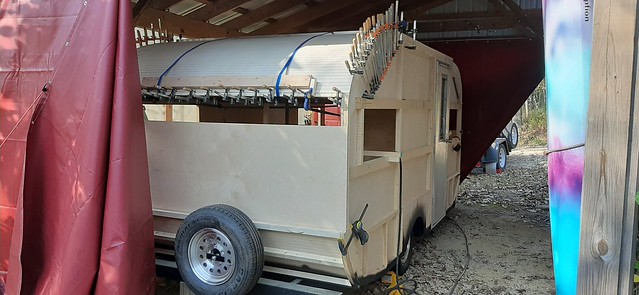
I also understand that I'm sort of an anomaly in that I'm not "restoring" but "building from scratch." With that in mind, I am attempting to use traditional methods but with an update on materials. I realize that our beloved hobby is based in a great blossoming of a cottage industry, where moms and pops started building travel trailers so Americans could travel as families affordably to see our beautiful country. In my opinion, sometimes quality was sacrificed in order to produce an affordable product, and I don't blame anyone for that. On the other hand, if there were more modern materials easily and affordably available, I bet they would have been used.
As example, our Friendship Vacaionaire skimped on siding (using exposed screws rather than Pittsburgh joints), flat laid 1x3 rafters (sort of inexcusable), and off the shelf wood paneling (the kind our basements were covered with). I think they were able to bend those panels because they were kerfed by design on the finished side to mimic vertical boards. And they came prefinished. Sort of brilliant.
Because I could not find similar paneling, I searched for an alternative because the one thing I did NOT want to do was hand finish about 16 sheets of paneling. I know there is nothing like that hand applied shellac finish, but I was looking for ways to modern up the appearance of this new build, and I dreaded the long task of hand finishing with either shellac or poly.
Then I came upon this pre-finished 3-ply birch plywood. It seems to be an industrial product used in the cabinet and drawer making industry. I got my first batch from my hardwood lumber supplier, and then discovered that Menards carries the identical product in quarter, half-inch, and three-quarter-inch sheets. They seem very solid and the most flat sheet goods (that are not MDF) that I've ever seen. I did not find a single void in the middle layer with any of my cuts.
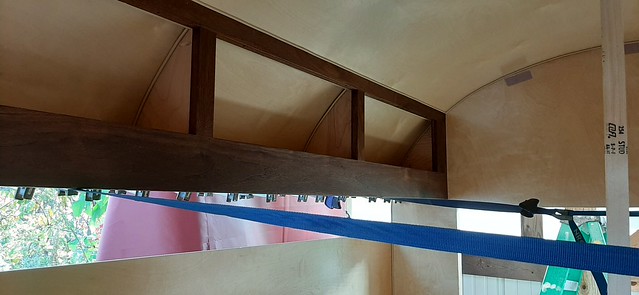
So, onto kerfing. I think the only way to succeed is to use a track saw because it is imperative to have a precise depth of cut. For this 5 mm sheet, I set my depth just about 3 mm. That meant that the entire outer finished birch veneer was intact, while only a thin layer of the opposing direction center layer remained (which is important to hold the finished layer from splitting at the cut). My first pieces for the bottom front and rear were kerfed at 1" increments for the entire section of curved areas.
When I got to the top where much of the curve is quite gradual, I attempted to space some of the kerfs at 7 inches apart. And there was the problem. It was at that point where I experienced some cracking on the back side and produced one noticeable stress line on the inside finished side. I'm not happy about it, but I'll be able to disguise that in further finish work. But, seeing this problem, I went back and added more kerfing (on 1" centers) to the remaining sheet going over the bed area. Result: no problem. bent with no cracking, relatively smooth interior bend. In raking light, you can notice slight faceting of those 1" sections, but mostly unnoticeable.
So, if you want to attempt this, make sure you keep all curves kerfed evenly and close, and control your depth with a track saw. BTW, I've since learned that some of the commercial tear drop camper companies use a sheet good that is birch veneer bonded to a bendable plastic layer that completely solves this problem. Wish it was available to the general public. If I ever do another one of these rigs, I'm definitely going to look for it. But if I have to kerf, I'd do it again.
Here I'm adding more regular kerfing after finding that irregular sectioning will fail.
 20201011_124029 by Joe Mirenna, on Flickr
Yep, you need a bunch of clamps. But it does make a nice curved interior. And that full 5 mm ceiling is amazingly stiff at the curved sections. And it hasn't even yet been fastened to the rafters (with small stainless steel screws, like Vikx suggests).
 20201011_154629 by Joe Mirenna, on Flickr
 20201011_154646 by Joe Mirenna, on Flickr
First, I want to say how much I appreciate the wisdom, experience, and kindness in sharing that I've received from so many of these forum members. Although I've never met anyone (..except fellow Friendship Vacationaire owner Martha), I feel a kinship and warmth to all.
I also understand that I'm sort of an anomaly in that I'm not "restoring" but "building from scratch." With that in mind, I am attempting to use traditional methods but with an update on materials. I realize that our beloved hobby is based in a great blossoming of a cottage industry, where moms and pops started building travel trailers so Americans could travel as families affordably to see our beautiful country. In my opinion, sometimes quality was sacrificed in order to produce an affordable product, and I don't blame anyone for that. On the other hand, if there were more modern materials easily and affordably available, I bet they would have been used.
As example, our Friendship Vacaionaire skimped on siding (using exposed screws rather than Pittsburgh joints), flat laid 1x3 rafters (sort of inexcusable), and off the shelf wood paneling (the kind our basements were covered with). I think they were able to bend those panels because they were kerfed by design on the finished side to mimic vertical boards. And they came prefinished. Sort of brilliant.
Because I could not find similar paneling, I searched for an alternative because the one thing I did NOT want to do was hand finish about 16 sheets of paneling. I know there is nothing like that hand applied shellac finish, but I was looking for ways to modern up the appearance of this new build, and I dreaded the long task of hand finishing with either shellac or poly.
Then I came upon this pre-finished 3-ply birch plywood. It seems to be an industrial product used in the cabinet and drawer making industry. I got my first batch from my hardwood lumber supplier, and then discovered that Menards carries the identical product in quarter, half-inch, and three-quarter-inch sheets. They seem very solid and the most flat sheet goods (that are not MDF) that I've ever seen. I did not find a single void in the middle layer with any of my cuts.
So, onto kerfing. I think the only way to succeed is to use a track saw because it is imperative to have a precise depth of cut. For this 5 mm sheet, I set my depth just about 3 mm. That meant that the entire outer finished birch veneer was intact, while only a thin layer of the opposing direction center layer remained (which is important to hold the finished layer from splitting at the cut). My first pieces for the bottom front and rear were kerfed at 1" increments for the entire section of curved areas.
When I got to the top where much of the curve is quite gradual, I attempted to space some of the kerfs at 7 inches apart. And there was the problem. It was at that point where I experienced some cracking on the back side and produced one noticeable stress line on the inside finished side. I'm not happy about it, but I'll be able to disguise that in further finish work. But, seeing this problem, I went back and added more kerfing (on 1" centers) to the remaining sheet going over the bed area. Result: no problem. bent with no cracking, relatively smooth interior bend. In raking light, you can notice slight faceting of those 1" sections, but mostly unnoticeable.
So, if you want to attempt this, make sure you keep all curves kerfed evenly and close, and control your depth with a track saw. BTW, I've since learned that some of the commercial tear drop camper companies use a sheet good that is birch veneer bonded to a bendable plastic layer that completely solves this problem. Wish it was available to the general public. If I ever do another one of these rigs, I'm definitely going to look for it. But if I have to kerf, I'd do it again.
Here I'm adding more regular kerfing after finding that irregular sectioning will fail.
20201011_124029 by Joe Mirenna, on FlickrYep, you need a bunch of clamps. But it does make a nice curved interior. And that full 5 mm ceiling is amazingly stiff at the curved sections. And it hasn't even yet been fastened to the rafters (with small stainless steel screws, like Vikx suggests).
20201011_154629 by Joe Mirenna, on Flickr20201011_154646 by Joe Mirenna, on Flickr


