|
|
Post by wisconsinjoe on Jul 29, 2020 6:56:43 GMT -8
How are the skins attached at the bottom near the floor? I having new 0.40 aluminum made. Is there a particular starting strip (like for house vinyl siding) with a hem bend on the bottom? Is it ever just stapled and then covered with an aluminum trim piece?
|
|
datac
Active Member

Posts: 339 
Likes: 170
1957 Cardinal
Currently Offline
|
Post by datac on Jul 29, 2020 7:05:32 GMT -8
Yes and yes, depending on the trailer. Many trailers are just hammered over and stapled with no trim piece, usually over a piece of flashing stapled to the bottom.
|
|
|
|
Post by wisconsinjoe on Jul 29, 2020 7:42:00 GMT -8
Yes and yes, depending on the trailer. Many trailers are just hammered over and stapled with no trim piece, usually over a piece of flashing stapled to the bottom. Not a fan of bending and stapling. A good place for water to sit and rot wood. On the camper that I demolished, the worst rot was where there was flashing between the outside and wood. |
|
nccamper
Administrator 
Posts: 7,743
Likes: 2,871
1962 Forester- 1956 Shasta
Currently Offline
|
Post by nccamper on Jul 29, 2020 7:47:07 GMT -8
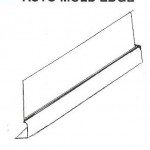
So they are making the siding without the AutoRoll at the bottom? |
|
|
|
Post by Teachndad on Jul 29, 2020 22:37:31 GMT -8
Hi Friends,
My 57 Westerner did not have the auto roll at the bottom sides of the trailer. It's as others have described. On the SIDES only, the skin is bent over the bottom of the floor stringer. The skin at the wheel wells is trimmed and was not bent over. There, the edge was finished off with aluminum trim like what you see around the edge of a table in a vintage trailer. If you want, my skins are off and I can take a picture of that part of the skin, but not until August 1 when I am back home. Lemme know if you want to see. Just tossing that out there.
Someone answer NCCampers question.
Rod
|
|
Getnold
Active Member
Posts: 142 
Likes: 78
1957 Westerner Pony Express
Currently Offline
|
Post by Getnold on Jul 30, 2020 4:16:33 GMT -8
I just received my aluminum from Hemet not too long ago and it had the autoroll but I cut it off. He could have done the skin without the autoroll but he really pushed me to get it so I did. My trailer was slightly out of square so it made using the autoroll at front and back difficult. It was so much easier to deal with without it. I started with the top piece of roof and made sure it landed at a spot on both front and rear windows that made sense. Then I cut the front to size, slipped it into the S lock, cut out the slots at the bottom for the metal frame and attached the skin to a 1x4 that I had attached across the bottom of the floor with screws. Basically did the same at the back. Turned out ok I think. I did it this way at Vik's advice btw. Perhaps she can explain better than I.
|
|
Getnold
Active Member
Posts: 142
Likes: 78
1957 Westerner Pony Express
Currently Offline
|
Post by Getnold on Jul 30, 2020 4:41:10 GMT -8
Here are a couple photos showing what I did. I painted the board that the skin is attached to (and the bottom of the floor for that matter) with primer and marine grade paint to help protect it. You can make it out in a pic or two. Btw, not sure you have to have that board but my floor in the Westerner is only 1/2 inch marine grade plywood and I needed more wood in the front and back for stronger attachment points. Good luck!  20200717_145836 20200717_145836 by  20200717_145817 20200717_145817 by  20200717_145906 20200717_145906 by  20200717_165242 20200717_165242 by
|
|
|
|
Post by vikx on Jul 30, 2020 10:37:33 GMT -8
Getnold's pictures and info are wonderful examples of how one has to compromise and go with the flow when building a trailer. Nothing is really exact; a person has to "make it work" by trimming, adjusting, modifying and plain ol' american ingenuity.
There's not often a perfect build without a little tweaking. Do it as the trailer tells you to. Make it strong and sturdy to last. Don't sweat the small stuff-we all do things a little differently.
I enjoy the differences and learn what to do and what I don't want to do...
|
|