sprinkles
New Member
Posts: 16
Currently Offline
|
Post by sprinkles on Jun 6, 2020 16:24:25 GMT -8
Hi there! We just finished demo'ing our 1966 Shasta Compact! Actually, it was already half demoed - we just removed a couple of walls, the kitchen cabinets and the floor. Now that we can see the frame completely, it looks like one part of it was cut out or somehow damaged. It looks like something happened on that side of the trailer at some point, as it was reinforced with metal flashing and several wood 2x3s placed together between the framing (the pics tell the full story). Our question is - does it look like the frame structure, even with this "cut" in the frame, is okay to support the new floor joists we'll put in? Our next step is to remove the rust from the frame, but we'd like to determine if the frame needs additional work before taking that step. Also, you'll see that a "box" was framed out in the center of the subfloor- what purpose does this serve, if any? We're trying to figure out why it was there in the first place. Thanks for chiming in! 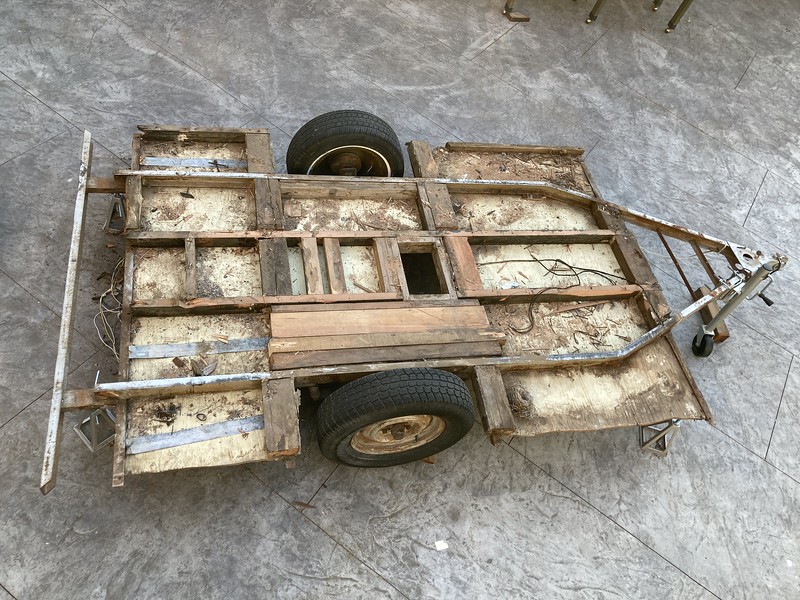 Wood 2x3s Placed on Subfloor, Rotated Wood 2x3s Placed on Subfloor, Rotated by Sprinkles The Shasta, on Flickr  Trailer Bed Exposed, Rotated Trailer Bed Exposed, Rotated by Sprinkles The Shasta, on Flickr  Shasta Compact Trailer Bed Notch in Metal Shasta Compact Trailer Bed Notch in Metal by Sprinkles The Shasta, on Flickr 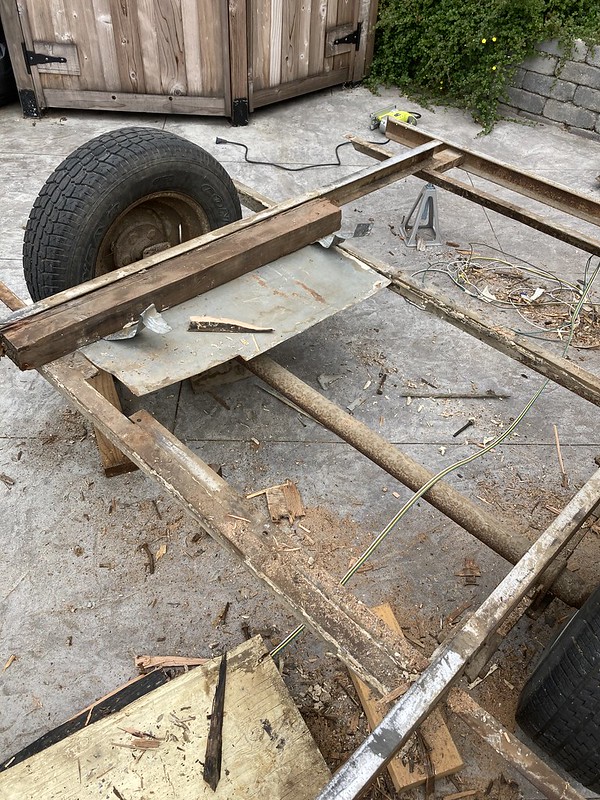 Shasta Compact Trailer Bed- With Aluminum Flashing Attached Shasta Compact Trailer Bed- With Aluminum Flashing Attached by Sprinkles The Shasta, on Flickr |
|
|
|
Post by vikx on Jun 6, 2020 21:24:02 GMT -8
The box is probably framing for a floor furnace. The aluminum may have been a shield for the exhaust heat. Shastas normally didn't have double frame members, so one may have been added (with the cut out). That may have been extra support.
|
|
|
|
Post by Teachndad on Jun 7, 2020 6:09:41 GMT -8
 PO fixes amaze me. What were they thinking? This is a 60's trailer with a floor furnace. My guess is that the floor furnace was added later after being pilfered from some 50's trailer. The "stacked lumber" where it's placed makes no sense to me. That's usually the location of the wardrobe. But after researching on the web, Shasta compacts don't have a wardrobe there. My guess is that the wood was a lazy fix to support the floor right there in case someone didn't want to walk over the floor furnace when it was on. So, they walked around it to the left to get to the bed?? You can clamp a sheet of plywood matching the thickness of the original floor and then walk on it to measure the degree of floor flex there. Looks like someone added a belly pan to encapsulate insulation. Why those strips of alluminum? This is Conundrum City.  As to where the stacked lumber is, you could add some wood crossmembers there just to reinforce the floor. The below image comes from Shasta Tom's restoration thread of his 1957 Shasta. vintagetrailertalk.freeforums.net/thread/10939/1957-shasta-1500-project-year?page=3 Notice the three longer floor stringers that he added to support the floor. Maybe consider that kind of support for the floor.  20200524_180043 20200524_180043 by Tom Ress, on Flickr As to the reinforced steel outrigger that spans that gap in your Shasta, does the reinforcement angle iron go under the C -channel where it's welded or do the ends stop at the C-Channel for the frame. Can you show another picture of the underside where the reinforced steel crossmember meets the C- Channel? I am not the most used tool in the shed, and there are more folks on this forum with far more experience than I, but I would think that if the reinforced angle iron cross member is under the C- Channel like the original, then you would be okay to leave it as is. I would check all the welds for cracks though. If however, the reinforced steel crossmember only meets the C- Channel, that could be a problem. Cool project. Rod
|
|
|
|
Post by vikx on Jun 7, 2020 10:05:32 GMT -8
The floor furnace could easily have been an original "option". They were still being used into the early 70s, so it's very hard to tell whether it was added later or not. The furnaces worked well but sometimes attracted critters thru the exhaust.
|
|
sprinkles
New Member
Posts: 16
Currently Offline
|
Post by sprinkles on Jun 7, 2020 12:30:18 GMT -8
The box is probably framing for a floor furnace. The aluminum may have been a shield for the exhaust heat. Shastas normally didn't have double frame members, so one may have been added (with the cut out). That may have been extra support. Thanks for the info, vikx! Interesting about the box and the furnace. I haven't seen anyone incorporate the floor furnace into their vintage Shasta flooring, so I'm assuming we've moved to different ways to heat these little trailers? We live in an area of California where heat isn't super important, but we do like to go to the mountains so that may be where we need heat. The cut out seems to be on the original frame, then it seems like they added an additional frame member (that doesn't go the full length) to try to support the frame. We're trying to determine if this frame as-is is okay to build on or if it needs work / extra reinforcement. Teachndad asked for photos of how the second frame component is attached to the frame so we'll be posting more pictures today or tomorrow and see if that angle iron add-on goes under the C channel. I think it stops short. The notch in the angle iron crossmember doesn't seem to match up with the furnace framing, so no idea on that one either. Hopefully we can figure out what's going on.. so curious what the PO(s) was thinking. Thanks! |
|
sprinkles
New Member
Posts: 16
Currently Offline
|
Post by sprinkles on Jun 7, 2020 12:42:28 GMT -8
We were pretty perplexed when we finally got a full look at the floor joists and frame during the demo process. We're not sure what the PO was thinking, but our working theory is that the floor + frame of the whole door side of the Shasta Compact was somehow damaged and they were trying to fix it from below. Those strange metal strips were installed all the way from next to the wheel well under that mess of planks to the back of the trailer. That whole side was much more difficult to detach than the rest of the floor. And there was no subfloor below the square of aluminum flashing.
We'll take a picture of the reinforced angle iron cross member and the welding from the bottom and post today or tomorrow. We don't think that it is under the C-channel like the original, but we'll confirm in a bit. More soon!
|
|
sprinkles
New Member
Posts: 16
Currently Offline
|
Post by sprinkles on Jun 7, 2020 17:52:39 GMT -8
|
|
|
|
Post by vikx on Jun 7, 2020 21:09:28 GMT -8
I don't see any problem with the extra piece. It won't hurt a thing to leave it. Check the frame carefully before you begin your build. It's certainly easier to clean and paint with a bare frame.
|
|
shastatom
Full Member
 I can chase women or fix campers, I choose to fix what I understand........... campers.
Posts: 745 
Likes: 419
Shasta 54,57 1500 58 Airflyte
Currently Offline
|
Post by shastatom on Jun 8, 2020 12:25:05 GMT -8
I would get the frame sandblasted that will tell you more. But the extra angle iron shouldn't matter but if you don't plan to put the floor heater back in I would cut both off and weld a new one in its place to have it look right and not add to confusion some day if you try and sell it.
|
|
|
|
Post by vikx on Jun 8, 2020 21:39:44 GMT -8
You're much better off with a Wave 3 heater! I'd junk that floor heater...
|
|
|
|
Post by Teachndad on Jun 21, 2022 3:10:18 GMT -8
Hey Sprinkles,
What happened with your project? I don't see any activity after this thread was posted? Hoping for some good news.
Cheers,
Rod
|
|


