datac
Active Member

Posts: 339 
Likes: 170
1957 Cardinal
Currently Offline
|
Post by datac on Mar 30, 2020 16:42:54 GMT -8
Wow, datac that looks so good Heh, that's the problem, as I now have to fight the urge to do the same thing with the other side, and then the rest of the cabinets that I've already rebuilt and reinstalled, etc., etc. It's a slippery slope to a never-ending project. |
|
|
|
Post by Teachndad on Apr 2, 2020 21:00:12 GMT -8
Yes, Datac, I totally agree with the other posts. Fine, very fine!
Is that birch veneer? Where did you get it and how much was it? My upper kitchen cabinet for my Westerner was stored in a shed that leaked last winter with dripping water damage that was later discovered. It finished off the veneer on that cabinet basically ruining the entire veneer.
How do you like working with the Minwax Gel Stain?
This is worthy of saving this to a file on my computer.
Cheers,
Rod
|
|
ladywendolyn
2K Member

Posts: 2,315 
Likes: 928
1964 Golden Falcon
Currently Offline
|
Post by ladywendolyn on Apr 4, 2020 18:51:40 GMT -8
datac that looks so good. I have to do a bunch of re-veneer in my trailer. Did you use contact cement on both sides?
|
|
datac
Active Member
Posts: 339
Likes: 170
1957 Cardinal
Currently Offline
|
Post by datac on Apr 5, 2020 14:51:10 GMT -8
I'm in sort of a weird position- 25+ years ago I worked in a boutique woodworker's store, bought and sold exotic woods, tools, taught classes, etc. The dirty secret is that I know a lot in theory but have never actually applied any of it. This is actually the very first time I've worked with veneer, despite having taught folks how to do it for years.  I'm basically all book-learnin', zero experience. Sheet veneer like this is sold with either a plain paper or paper with heat-sensitive adhesive (iron-on) backing, and in a bunch of different species. Even though it may be a bit cheaper and/or look similar to birch, I try to avoid maple as it tends to accept finishes unevenly. Temps can get pretty elevated in a closed-up trailer in the Summertime, so while I might normally choose heat sensitive I'm leery in this particular application. It's usually sold in 2' or 4' widths, generally by the square foot, and most places will cut off whole foot increments. For this project I bought a 2'x6' piece of birch to make certain I had plenty for the bottom and a generous overlap, cost me maybe $25. If you have flat panels to cover, or a vacuum table, or some setup that allows for broad clamping, you could use a good aliphatic resin (woodworker's glue, Titebond III or similar), but I didn't want to be futzing with that around the tight curves on the front of the cabinet, so I stuck with (heh) contact cement. I prefer spray contact cement, usually 3M High-Strength 90. Roughly cut the veneer to shape, leaving at least an inch or two overlap, make certain that the old wood surface is clean and solid (as you can see in my photos, I ended up stripping the entire outside layer of veneer off the old cabinet), and mask everything with blue painter's tape that won't immediately be getting adhesive. I started with the bottom piece. Do a couple of even coats of adhesive on both parts and let it dry until tacky. Common mistake that folks make- be certain to remove the painter's tape after spraying, but before gluing the pieces together. Carefully bow the veneer until it touches down right in the middle and spread firmly out to the edges to avoid any bubbles or ripples. Needless to say, contact cement is not repositionable, so you must get it exactly right the first time, thus the generous overlap when you go to set down your veneer. I like to hit it with a laminate roller when it's all down. When the adhesive has cured (I'm paranoid, so I like to wait overnight), trim the veneer down with a sharp flush-cut bit in your router, and continue in the same manner with the sides or other overlapping areas. After it's all cured and you've cleaned it up with the flush-cut bit, check the radius on your other cabinetwork and choose a similar roundover bit (5/16" in this instance). Don't screw around with cheap bits, get a decent carbide bit with a roller bearing, or else you'll risk scorching or chewing up your work. Hit the edges with the roundover bit and you're done. I experimented a bunch trying to find a good color match for my existing birch. Since the original finish looks to be just ambered and aged shellac, I knew I didn't want to accentuate the porous areas of grain like a penetrating stain will do, so gel stain it is. I actually do a light coat of shellac first as a sealer, then after it's cured I follow up with wipe down/wipe off of the gel stain (Chestnut in this instance), and let that cure overnight before continuing. The goal is just to add a bit more brown to the amber shellac, not dominate. After a couple of more coats of shellac I may do another quick wipedown with the gel stain if necessary, and then even more coats of shellac. The cabinet in the photo has one coat of 1/3 cut amber shellac as a seal, one wipe on/wipe off of Chestnut, and four more coats of uncut amber shellac (it's cool enough out I can get away with that). You'll obviously need to do your own color tests to see what works for you. |
|
yas
Active Member
Posts: 422
Likes: 162
'63 Shasta Airflyte
Currently Offline
|
Post by yas on Apr 5, 2020 17:37:34 GMT -8
I finished cleaning up the tongue area on Big Sis.  |
|
|
|
Post by vikx on Apr 6, 2020 20:02:12 GMT -8
Looks brand new Yas!!
|
|
|
|
Post by Teachndad on Apr 6, 2020 20:38:15 GMT -8
Thank you DATAC,
Awesome response to my question! Thank you for the time you took to furnish all that information.
Cheers,
Rod
|
|
yas
Active Member
Posts: 422
Likes: 162
'63 Shasta Airflyte
Currently Offline
|
Post by yas on Apr 8, 2020 16:30:03 GMT -8
Thank you! My favorite paint in a spray can is Rustoleum Professional. It lays out really nicely. |
|
roadtripper
Active Member
Posts: 311
Likes: 116
Currently Offline
|
Post by roadtripper on Apr 8, 2020 18:47:22 GMT -8
To chime in on the veneer topic of datc (beautiful work BTW) I’ll share a method I used a couple of times. Once was cherry veneer on a spiral staircase stringer for a client and once was with oak veneer on a curved wall below a curved counter bar in my own kitchen. The oak has held up well but not perfect. May be a little bubble or two after 10 years. On the stair I never had a call back, so hopefully it’s fine. Both obviously on curves and this method would probably work better flat. No guarantees on this...just throwing it out there.
With the sub surface well sanded and clean, and the veneer pieces cut a little oversized I rolled type 2 tite bond on both surfaces and then allowed them to completely dry. I then put them gluefaces together and used a hot clothes iron which reactivates the glue somehow and quickly sticks them together.
Again, no guarantee, but might be worth playing around with again.
But also, I have no problem with contact cement and a roller.
|
|
roadtripper
Active Member
Posts: 311
Likes: 116
Currently Offline
|
Post by roadtripper on Apr 8, 2020 18:54:54 GMT -8
And what did I do to my trailer today? I went out and swept the floor and talked to her. Said don’t worry, we will go camping again. And this site is a nice diversion for a few minutes each day. I’ve finally learned to not look at the news too much. Just enough to stay informed is much better for you than the full dose. Hope you are all ok.
|
|
|
|
Post by Teachndad on Apr 9, 2020 6:05:38 GMT -8
I like to hit it with a laminate roller when it's all down. Datac, Thanks again for your detailed description on how you glued on the veneer.  Is this a laminate roller? 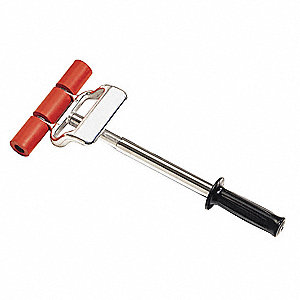 Do you only use one hand to roll out the veneer after glueing? Seems to me that you would have to mount the cabinet to a table to use both hands, so it wouldn't move. Do you always roll with the grain? Cheers, Rod |
|
mobiltec
5K Member
 I make mistakes so you don't have to...
Posts: 9,822
Likes: 3,749
1954 Jewel In Progress...
Currently Offline
|
Post by mobiltec on Apr 9, 2020 7:31:15 GMT -8
The TV just needed all new capacitors. The old ones are paper and wear out.
|
|
idaho211
Active Member
Posts: 284
Likes: 45
Currently Offline
|
Post by idaho211 on Apr 10, 2020 5:48:26 GMT -8
|
|
nccamper
Administrator 
Posts: 7,744
Likes: 2,871
1962 Forester- 1956 Shasta
Currently Offline
|
Post by nccamper on Apr 11, 2020 7:22:28 GMT -8
New table for the 59 Airflyte. It weighs a ton!
I have six mini-projects going at once. Hopefully the lights will be on tomorrow. Then repair the upstairs bath, do brakes on one of our cars, plant grass in the backyard, finish planting the vegetable garden, and back to the camper projects... |
|
ekimnamniets
Active Member
Posts: 179
Likes: 34
Currently Offline
|
Post by ekimnamniets on Apr 13, 2020 10:38:15 GMT -8
Repair the upstairs bath? Just how BIG is that camper?
|
|


 I'm basically all book-learnin', zero experience.


