wendyv
New Member
Posts: 4
Currently Offline
|
Post by wendyv on Nov 20, 2019 19:10:37 GMT -8
  Hi all! I've been reading the threads watching lots of videos, and the more I read the more I realize I'm likely in trouble. I recently bought a 67 Pathfinder camper that is pretty solid, but had old skin with lots of patches so I thought I'd reside the driver and passenger side. I got started pulling the siding and framing looks good so far except for the edgeboard and a piece of wood along the rear edge. So now I have to pull roof siding to see if there's more damage. So I take a look at the roof and it is not one skin from front to back, it is actually in three pieces (maybe 4) and the middle piece is slathered with some sort of sealant. Great  . When I start peeling the overlaps, it appears that the mid section metal roof is older is riveted. The putty tape is missing in spots (which might explain the rotted corners) and overlapped, in my newbie option wrong, as it actually would catch the rain instead of repel it.. I have lots of questions and need help/advice, but thought I'd start here. And yes, as you may have already guessed, total newbie here. Thanks all!  UNADJUSTEDNONRAW_thumb_ffd UNADJUSTEDNONRAW_thumb_ffd by Wendy VanWagoner, on Flickr 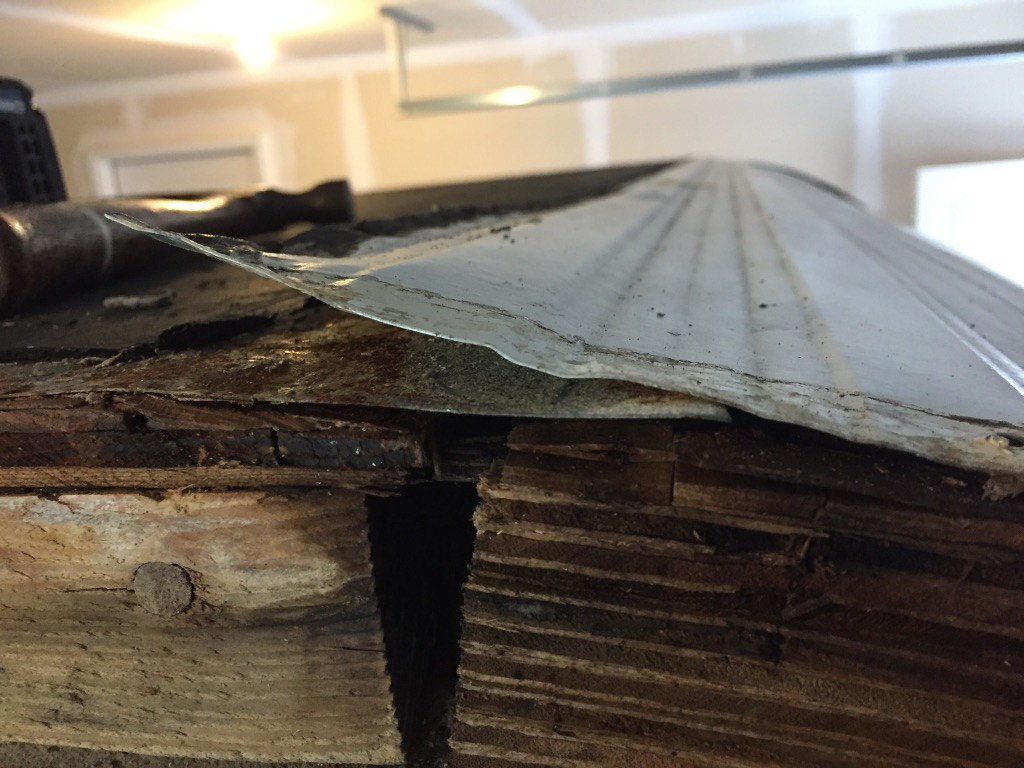 UNADJUSTEDNONRAW_thumb_ffa UNADJUSTEDNONRAW_thumb_ffa by Wendy VanWagoner, on Flickr  UNADJUSTEDNONRAW_thumb_ffc UNADJUSTEDNONRAW_thumb_ffc by Wendy VanWagoner, on Flickr |
|
nccamper
Administrator 
Posts: 7,743 
Likes: 2,870
1962 Forester- 1956 Shasta
Currently Offline
|
Post by nccamper on Nov 20, 2019 19:43:33 GMT -8
Welcome!
To be honest, with all that tar I’d replace the roof no matter how many pieces they used on it. Getting the house paint off will be a job-and-a-half but the tar will be absolutely toxic to remove. I know, I've tried it.
With that said, I wonder if somebody did a cheap roof replacement already. Are you sure it’s a late 60s? I think a few early 50s campers were made in pieces but I’ve never seen a 67 made this way.
|
|
wendyv
New Member
Posts: 4
Currently Offline
|
Post by wendyv on Nov 20, 2019 20:14:18 GMT -8
Thanks for the response. I'm pretty sure the title says it's a '67. I just got the title back from the state and will double check.
I believe the paint is an automotive paint, but I'll double check that too, the other owner recently painted it and gave me the leftover gallon. Since I'm replacing the siding on the sides, and now looks like I'll need to replace the roof, I guess it doesn't matter what it's painted. But I am curious, does the paint always have to be stripped before repainting on these campers? And, if I'm replacing the siding, do I have to stick with the mesa pattern?
|
|
|
|
Post by vikx on Nov 20, 2019 20:46:59 GMT -8
Are you sure the roof isn't factory seamed? It looks like that might be the case, tho I've not seen the ends screwed down before. It's very hard to tell what's there with all that tar. In any case, NC is correct: new roof. I would take it all apart before ordering the metal and do the structural repairs first. Then you can measure and see exactly what you need.
You can change the pattern however you like on the skins. A 67 isn't that rare, so a little different pattern won't hurt a thing. In fact, many trailers had different patterns on the sides compared to the front and rear.
|
|
nccamper
Administrator
Posts: 7,743
Likes: 2,870
1962 Forester- 1956 Shasta
Currently Offline
|
Post by nccamper on Nov 21, 2019 4:10:41 GMT -8
Since you're replacing the side skin it doesn't matter but if you have house paint on it, especially painted with a brush, and want a nice finish it would have to all come off.
Trust me, you don't want to try to reuse the tar covered roof. It's a toxic job and nobody goes up on a roof with that much tar unless it's leaking like crazy. Strip off the tar and you know what you'll have...a roof leaking like crazy. 
Have fun with your project.
|
|
wendyv
New Member
Posts: 4
Currently Offline
|
Post by wendyv on Nov 22, 2019 7:56:57 GMT -8
All good feedback. Thanks! I will strip off the roof. I'm already having a 'fun' time digging out each screw from the tar and paint just to unscrew it with my drill. It's going to be a slow process.
|
|
WhitneyK
Active Member

Posts: 492
Likes: 169
'67 Shasta Compact
Currently Offline
|
Post by WhitneyK on Nov 23, 2019 17:10:52 GMT -8
I might have missed it, but what kind of trailer are you working on? I have a '67 Beeline Wasp that has the overlap in the front and rear on the roof like yours does. The middle flat section is / was galvanized tin, the front and rear are aluminum.
No factory seam, just overlap and some sort of sealer (looked like tar to me). Some have suggested that someone "cobbled" it somewhere along the line, but I believe that this is just how Beeline decided to do it. May not be the best solution, but sure would be easy to replicate...
|
|
wendyv
New Member
Posts: 4
Currently Offline
|
Post by wendyv on Dec 4, 2019 20:17:44 GMT -8
The camper is a 1967 Pathfinder and yes, my roof sounds exactly as you describe! The middle section looks like a different material than the aluminum siding at the front and back. Interesting!
|
|
57 Trotwood
Active Member
Posts: 128
Likes: 67
Currently Offline
|
Post by 57 Trotwood on Dec 5, 2019 4:26:18 GMT -8
The camper is a 1967 Pathfinder and yes, my roof sounds exactly as you describe! The middle section looks like a different material than the aluminum siding at the front and back. Interesting! Hey Guys, I have a 1957 Trotwood and I too have the same kind of 4 piece roof with the edges overlapping and a galvanized section in the middle. |
|
WhitneyK
Active Member
Posts: 492
Likes: 169
'67 Shasta Compact
Currently Offline
|
Post by WhitneyK on Dec 5, 2019 19:20:06 GMT -8
The camper is a 1967 Pathfinder and yes, my roof sounds exactly as you describe! The middle section looks like a different material than the aluminum siding at the front and back. Interesting! Hey Guys, I have a 1957 Trotwood and I too have the same kind of 4 piece roof with the edges overlapping and a galvanized section in the middle. My center galvanized section had a fold over with awning rail and the front and rear aluminum had the butt joint and aluminum trim on the top. |
|
tpcm5000
Junior Member
Posts: 83
Likes: 45
Yellowstone 1966
Currently Offline
|
Post by tpcm5000 on Apr 18, 2020 6:26:21 GMT -8
Thank you Wendyv for posting, I am about to take on my roof and thought a three piece roof was a hack from my PO. I too have only watched tutorials and read docs/posts on restoring a continuous, single panel roof. Was hoping someone could confirm what I have on my hands and what will be the order of removal and rebuild? Here are my two seams.  frontrfpanel frontrfpanel by Tom Myers, on Flickr  backrfpanel backrfpanel by Tom Myers, on Flickr And here is one row of sheet metal screws.  screwsrfpanel screwsrfpanel by Tom Myers, on Flickr And lastly, a view from the back.  backrfpaneltorear backrfpaneltorear by Tom Myers, on Flickr So the roof seams are likely overlaps, and the screws secure down through a ceiling joist? The two connecting ceiling panels, I will call them roof corner panels, then fall to the back and front and likely connect to front and back panels with an S lock? Assuming so, I am looking at the following order for removal? 1. try to remove roof goop (plan to give up and buy a new center ceiling panel if goop won't budge) 2. remove ceiling screws at overlap seams 3. remove jrail and staples 4. remove other roof fixtures and pull center roof panel 5. inspect and pull front and back roof corner panels if rot is more extensive Replace cedar ceiling, follow other tutorials, posts, instructions, etc. on restoring a roof and ceiling And then for order of rebuild? 1. reinstall roof corner panels if they were pulled 2. attach center roof panel, position so there is an overlap with the front and rear roof corner panels 3. insert butyl tape at the overlap and between panels, screw overlap seam together and down into joist. Smooth a thin layer of OSI gutter seal on the raw butyl edge. Replace roof fixtures, follow other tutorials, posts, instructions, etc. on restoring a roof and ceiling Sorry for the long post, any tips or pointers to tutorials I may have missed very much appreciated! |
|
|
|
Post by vikx on Apr 18, 2020 11:00:20 GMT -8
Wow Tom you've got a mess on your hands... the goop is Silver Slop and VERY difficult to remove; it won't even sand. Honestly, the best thing to do is to purchase new roof metal. The hours you will spend fighting the Slop aren't worth it and you will never remove it all. The problem is that the Slop peels over time, so patching it doesn't work forever. 1. Pick slop and remove screws 2. Remove vent and roof fixtures; be sure to use a support board(s) rather than getting on the roof. 3. Remove J rail and staples 4. At this point, I would remove the roof panels to inspect edge wood and rafters for rot. I doubt the wood is cedar, more likely fir or pine. If you absolutely must re-use the roof panels, you're rebuild order is fine. Be sure the rafters are absolutely sound for the screws will grab properly. Also, you need about 3" of clean metal at each seam to seal it. Lots of miserable picking, scraping and sanding ahead... I recommend Proflex clear sealant instead of gutter seal in this instance. It is not caulk but a brushable sealant. Do not substitute this product. www.campingworld.com/proflex-brushable-sealant-21208.htmlOnce the panels are puttied (pure butyl) and screwed, paint 3 layers of Proflex over each seam and screw heads. This is permanent sealant, so don't use it on the vent. (Dicor self leveling caulk for the vent) Roof fixtures can be sealed with Proflex, but it makes repairs unpleasant. Proflex is nasty and sticky, so use disposable brushes. Paint the roof when repairs are complete. OSI gutter seal is great for the staples on the roof fold over. I also seal any staple divots. Be sure to smooth with a paint thinner dipped finger; you want it as flush as possible. Gutter seal is also great as a final thin seal at the top of J rail. Hope this helps. I vote for a new roof. |
|
tpcm5000
Junior Member
Posts: 83
Likes: 45
Yellowstone 1966
Currently Offline
|
Post by tpcm5000 on Apr 18, 2020 11:43:02 GMT -8
OK, I now vote for a new roof too. I assume I can clean up the edge of the front and rear corner panels and buy a piece of aluminum to replace the main center panel roof. That does not sound too bad or expensive but please let me know if I have that wrong. I gather some of this I will need to discover as I go.
Tremendously helpful, and reassuring, thank you!
|
|
|
|
Post by vikx on Apr 18, 2020 21:05:09 GMT -8
I think you will need a complete new roof, from the front seam to the back seam. Replace all 3 panels with a factory seamed RV roof.
|
|
tpcm5000
Junior Member
Posts: 83
Likes: 45
Yellowstone 1966
Currently Offline
|
Post by tpcm5000 on Apr 19, 2020 7:12:37 GMT -8
Got it. I take it the main reason for the single panel approach is to not have seams on the roof which will leak eventually (particularly in the elements of the Adirondacks)?
I like the idea of single panel, but my concern would be getting the dimensions perfect. If I replace just the center panel I would have a ton of wiggle room as the seams would be overlap with the front an back panels. A quarter inch here or there won't matter. If I replace all three with a single panel, I will either need the s locks fabricated or make the s locks myself. If I have fabricated, with all the variables, I wonder if I could ever get the measurements perfect. Being even a touch long or short would be a disaster. If I do on my own, I do see tips on how to make the s locks, I similarly would be concerned about getting the seams perfect.
Or do I just need to do educate myself more on this stage of the process?
|
|


 . When I start peeling the overlaps, it appears that the mid section metal roof is older is riveted. The putty tape is missing in spots (which might explain the rotted corners) and overlapped, in my newbie option wrong, as it actually would catch the rain instead of repel it..


/Campers/67%20Shasta?preview=2019-02-03+18.01.00.jpg)

