ruderunner
Active Member

Posts: 471 
Likes: 97
Currently Offline
|
Post by ruderunner on Nov 15, 2018 7:50:56 GMT -8
Wow been 5 weeks already. Just one thing after another here lately. So I got the oil pan replaced and then discovered the transfer case linkage on the welfare truck was rusted solid. Several hours taking it all apart, cleaning and lubiing then reassembling.
Moved onto the Jeep, all new brakes, including lines drums and rotors. Also found bad axle u joints and rotten muffler. Took three weekends to do all that only to find there might be some crud buildup in the carb as im having an intermittant fuel starvation problem.
AND, the furnace in the workshop blew up. Almost litterally. lots of soot out of the vents due to a rusted out heat exchanger. What a mess. Got the new furnace installed last week, was going to finish the ductwork this weekend but im stuck at home with a very sore back. Can hardly walk, no way to lift or climb a ladder. Getting quite cold out there so I'm going to have to get that all sorted out soon.
On the plus side, got a table saw (freebie from a friend) and found a place in Indiana that has what appears to be 1/8 inch birch ply for only $15 a sheet.
|
|
|
|
Post by vikx on Nov 15, 2018 20:49:26 GMT -8
Hang in there, Ruderunner
|
|
ruderunner
Active Member
Posts: 471
Likes: 97
Currently Offline
|
Post by ruderunner on Nov 16, 2018 3:34:26 GMT -8
Oh it's ok. A little discouraging but in reality just a minor setback. Thanks for the sympathy.
In the scheme of things, I was expecting the jeep brake problems not the carburetor problem. The furnace was a surprise though, working fine last year. Guess the rusted spot just blew out.
And the problems with the welfare truck are not terribly surprising, it is 40 years old.
Once I get the heat situation sorted out and some cleaning up the shop, the camper moves in so I can set it on jacks, finish removing the floor and start on the frame work.
|
|
ruderunner
Active Member
Posts: 471
Likes: 97
Currently Offline
|
Post by ruderunner on Feb 2, 2019 10:21:32 GMT -8
And an update, no pics just yet though.
Finally got the furnace in and functional, sprung for a programable stat. Keep things at 50 during the week and 65 on weekends, plenty comfy for working.
Also got the remains of the floor off the frame and removed the grey and black tanks. Found a couple cracked welds on a couple outriggers but they won't take too long to reweld. Did tow thw rolling chassis to the scales and went across at 820#, not counting tongue weight which is probably another 80 lbs. While I had the trailer hooked up I also picked up some plywood and 2x12 for the floor. Might start ripping the 2x12 into 2x3 tomorrow.
Suspension seems to check out ok, brakes will need the works though. It appears that the axles were originally designed to be above the springs and have been switched to under. Thing is, the added saddles aren't welded to the tubes, just held in place with the u bolts and some sort of spacers between the top and bottom saddles. Not a big deal as I'm planning to make new saddles to relocate the axles a little closer together, nothing major an inch and a hilf or so per axle.
|
|
kirkadie
1K Member

Posts: 1,156
Likes: 556
'69 Serro Scotty Hilander
Currently Offline
|
Post by kirkadie on Feb 2, 2019 20:44:56 GMT -8
Bet there are quite a few of us that have thought hard about doing a new body on a donor frame just like you.. especially after seeing all the different builds here and getting insight on what makes a safe design. Can't wait to see where you all go with this. What fun.
|
|
ruderunner
Active Member
Posts: 471
Likes: 97
Currently Offline
|
Post by ruderunner on Feb 10, 2019 5:13:48 GMT -8
Kirk, not sure how many would follow our lead, seems most here are looking to actually restore a vintage camper. We're looking to build a modern camper in the spirit of vintage. Otoh, most of the build process here is about the same as some of you're complete rebuilds, we just don't have a template to follow. There's plusses and minuses with that, we have the freedom to do whatever we like but have to do the engineering on the fly.
I'm fairly convinced that there is a financial advantage to doing it this way but it does take some frugal shopping. In this area, vintage camper do exists but are in such poor condition that all would need complete rebuild and that would include most of the systems which aren't likely to work, or in the case of gray tanks etc would need added. But, newer clunkers are easy to find and generally have modern systems that may still function as well as keep things legal and safer (better couplers, gray tanks etc)
While we're not keeping an actual account of how much this is costing, I have beeen keeping a running tally in my mind. Purchase was swapping a brake job about $300 value, scrapping the aluminum netted $100, extra windows and fresh water tank was about $50, the 2x12s from last week and some misc hardware from the trailer supply was about $100. So far we're in for $350 or so. Note, I got the plywood for the floors as a freebie from work, 20 sheets of 3/4 7ply but they're 3'x4' sheets leftover from building some shipping crates.
As for a progress report, I got the 2x12 ripped down to 2x3 for floor framing and loosely laid out the plywood for the floor. I did manage to relocate the axles last week, and found that I can get them 4" closer together and still maintian tire to tire clearance, good enough. A discovery was made during that process related to the blowout that tore up the streetside of the camper. Looks like the front spring hanger was bent or broken off and repaired crooked, it's pushed back about 1/2 inch. I'll account for that when I make the new spring saddles for the axles.
Mama bear is starting to see things and we spent a couple hours yesterday about where we want to place certain items in the camper. She' more of a visual person while I'm more mental (in multiple senses) meaning she has to see things and I can picture them inmy mind. We're not making big changes to the plan, just finalizing details before anything actually gets assembled. The 50's/70's kitchen table set I grabbed will be cut up to become our dinette and vanity. By 50's/70's I mean the table is old school 50's diner style with cracked ice forminca and extruded aluminum wrap on chromed curved legs, the chairs have the 50's frames but decidedly 70's upholstery, yuck. New upholstery will be done, not yet sure on colors.
Hopefully next weekend I can get the metal supply shop and start on extending the frame and repairing/relocating the outriggers. And after that I plan to remount the water tanks to get them in position before actually building the floor. It's still a long way from being a camper but at least it's starting to move in the right direction.
|
|
ruderunner
Active Member
Posts: 471
Likes: 97
Currently Offline
|
Post by ruderunner on Mar 23, 2019 5:02:41 GMT -8
Well I've been busy pluging away at frame mods and started the floor framing. No inprogress pics of the above since I dropped my tablet and broke the camera. But ive gotten the tablet fixed and snapped some pics for viewing enjoyment. Rear floor framing and frame extensions, note that at this point the joists are left long and loosely screwed together, I'll cut to final length after placeing the shower and toilet. Ignore the current placement of the openings for the black tank, they'll be adjusted as needed.  019 019 by Andy Malycky, on Flickr 019 by Andy Malycky, on Flickr Front bedroom floor and gray tank. Ill have some plumbing to do to get the vent through the wall and the current entry for the drain will be capped and moved. 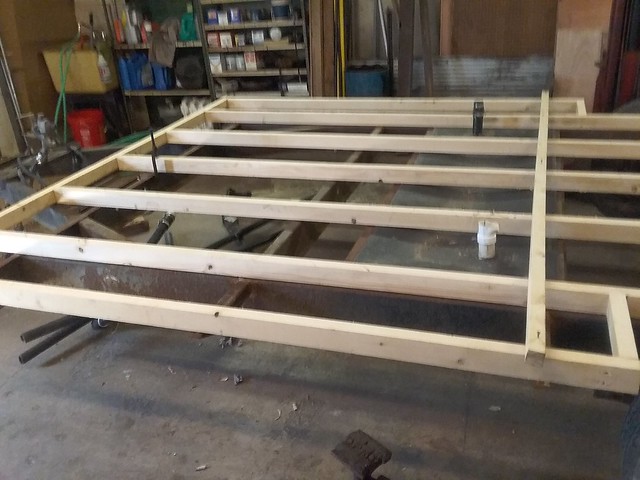 021 021 by Andy Malycky, on Flickr General view of floor framing, still need to add cross bracing but want to narrow down wall and cabinet placement first. 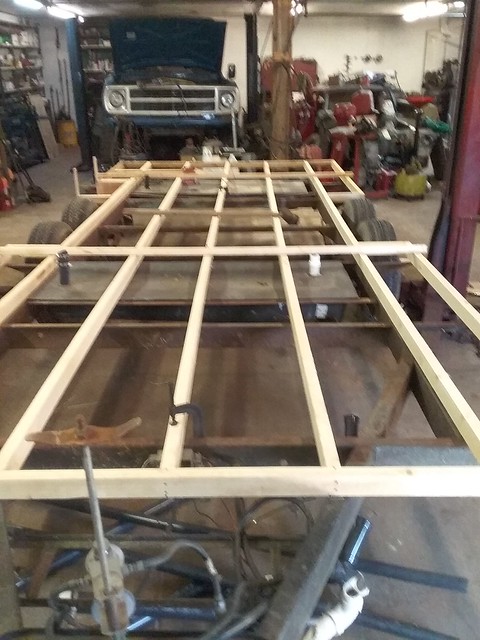 022 022 by Andy Malycky, on Flickr  024 024 by Andy Malycky, on Flickr  025 025 by Andy Malycky, on Flickr Drop opening for curbside door, this was a purely asthetic modification as I like the look of the door lower on the side. I also relocated the step assembly below the frame, welded and will be tied into the walls.  026 026 by Andy Malycky, on Flickr I've mentioned the "welfare truck" a few times, here's a gratuitus photo. It's ugly but always runs.  028 028 by Andy Malycky, on Flickr I have an extra set of these bumperettes, I think I'll add these to the camper for a stylish rear bumper. Shoule be easy to attach to the standard 4" square tube.  031 031 by Andy Malycky, on Flickr Gotta go take a sick cat to the vet. |
|
|
|
Post by vikx on Mar 23, 2019 20:48:15 GMT -8
Love your old truck! And hope your visit to the vet had a good outcome.
|
|
ruderunner
Active Member
Posts: 471
Likes: 97
Currently Offline
|
Post by ruderunner on Mar 24, 2019 5:32:32 GMT -8
Things went ok at the vet. Our fat cat Kitten has been struggling with a sinus infection for a couple months, just haven't found the right medication to knock it out. He'll improve for the two weeks hes on the meds, but it comes back in a week after he's off them. We did have to put down our litle Marty last week, 17 years old and ended up with a large tumor in his abdomen.
And last month we adopted a stray who was clearly a house cat before. We posted some fliers and online and no one claimed him. Calling him Preston though there's been some other choice names for him. He's about a year old and still rambunctious.
I did a little shopping for some building supplies, screws for framiing, a roll of flashing for the heater duct and tried to find plumbing fittings for ABS pipe. Home Depot didn't carry anything ABS, Lowes was very limited. I'll try Cleveland Plumbing supply next weekend. Just one of the many reasons I hate plumbing. No matter what I'm working on it's always 3 or 4 trips to the store to get the right fittings, working in limited access places (normally, I'm wide open here) wet drippy work. Ugh. I got smart a few years ago with the house, bought everything in bulk and replmubed the whole house in a weekend. Got tired of patchng pipes here and there, and with only one shutoff it meant shutting off the whole house for a small repair. Now it's all new cpvc, multiple shutoffs and I relocetd the water heater to the garage vs the basement, no more carrying it up and down stairs.
|
|
ruderunner
Active Member
Posts: 471
Likes: 97
Currently Offline
|
Post by ruderunner on Jul 7, 2019 4:03:51 GMT -8
I guess this is a quarterly update. Its rained here nearly daily since my last post. Which has been good news bad news.
I got to make significant progress on a project truck since I wasn't able to work outside often, but on dry days it was all out efforts to keep up with yardwork and gardening. Things are drying out lately and the upper garden is doing nicely, actually already picked some potatoes and radishes. The lower garden was devastated, looking like we lost 90 percent of what was planted.
Ive gotten most of the floor insulated and decked, heater vents in and tank vents relocated. Mocked up the bathroom fixtures and marked the location for cutting plumbing openings. Got the location of the two interior walls marked and purchased the flooring.
Helpful hint, Menards has rolls of vinyl flooring pre cut sizes of 6x9 for only 20 bucks.
Speaking of floors, i have lots of screw holes and a few seams to level out. Im going to sand things flatter but ill still have to fill some divots and seams. I have a can of floor leveling compound but its basically plaster and im worried about it cracking and popping loose from vibrations. Would say latex caulk be ok? It'll stay more flexible and can be spread smoothly.
|
|
ruderunner
Active Member
Posts: 471
Likes: 97
Currently Offline
|
Post by ruderunner on Aug 18, 2019 5:13:18 GMT -8
Progress update,
finished the floor decking, mocked up the shower stall and started on the number 2 bulkhead (aka bathroom wall)
Need to finish the framing on that wall to support the shower fixtures. Then onto the number 1 bulkhead (bedroom wall) bed base and pass through cabinet.
Almost got a freebie full size matress but the mother in law called dibs!
After the bedroom is fleshed out, I'll have the open area between them to fill in with the kitchen, which the plans have changed again. Momma now wants a breakfast bar arrangemnt vs a dinette. Im good with that as it will be much easier to implement and gives more cooking/counter space.
Yes, we cook in our camper. Alot.
|
|
ruderunner
Active Member
Posts: 471
Likes: 97
Currently Offline
|
Post by ruderunner on Sept 14, 2019 5:16:12 GMT -8
Progress pics! Here's the center kitchen area, at almost 7 foot long by almost 8 foot wide this should be comfortable for us to cook and eat in. Obviously right now just open space but for reference, the drill is about where the hot water tank will be and the fridge will be against the wall in left foreground. Sink wil be above the water tank.  20190908_132245[1] 20190908_132245[1] by Andy Malycky, on Flickr Bedroom bulkhead, still need to hang the door and part of the bed base is visible  20190908_132226[1] 20190908_132226[1] by Andy Malycky, on Flickr Better view of the bed base and the start of the pass through storage  20190908_132216[1] 20190908_132216[1] by Andy Malycky, on Flickr The throne room should be big enough for two people to use at once.  20190908_132201[1] 20190908_132201[1] by Andy Malycky, on Flickr I wanted to post some pics of the vintage Ford taillights I want to use but I can't find them right now! Upcoming work, finish the pass through and bed stand and start rough framing of the side walls for the bedroom. Then the bathroom. Still have to finish framing the bulkheads but need to sort out where to locate the vents and plumbing for the shower before finishing the kitchen side of those walls. Then onto building out the kitchen cabinets, locating the sink and plumbing the propane lines and water lines. On a sad note, Kitten who I mentioned previously was fighting a sinus infection, ended up having a tumor. We had to put him down last week. Mama is bummed but moving on. |
|
|
|
Post by danrhodes on Sept 14, 2019 12:21:17 GMT -8
Looking like a great build. Having trouble seeing where you can sleep with a bathroom larger than the one at my house though ;-) If you want two people at the same time, you need to find the Thetford version of this though.... youtu.be/avb1XbO0EIs |
|
kirkadie
1K Member
Posts: 1,156
Likes: 556
'69 Serro Scotty Hilander
Currently Offline
|
Post by kirkadie on Sept 14, 2019 14:29:26 GMT -8
Or save precious room by installing the hard-to-find over/under commode. I thought I saw a picture of one but thankfully that SNL episode has been deleted.
|
|
ruderunner
Active Member
Posts: 471
Likes: 97
Currently Offline
|
Post by ruderunner on Sept 14, 2019 15:03:59 GMT -8
Look at it this way. Im not cloning a Lil Loafer!
Bed area is about 8x8, bathroom floor is 3x8 but with the rounded tail of the trailer holding the sink and counter, its effectively 4x8.
Im almost as big as Big Bill, im just less tolerant of tiny equipment.
Ive broken on of our goals, sticking with an 18 foot body. Going to be just under 19 feet. But I cheating since I'm kinda building this with a specific tow vehicle in mind and have pushed the front wall forward to the limit of what the limit is if one should jackknife the combo.
Once i get the bedroom sides up, i can double check clearance
|
|


