bmrrwolfe
Member

Posts: 36 
Likes: 3
Currently Offline
|
Post by bmrrwolfe on Jun 21, 2017 10:56:18 GMT -8
Time to bring back an old thread. I have decided to go with the foam roller, and able to find some oil based paint. I have spent quite a few hours removing goop, stripping the layers of paint, and wet sanding the skin. I will finish going over the skin with denatured alcohol, and give it one more cleaning before I start laying the primer. Will be sure to post up some pictures through the process.
Also after spending way too much time cleaning the roof, I have decided to replace it with a new "one-piece" roof that I was able to source locally to remove a few of the roof seams and hopefully prevent future leaks. I found it at a local semi-trailer repair shop, and will be leaving it bare aluminum for now.
|
|
bmrrwolfe
Member
Posts: 36
Likes: 3
Currently Offline
|
Post by bmrrwolfe on Jun 14, 2017 9:17:58 GMT -8
Thanks. For the time being I am going to leave the roof unpainted/ bare aluminum. If I think its an issue I can always add the paint later.
|
|
bmrrwolfe
Member
Posts: 36
Likes: 3
Currently Offline
|
Post by bmrrwolfe on Jun 7, 2017 9:22:14 GMT -8
So I opted for a new one piece roof that I picked up from a Semi-Trailer repair shop. Can I leave it the bare aluminum? Or do I have to prime & paint it with the rest of the trailer? Just asking as I see some people leaving their trailers bare aluminum, and if I don't have to spend the time prepping, priming and painting, I'd rather not. Any real difference with heat in the summer, leaving it alone vs painting it white?
Thanks!
|
|
bmrrwolfe
Member
Posts: 36
Likes: 3
Currently Offline
|
Post by bmrrwolfe on Sept 23, 2016 14:38:08 GMT -8
I have finished the paint prep on half of my 1966 Scotty, and am wanting to start priming and painting, but am torn as to which way to paint... Some say you can get decent results from a good roller or brush, and others say spraying is the way to go.
For primer, I am using Ace Aluminum primer, and I have not yet decided on the paint.
Although I have an air compressor, I do not have a gun, nor do I want to do the setup to run a spray gun on the compressor. If I was going to spray I plan to buy a middle of the line electric spray gun, but only if the results are worth it.
I am using the original skins, so there quite a few dents and imperfects from the last 50 years, and I am not restoring it, or trying to make a show piece. Just a decent paint job that will last.
Any advice is greatly appreciated!
|
|
bmrrwolfe
Member
Posts: 36
Likes: 3
Currently Offline
|
Post by bmrrwolfe on Sept 19, 2015 19:41:39 GMT -8
Another welcome from the frame up rebuild club!
Its funny how the trailer can look to be in good shape, pull down the road just fine, then you start something small and simple, and uncover all the rot, and wonder how the trailer made the trip home!
Its a little overwhelming at first, but just have a plan and get to work, with the help of some of the veterans here, the rebuild becomes fun.
|
|
bmrrwolfe
Member
Posts: 36
Likes: 3
Currently Offline
|
Post by bmrrwolfe on Sept 15, 2015 17:09:32 GMT -8
Insulation is done! Also the electrical has been started. Tail lights, front and rear clearance lights, and both front and rear marker light wiring has been ran. To simply future issues, I ran all connections/splice to the tongue of the trailer.. I have always seemed to have trailer light issues in the past, so I eliminated all splices from under the frame to a small box at the tongue of the trailer. If a light ever goes out, I can test at the splice, and pinpoint the issue.
Also, you might notice that I more then doubled the number of cross braces. I wanted to make sure this thing was sturdy, and since it was extremely light to begin with, I wasn't worried about the little bit of added weight.
<a href="http://s93.photobucket.com/user/bobbyb92290/media/Camper%202/IMG_20150913_124757905_HDR.jpg.html" target="_blank"><img src="http://i93.photobucket.com/albums/l61/bobbyb92290/Camper%202/IMG_20150913_124757905_HDR.jpg" border="0" alt=" photo IMG_20150913_124757905_HDR.jpg"/></a>
<a href="http://s93.photobucket.com/user/bobbyb92290/media/Camper%202/IMG_20150913_124810890.jpg.html" target="_blank"><img src="http://i93.photobucket.com/albums/l61/bobbyb92290/Camper%202/IMG_20150913_124810890.jpg" border="0" alt=" photo IMG_20150913_124810890.jpg"/></a>
I also have cleaned off two pieces of the roof skins, about 1/4" of fiberglass, tar, silver slop and whatever else the PO's have put on over the last 50 years. Took a lot of time with the heat gun to get most of it off. There is still a little bit left. Whats have others done when it comes to painting the roof when they have these kind of roofs? Also whats the best "sealant" to use on the smooth overlapping seams of the roof?
Also I still have not decided on the power distribution center, but top of the list is the Parallax 6730D, unless someone tells me otherwise.
|
|
bmrrwolfe
Member
Posts: 36
Likes: 3
Currently Offline
|
Post by bmrrwolfe on Sept 7, 2015 11:45:54 GMT -8
Thanks, mountainsounds. I just checked out your thread and you're doing a beautiful job! Lots of inspiration there. I also checked out your rebuild, mbrrwolfe, and it's very helpful, thanks! Do you have any photos of the interior paneling you added? I'm not sure how much I'll be changing things because I wanted to keep most of the interior cabinets as is, but I'm curious to see your solution. Here are a few pics of the interior paneling: 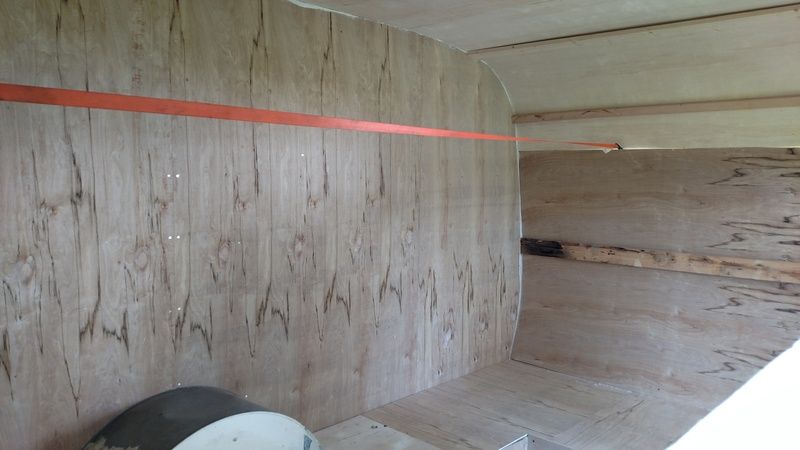 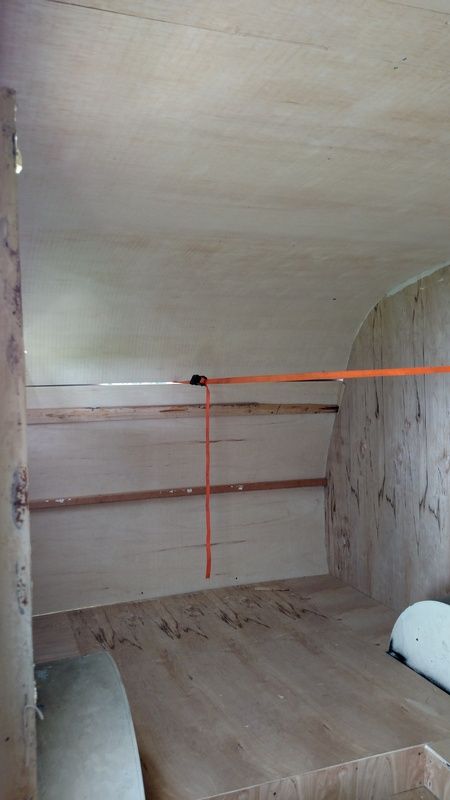 The side walls are actually Luan from Home Depot. Being on a low budget and they are only $13-14 for a 4x8 sheet. I am planning on painting my interior, so if your staining, then it may not be the best to use. The front/top/back had one sheet of luan (you can see the grain change) but when I realized that it does not bend easy, even with most of the techniques I have read about, so the rest was just a decent quality sanded ply. |
|
bmrrwolfe
Member
Posts: 36
Likes: 3
Currently Offline
|
Post by bmrrwolfe on Sept 7, 2015 10:58:33 GMT -8
Well it has been a while since I last updated this, but work has slowly been continuing. The structure has been completed, and the skin was set in place to test fit, and mark locations of windows and roof vent to finalize the locations for the cross braces. (ignore the old rotten boards that were used as temporary supports) 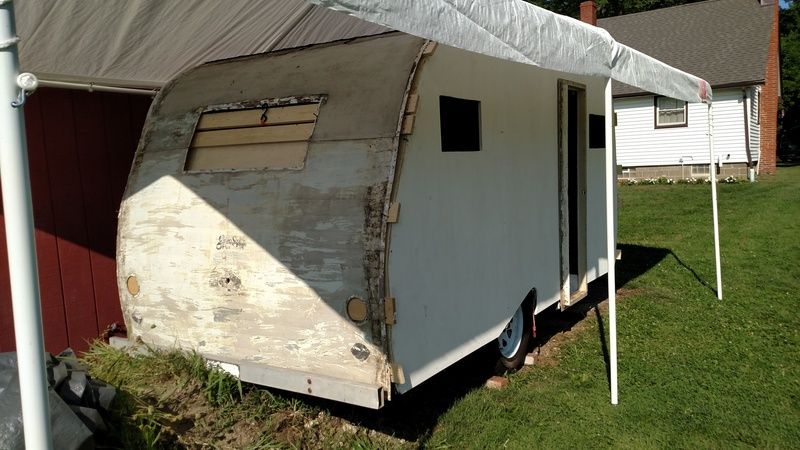 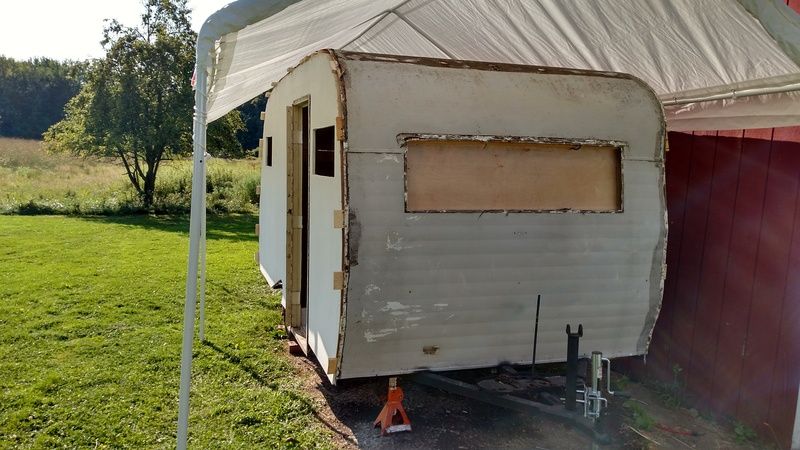 I spent way to much time arguing with the city, who cited me for having the canopy & camper, stating it was against city ordinances to have, and that I can not major repairs to an RV in my yard, after trying to fight it, I was told if it wasn't moved then I would get additional citations.. After getting a councilman involved, I still had to move to a spare concrete pad, but can keep the canopy for now. Anyone else have any issues like this?? Next update was cutting out the front and rear windows, and running the wiring for the taillights, marker lights, and the clearance lights. As well as started planning out the interior wiring system. I originally was going to just have a 110 system, but decided to include a 12V system as well. I was leaning towards the Parallax 6730D www.parallaxpower.com/6730d-power-center-6730d or the WFCO WF-8735-PB www.amazon.com/WFCO-WF-8735-PB-Black-Power-Center/dp/B004LF14Q4 |
|
bmrrwolfe
Member
Posts: 36
Likes: 3
Currently Offline
|
Post by bmrrwolfe on Sept 2, 2015 19:03:52 GMT -8
Welcome! I am in the process of rebuilding a 66 Scotty with the 1/2" walls as well. I was shocked as to how thin they were when I started tearing it apart. I added interior paneling (after putting up the walls, as to not change the ovetall width) and offset the seams. Really helped to add some strength. Here is my build (which I need to desperately update) vintagetrailertalk.freeforums.net/thread/4830/1966-scotty-sportman-rebuild |
|
bmrrwolfe
Member
Posts: 36
Likes: 3
Currently Offline
|
Post by bmrrwolfe on Sept 1, 2015 9:20:28 GMT -8
I have no experience with the Parallax 6730. It is designed for smaller pop ups and campers. *Some* converters MUST have a battery as a buffer. Couldn't find anything on that, nor could I find whether it has a smart charger. I recommend doing some more research before making a choice. It looks like an efficient little unit, all in one. I don't normally use a 30 amp main, just the regular 15 and 20 amp circuits. Also, you will have to upgrade to a 30 amp inlet if you're going to go with a 30 amp converter... Thanks for the input. From my research, it does not need a battery, it can charge a battery, but is not a 3 way (smart charger). I will be putting in a new inlet and use a 30a line. |
|
bmrrwolfe
Member
Posts: 36
Likes: 3
Currently Offline
|
Post by bmrrwolfe on Aug 31, 2015 16:57:34 GMT -8
|
|
bmrrwolfe
Member
Posts: 36
Likes: 3
Currently Offline
|
Post by bmrrwolfe on Aug 31, 2015 13:38:45 GMT -8
I'm running a Magnatek 6300 NOS in my Hansen. It works really well but is not the best battery charger. A person has to disconnect the battery if you'll be plugged in over a day or so... WFCO (World Friendship Company) are the lowest end converters available. I have replaced many in newer rigs. Perhaps consider Progressive Dynamics, Intelli Power or Parallax. Also be sure it has a smart charger, either built in or as an add on. There are more brands than above, some are all in one, some deck mount. If WFCO have parts available, maybe. A cooling fan really helps. I don't have pictures, but they are fairly easy to install. You need heavy gauge wires from the battery. I won't actually have a battery, but like the idea add one later or for the next owner. Thanks for heads up on the WFCO and that explains the low price. I will look into the other brands, but I was just more curious as the concept of the power center, and the ease of install since I have not really seen much info on them other then in newer campers. |
|
bmrrwolfe
Member
Posts: 36
Likes: 3
Currently Offline
|
Post by bmrrwolfe on Aug 30, 2015 6:45:29 GMT -8
Now am I overthinking this, and at this point would a true RV converter be just as simple to install?? For anyone who is running a converter, what size are you running? and could I get some pictures of the install? Or has anyone put a new power center in their campers? Something similar to this? www.amazon.com/dp/B004LF4RAE/ref=twister_B00LGDZKIC?_encoding=UTF8&psc=1Seems well priced, and simplifies the install to one contained unit. Thanks! |
|
bmrrwolfe
Member
Posts: 36
Likes: 3
Currently Offline
|
Post by bmrrwolfe on Aug 28, 2015 18:26:31 GMT -8
I think that the link I was looking for. Thank you. One of the biggest incentives I have seen for adding a 12V system, is for the light fixtures available, and possibly any future thoughts of boondocking.. I really like the simple 12V light fixtures available, and was wondering if anyone has found any for a 110V? Thanks!
|
|
bmrrwolfe
Member
Posts: 36
Likes: 3
Currently Offline
|
Post by bmrrwolfe on Aug 28, 2015 4:31:52 GMT -8
You'll need a 30 amp inlet and appropriate wiring to the breaker box. The A/C and Microwave are big draws. Most require a dedicated circuit. I would consider using a separate cord for at least the A/C. Bypass the trailer system because you won't be using it ALL the time. 3 circuits: 1. 15 amps, Lighting and a few outlets (TV-nothing with a load) 2. 15 amp, More outlets (fridge, kitchen) 3. 20 amps Microwave; possibly a space heater but not in use at the same time Also add an outside plug on the least used circuit. Hope this helps. Thank you, that does help. The other part that I was wondering about, was how many avoid the 12v system and converters completely. It's seems to simplify the process greatly, but since the camper is stripped down, now is the time to do woring easily, and want to have it done the right way. I'm familiar with wiring a house, so the wiring won't be an issue. But I thought I saw it somewhere on here (can't seem to locate it) but when installing the breaker box the grounding bars, need something specific. Could someone point me to that thread? Also any direction to what breaker boxes people have used,and tips on finding nice camper style 110 lights on a budget? I like the slim ceiling LEDs found in a newer camper but all I see are 12v.. |
|


