|
|
Post by Teachndad on Jan 26, 2024 13:19:59 GMT -8
Hi Derek, I wish we had an experienced member from that neck of the woods on the forum, but I don't think so. It's a nice dream to bring it back, but from your brief description it would take a lot of time energy and money to bring back. People have trailered their trailers on a flat bed to their homes And it could be an option, but tow service cost would most likely be expensive and the trailer would have to be checked and possibly reinforced for the journey so it doesn't blow apart on the way to it's destination. Here is a thread that is somewhat related if you look for a private party to take on the project. vintagetrailertalk.freeforums.net/thread/13032/new-trailer-talk Just my two cents. Rod |
|
|
|
Post by Teachndad on Jan 26, 2024 7:41:13 GMT -8
It's nice just sitting in these trailers and enjoying the experience. Greg mentioned the stripe being a little different than original. 99.5 percent of the folks out there will never know. In my experience, the general public often asks me about my trailer, "Is that a Shasta?" Wings and a stripe is all you need and it's a Shasta.  Cheers, Rod |
|
|
|
Post by Teachndad on Jan 26, 2024 7:22:19 GMT -8
I was researching the plethora of information on VTT and didn't realize Joe's sharing of his camper shed was over 8 years ago. Does time fly when you are having fun?
I felt it deserved a repost.
Cheers,
Rod
|
|
|
|
Post by Teachndad on Jan 25, 2024 10:37:29 GMT -8
Hi Greg,
Is the axle still on the trailer? If the axle is still on the trailer, then you can use those corkscrew jacks you have lying around. Level out your trailer as best you can with the tongue jack. I am assuming your floor is level. PLace one corkscrew jack aft of each wheel. Place more or less half of the distance to the end of the trailer. Place the screw jacks up under the C channel of the frame and two more up front under the C - channel just behind the front wall if that makes sense. You will also want to chalk the wheels.
Others are encouraged to answer the other questions or add to my suggestion.
Rod
|
|
|
|
Post by Teachndad on Jan 24, 2024 21:20:48 GMT -8
In trying to help out Greg, I walked through the steps we presented in the current discussion and my photo wouldn't show after uploading either.  Normally, I upload to an album and my photos show up in my photo stream, but with just 1 photo, the photo wasn't showing up in the photostream.  So, that sent me down a rabbit hole trying to figure out how to get the photo to show up. The steps below are what I came up with. Maybe someone has a better way to do this? Greg did get to the point at which the image had a pink rectangle around it. Yay Greg! Here is a summary of the steps in one place. Sign in on the Flickr page Click on the cloud with the arrow icon top right corner Click on " Choose photos" in the center of your screen Click on " Your photo you want to upload". Clicked Open button (lower right) image with the pink frame is now visible Click on Upload 1 photo (upper right corner) Click on Upload button (center of screen) At this point, you won’t see your photo
Click on Camera Roll (Look a bit right until you see " Camera Roll") Look at the thumbnail of your photo Click on the opposing white arrows in the top corner of the thumbnail Click on the words “ View On Photo Page” (far right) Now your photo shows up surrounded in black.Click on the bloated arrow (lower right corner) Click on BBCode in the pop up screen if it doesn’t already have a blue line under it. See image below for locationo of BBCode. *Size of the photo can be changed. Click on down arrrow (small upside down triangle) Optimum presentation size is med 640 x 243 or the next medium size choice. (Don't use the size in the photo below.) I found this photo online just to show where the BB code is. 
Now click on link in the narrow long rectangle
It will have a blue back ground
Right click on the link with your mouse AND click Copy
Now, on VTT, go where you want to post your picture. Move your curser where you want to put the image
Right click and look through the pop up choices for "Paste".
Click on Post quick reply or Go advanced.
Try that and see if it works. Not our fault it’s a chore.
Go have a beer. 
Rod
|
|
|
|
Post by Teachndad on Jan 24, 2024 10:13:18 GMT -8
Hi Willie,
I can't help you with this one. This is a very oddball accessory for the trailers we usually see around here. Just me, but I think this would be more something you might see on a vintage Airstream. All I can suggest is to ask on some Airstream forums. I think you would have more luck there for this particular question.
But, hey, maybe someone here can help.
Cheers,
Rod
|
|
|
|
Post by Teachndad on Jan 24, 2024 7:33:50 GMT -8
Hi Jim, Are you just rescreening all the side windows or the front window set or both? When I redid my front window assembly for riveting, I had the help of a friend's son who was an aircraft mechanic and one of his jobs was riveting. So, I was able to ask him to come over and help with any solid rivets. He used a rivet gun, compressor, Clecos, Cleco pliers and a series of different bucks to buck the rivet against depending on it's location. I believe the type of rivet you are looking for is a semi tubular rivet with a truss head aka flush rivets. I had bought a series of small rivets I thought were the right size, but he came over with an assortment and we used some of mine and some of his to finish the job. Prior to using my friend's son, I was calling around to machine shops to see if they could do riveting for me or even airplane repair shops for help. Learning to rivet has an investment curve as well as a learning curve if you want to learn. People use the pop rivets because they are in most instances easy to install and reasonably easy to size. The tail of the rivet does stick out, though. I presented a little of the experience with post #51 on this page vintagetrailertalk.freeforums.net/thread/3598/andy-57-westerner-restoration-thread?page=4 John Palmer is the rivet guy around here. He’s the one with the most experience with riveting. I used the pop rivets in the Hehr side windows as well as the rear window. Up front, is where we used the rivet gun, not on the other windows. The entire front window set frame had loose rivets and we had to basically reattach the pieces of the outer frame to stiffen it up. That necissitated the use of flush revits for that application. Finally, here is what it looks like to use the pop rivets to attach the vertical support to the back frame of a smaller Hehr window. (Click on the photo and once in Flickr, click again to magnify.) This is from the front side (interior side of the window frame) 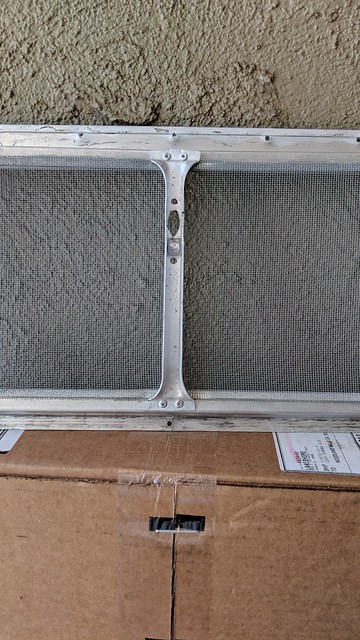 Here is the tail side of the rivets showing on the exterior side of the back frame. Note also the use of the awl to poke through the new screening.  Here’s my opinion for what it’s worth. The pop rivets as I show them being used are just fine in this application. No one will see the tail end of the pop rivet (if that’s a concern) or know that it was originally a flush rivet. The front window assembly is different. That’s where we used the rivet gun. Rod |
|
|
|
Post by Teachndad on Jan 24, 2024 5:31:39 GMT -8
Hi Larry,
Gotcha. As stated earlier in the thread. The streetside skirtboard was heavily desintigrated so I didn't have a decent template for cutting a new one. The original taped together skirtboard that's lying in front of the new skirt board is actually the skirt board from the other side (curbside). Incidentily, that had a huge knot in it which came apart. Hence the masking tape to hold it together. I had to make a decision whether to precut the streetside skirtboard based on the curbside skirtboard or wait until the entire curbside wall was completed and then match to that one. I chose the latter for better or for worse.
This is my first restoration and it's been like trying to get to the center of a maze. We all know what that's like.
Cheers
Rod
|
|
|
|
Post by Teachndad on Jan 22, 2024 22:45:13 GMT -8
Hi Friends, I added glue and screws to the joints and added two pieces of lumber for additional support.  I have 1 of 2 backer boards with pocket holes drilled, cut and ready to support the bed frame, but decided not to add it at this time. I am going to wait until the walls are up and I add the bedframe to the interior. Then I will add the backer boards. The clamped areas on the wall are where I added a white narrow strip of 3/8” thick poplar. These were left over cuts from the skirtboards. In the clamped areas, original screws or staples for the skin for anchoring the window frames barely seated and sometimes missed the lumber because the framing was too narrow. So, I glued the 3/8” strips in place to widen the framing boards. This seemed to me to be a good compromise for strength and not disturbing the original still good lumber. The curved edge of the lower radius board will be cut/shaved to meet the end of the original but deteriorated skirt board that I laid in front of the new skirt board.  Cheers, Rod |
|
|
|
Post by Teachndad on Jan 21, 2024 8:59:11 GMT -8
Hey Jesse,
Your perservereance is appreciated!
To message, you can click on the screen name to the far left of that persons post. The private message window should pop up. Type in your message and click on send. As a new member, you might not be able to do that. Vikx can confirm.
A veteran member can PM you with no problem. If you can't send PM's, I don't see why you couldn't just ask for a member to PM you in a post in your thread.
Rod
|
|
|
|
Post by Teachndad on Jan 20, 2024 11:31:45 GMT -8
Ten ... thank you for the link, but I could not find it  ... maybe it is gone. ... maybe it is gone.
Pictures: I just learned how (I think) to add pictures. This picture (if it shows) is my idea of how I would add the top section. It would be 6" high in the center and about 10' long. I am not sure that I want to go to all of this trouble. My other thought is to lower the floor about 3", just in the center section where one stands. Has anyone done that? Larry
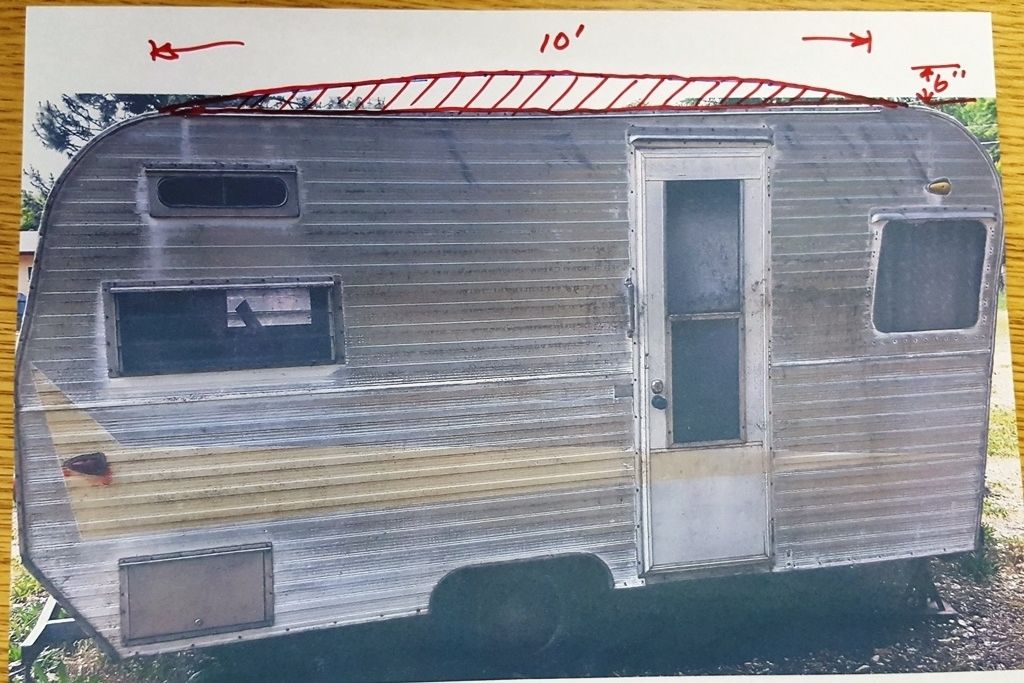
Curious. What happened to this project. Please update should you get a notification. It would be great to see what happened finally. Cheers, Rod |
|
|
|
Post by Teachndad on Jan 20, 2024 11:04:43 GMT -8
Hello everyone, My name is Jesse kunda. I just came in last night. I've got a 1954 Aljoa that I inadvertently started a restoration on about three years ago. Thanks for letting me in. I'm kinda old school, meaning I missed the boat on computers and all the new tech way of social networking, I really don't have any clue on how to use these forums, if anyone could lend a hand and help me Navigate on how to post my story and years of pictures and all my knowledge that may be able to help anyone else, I'd be so grateful. Hi Jesse and Welcome! I undertstand the confusion. A thread is a topic that you start. In this case, you started a thread of introduction. What you typed was your post. Any time you type something and click the create post "button" at the bottom right, you just created a post. When you ask a question or introduce yourself like you just did, that started a thread. In order to post pictures, that's a little more involved. You will have to first open a free acount at www.flickr.com/. Find the register button on the home page. Once registered, you will have to move them (upload them) to the website. Here is a thread on how to post after you register your account. pictures. vintagetrailertalk.freeforums.net/thread/7276/add-photos-hosted-flickr-tutoria click on the link to your left. If posting pix is too difficult, you can still post your questions on the site. The site is divided into different sections. Find the one that applies to your topic so you can start a new thread. You can also learn a lot by just going through the website clicking on different area of the forum and see what's in there. You can read the topics folks have posted about and click on the the title of the thread and it will get you to the thread. Like Vix, said, you already made it through your first post, so you are on your way. Cheers, Rod |
|
|
|
Post by Teachndad on Jan 20, 2024 10:49:06 GMT -8
My Shasta's VIN is C-12266. Can you help with the model and year? Hello and wecome! Your trailer is a 1959 Airflyte built in Northridge California. Cheers, Rod |
|
|
|
Post by Teachndad on Jan 20, 2024 10:42:28 GMT -8
Hi Peter,
I am glad you are trying to attempt this. It's a problem that clearly vexes everyone.
My thoughts come not from experience, but I will give it a go at least to open the discussion. You are clearly making a spring clip like in the Hehr push out windows by creating tension against the glass and pushing against the outer window frame complete with glass seal, and I am sure that's the inspiration for your design.
Screen spline is good on the interior where you designed it to be, but I would think it will eventually dry out and shrink. But that might take a few years and if the trailer is stored under cover or shaded you should get a decent life maybe 4- 7 years?, but I would think it would need to to be replaced with some sort of regimen - Conservatively every 2 to 3 years or more? It could be included in regular maintenance like putty tape removal and re application.
Definitely worth a model with a water test.
Rod
|
|
|
|
Post by Teachndad on Jan 19, 2024 6:28:55 GMT -8
Hi Vicki and Welcome! Adding to what Vix already mentioned. You want a seller to be able to show you pix like what you see in this thread. vintagetrailertalk.freeforums.net/thread/10167/1964-shasta-airflyte-alaska The skins (aluminum siding) was removed to see where the rot was. They all have rot. Then methodically, the restorer would be restoring it bit by bit or some of us do a frame off restoration and everything comes apart like a Lego model. Then you put it back together - better, stronger, not necessarily faster (6 Million Dollar Man reference). In the linked thread above, the restorer worked correctly from the outside in. That means he/she removed the skins on the outside and then looked inside for the work to be done. For anyone selling a "restored" vintage trailer, the seller should have pix like you see in the linked thread. Flippers generally want to do their work fast and cheap. The often start by working inside first (inside out). They remove (note rip out!) the old paneling inside which weakens the structure and then replace with new paneling and forgo repairing the water damaged sill boards that make up the lower parts of the walls. So, the trailer can be come weak in this "process". Then, they paint the outside. Hence inside out. It's easy to be swooned by a flipped trailer. They look nice because the most money was spent on the paint job. They probably picked up the trailer for a song, flipped it and added $10,000+ to what they paid for it hopping to catch some unsuspecting buyer. As Vix stated, if you find something post about it here with a link. You can find trailers on Facebook Marketplace as well as Craigslist. Read this thread. vintagetrailertalk.freeforums.net/thread/962/warning-scammers-busy-beesAnother option is to go directly to a commercial restorer, but that can be $$$, but you never know. Also, you need to decide how far you want to drive to see your trailer. After you see pix and talk with the seller and it seems legit, you might have to drive a few hours or more. I have driven up to 900 miles one way after sharing pix and talking extensively over the phone, but I had two trailers for which I drove over 200 miles one way. Consider expanding your searches and not just an hour drive. I once drove 4 hours to see a trailer and it didn't look anything like the pix. This is when I was inexperienced. It wasn't towable. Left work at 1 pm, got lost, got home at 11 pm. Go out and kick some tires to see what's out there. Don't get entranced by a "pretty face". Cheers, Rod |
|


 Normally, I upload to an album and my photos show up in my photo stream, but with just 1 photo, the photo wasn't showing up in the photostream.
  So, that sent me down a rabbit hole trying to figure out how to get the photo to show up. The steps below are what I came up with. Maybe someone has a better way to do this?

 ... maybe it is gone.

