slowlady
New Member
Posts: 21 
Likes: 4
Currently Offline
|
Post by slowlady on Oct 30, 2017 18:31:36 GMT -8
It seems like there are two different methods of restoration (a) building the wall off the trailer then attaching the whole piece, or (b) fixing the frame/panels one section at a time while it’s still attached to the trailer.
I haven’t really considered trying method (a) but should I? Are there situations that would necessitate it? Why do folks choose one way or the other?
|
|
|
|
Post by vikx on Oct 30, 2017 19:29:46 GMT -8
If the trailer has to go all the way down, it's easier to build the walls and then attach to the trailer. If there is good wood and wall studs, you can repair the walls in place. It's not too difficult to repair the sills and skirts with the walls up.
One reason to take a trailer all the way down is when the floor is totally rotted out. You have to have everything out to fix the floor. Sometimes, a floor can be pieced if it's just sections that are bad. For instance, if the back is soft, cut the bad off and replace. Of course the joists need to be in good condition. You can't really tell what is needed until you get there.
I think your trailer can probably be fixed with the walls in place. Can you post some photos of what you have?
|
|
nccamper
Administrator 
Posts: 7,743 
Likes: 2,870
1962 Forester- 1956 Shasta
Currently Offline
|
Post by nccamper on Oct 31, 2017 4:38:05 GMT -8
Another factor is work space. If you have a enclosed space to work it makes pulling it down to the frame much easier. If you're working outside, it may be easier piece by piece if it isn't totally rotted as vikx mentioned above.
|
|
slowlady
New Member
Posts: 21
Likes: 4
Currently Offline
|
Post by slowlady on Oct 31, 2017 5:31:01 GMT -8
Thanks for your responses! Here are a couple of pictures. From what I can tell at this stage of disassembly the floor seems like it's in pretty good shape. As you can see I'm under cover, but I'm tucked in a corner of someone else's barn so I don't have a ton of room. 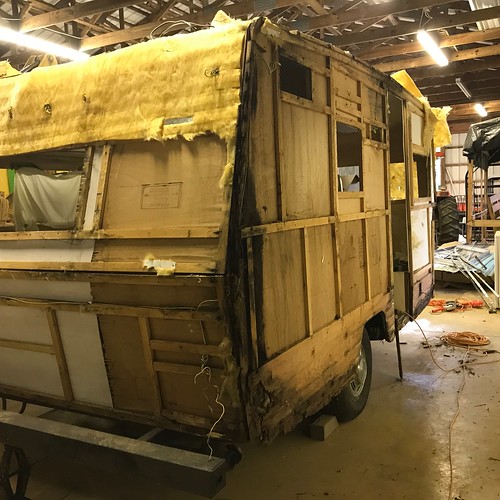 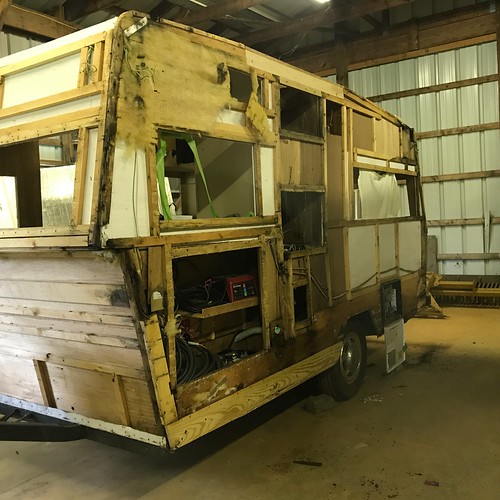 |
|
nccamper
Administrator
Posts: 7,743
Likes: 2,870
1962 Forester- 1956 Shasta
Currently Offline
|
Post by nccamper on Oct 31, 2017 5:57:44 GMT -8
I've restored worse without taking the walls down but it requires working in a methodical way. I work section by section repairing from the floor/sill up.
A few questions:
You say the floor seems solid. That includes all the framing under the 3/4" floor?
The sides resting on the bottom sill (which screws into the frame) hasn't rotted to the point that the walls have sagged?
The metal framing under the floor is solid and not sagging or needing attention?
Are you reusing the skin? If so you need to be exact. I find it easy to match the walls to the old skin with the walls up. Others may disagree.
Another big issue is whether your friend will let you take over a big part of the barn if you take the walls down.
|
|
slowlady
New Member
Posts: 21
Likes: 4
Currently Offline
|
Post by slowlady on Oct 31, 2017 7:19:52 GMT -8
I am reusing the skins, and he would probably let me but the barn is just pretty full as is. The floors: it is time, overdue, for me to slide underneath and take a good honest look. Thank you!
|
|
nccamper
Administrator
Posts: 7,743
Likes: 2,870
1962 Forester- 1956 Shasta
Currently Offline
|
Post by nccamper on Nov 1, 2017 10:15:08 GMT -8
Take an ice pick and don't be shy about poking. |
|
lawman
New Member
Posts: 12
Likes: 4
1967 Cardinal Flipper
Currently Offline
|
Post by lawman on Feb 27, 2018 17:51:24 GMT -8
If the skirt boards are so rotted, how do you know how to fabricate another skirt that will be the same size? Have not started looking under the skins yet on our '67 Cardinal, but I know at least one side is rotted.
|
|
Ten
3K Member

Posts: 3,432
Likes: 1,467
70 Shasta 16SC + 1964 Airflyte
Currently Offline
|
Post by Ten on Feb 27, 2018 19:51:20 GMT -8
slowlady , Have you done any replacing yet? If not then the front corner at the bottom has been opened up and some work done before. It appears in the photo like a piece or two of pressure-treated wood has been added. Just in case you get looking and decide maybe it should be good enough to keep, there are plenty of reasons to get rid of pressure treated lumber in the framing. The biggest is that the chemicals used in the PT process will react and oxidize the aluminum siding.
|
|
ladywendolyn
2K Member

Posts: 2,315
Likes: 928
1964 Golden Falcon
Currently Offline
|
Post by ladywendolyn on Feb 27, 2018 20:28:45 GMT -8
If the skirt boards are so rotted, how do you know how to fabricate another skirt that will be the same size? Have not started looking under the skins yet on our '67 Cardinal, but I know at least one side is rotted. I have had to work through this issue. Usually one side is in good enough shape to get a pattern, but I also made poster board patterns of the exact curve on the back and front of my trailer while the skin was still on. This became very helpful when working on the back corner which was rotted at both sides. I was able to compare the tracing to the existing wood, and confirm my cuts. Along the sides, it is a little bit of guess work, but take lots of photos even when its rotted, and you should be able to sort it. Worse case scenario, someone with the same model, or one of the leaders here on the forum can give you some advice when your stuck. They have talked me down from the wall a few times...lol |
|
|
|
Post by vikx on Feb 27, 2018 20:57:08 GMT -8
One side is not always the same as the other!!! Wonder how I know this?
The way to make the skirting match the skin is with the SKIN. There are screw holes, doors and windows that allow you tack the skin exactly as it was. I use small 3/4" drywall screws, but 1" will work. Don't go clear thru...
Get your skirts rough cut first. Then, using trim screws, tack the skirt(s) in place. Two screws will do. Hang the lower skin and tack. You can also clamp the bottom. Trace around the skin pattern onto the skirt. You should be able to lift the skin and remove the skirt for trimming. Cut with a jigsaw and sand smooth. Tack back in place and if it matches your skin, the final attachments can be done.
Lawman, since your trailer is still intact, remove the front, roof and rear metal. There are a couple of ways to do it depending on amount of rot.
Remove all windows and doors, then loosen the bottom of the side skins. You should be able to prop the siding up and work underneath and/or slip the lower siding off. When repairs are complete, slip the siding back where it was (Be exact!) and trace the pattern on the skirts for final cuts. Propping the skin up makes for a little faster job since you don't have to take it off, then rehang.
|
|
lawman
New Member
Posts: 12
Likes: 4
1967 Cardinal Flipper
Currently Offline
|
Post by lawman on Feb 28, 2018 10:25:47 GMT -8
Ok! Thanks for this. The first question so far to make me lose sleep. Makes sense though.
|
|
slowlady
New Member
Posts: 21
Likes: 4
Currently Offline
|
Post by slowlady on Apr 6, 2019 16:29:24 GMT -8
If the skirt boards are so rotted, how do you know how to fabricate another skirt that will be the same size? Have not started looking under the skins yet on our '67 Cardinal, but I know at least one side is rotted. This forum is so awesome. Thank you all. Quick update: I set aside my restoration about this time last year because I had a cross country trip planned for summer 2018. Thank you Larry for your advice to not try to restore on a deadline. A friend helped me convert my minivan and my son and I spent an incredible 5 weeks on the road. It was hard to let go of my dream of taking my trailer but it was the absolutely the right move. Anyway, a year later, and it's time to give camper some love!
With regards to my original post on this thread, Larry helped me work out a plan. I'm going to rebuild the frame while the walls are still up, then remove the walls and take everything apart and fix everything and put it back together. Right now I'm working on the curb side forward skirt, and it turns out I'm struggling with exactly lawman's question because the edges of ALL my skirts are rotten, and I am going very slowly making a wood template/practice piece and having trouble figuring out if it's the right size because the rotten skirt piece is so different from the skin.
vixk, since my skins are already off would I get a rough cut now then follow the rest of those steps way on the otherside when I'm putting the metal back on? Is it ok to use the skins as a template when they're off the trailer?
Thank you all so much! It's good to be back!
|
|
studeclunker
Member

Posts: 42
Likes: 9
'51 Spartanette Tandem
Currently Offline
|
Post by studeclunker on Apr 8, 2019 12:40:00 GMT -8
Like I advised you before and you seem to have at least watched the free videos, Mobltech has the answers. If you join his inexpensive Patreon group, you get an EXACT explanation on how to do what you are asking about. Both you and Lawman. For now, look at the videos for the '57 Westerner and the '62 TravelEze. He talks about this very framing issue in both. His website (if you don't already know) is www.cannedhamtrailers.com/ The TravelEze is the first thing you see. |
|


