theresa
1K Member
 from Northern Maine ~ Proud new owner of Lola, a 1960 Shasta Airflyte and Pearl, a 1962 Mobile Scout
Posts: 1,055 
Likes: 347
Currently Offline
|
Post by theresa on May 7, 2017 12:15:04 GMT -8
Ok, I'm at an impasse with my tall wardrobe cabinet. I want to cut out the design on the plywood sides of the cabinet, but I'm a novice with a router. I am trying to use a 1/2" straight bit, and clamp the old piece onto my new plywood and use the old as a template to cut out the design (the Shasta with the two curves and straight line in the middle, sort of like this ) | ( No matter how hard I try, I just can't seem to figure out how to make accurate cuts without the router getting away from me and making it messy. I can't really see where I'm going with the router tip, and it just cuts so fast that before I've even realized it, I've messed it up. Help? Would I be better doing it on the router table without the fence on it than trying to go from the top down?
|
|
|
|
Post by danrhodes on May 7, 2017 12:27:44 GMT -8
Does anyone in your town have a water jet cutter or other computer controlled cuttingmachine? A router is really not the tool for this...would the wood fit on a scroll or band saw table? Maybe a jigsaw with a very narrow bit?
|
|
mel
Senior Member
1964 Shasta Airflyte
Posts: 1,729
Likes: 523
Currently Offline
|
Post by mel on May 7, 2017 13:01:09 GMT -8
I did mine with a jig saw, I made sure to tape with painters tape for less splintering. It worked ok, but not perfect. 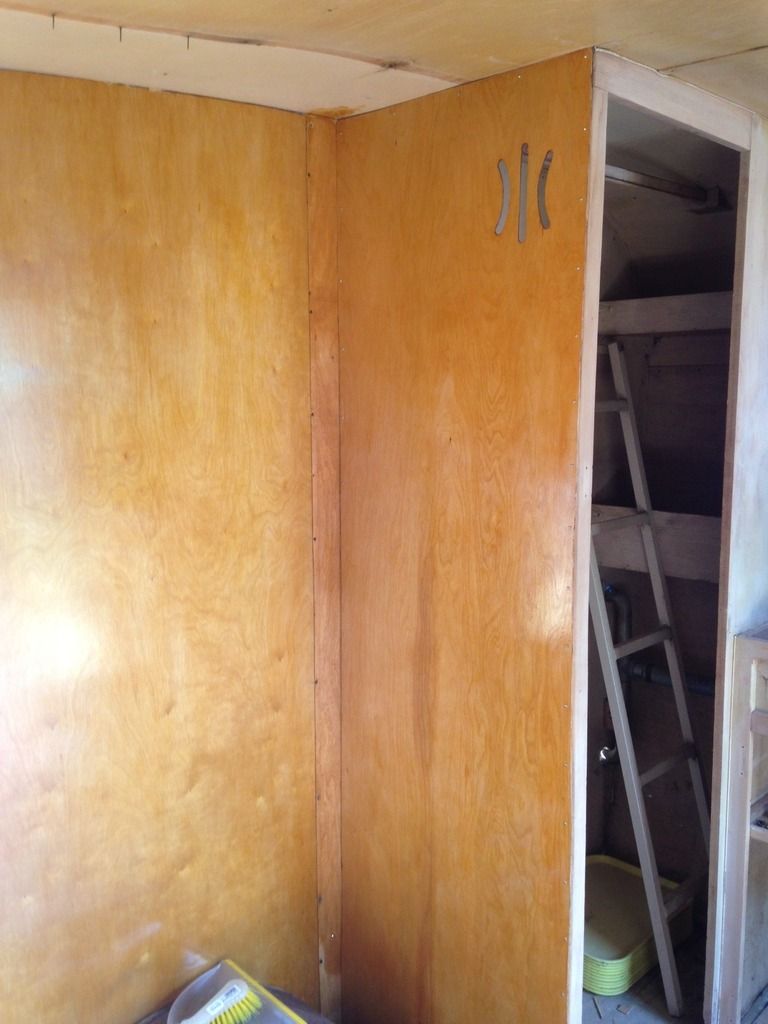 |
|
nccamper
Administrator 
Posts: 7,743 
Likes: 2,870
1962 Forester- 1956 Shasta
Currently Offline
|
Post by nccamper on May 7, 2017 13:36:50 GMT -8
I also cut the S in a magazine rack with a jig saw then sanded it. A router is just too hard to control. A band saw would probably work even better.  Is this the design you're recreating? |
|
theresa
1K Member
from Northern Maine ~ Proud new owner of Lola, a 1960 Shasta Airflyte and Pearl, a 1962 Mobile Scout
Posts: 1,055
Likes: 347
Currently Offline
|
Post by theresa on May 7, 2017 15:14:37 GMT -8
No, it's the design in the side of the cabinet that mel referenced above. I'm glad to hear that I'm not just totally inept and couldn't figure out the routing. I'll switch gears tomorrow and dig out the jig saw. Thanks! |
|
roadtripper
Active Member

Posts: 311
Likes: 116
Currently Offline
|
Post by roadtripper on May 8, 2017 6:16:00 GMT -8
The tight radius at the end of each cut will be pretty hard with a jig saw. I'd recommend drawing your layout and then using a forsner drill bit of the right size ---- 1" or 1 1/2" or whatever you want, at each end and then connect the holes with the jigsaw. When you drill, clamp the ply down on a piece of scrap to keep the back from splintering out.
|
|
kirkadie
1K Member
Posts: 1,156
Likes: 556
'69 Serro Scotty Hilander
Currently Offline
|
Post by kirkadie on May 8, 2017 7:32:38 GMT -8
|
|
theresa
1K Member
from Northern Maine ~ Proud new owner of Lola, a 1960 Shasta Airflyte and Pearl, a 1962 Mobile Scout
Posts: 1,055
Likes: 347
Currently Offline
|
Post by theresa on May 8, 2017 8:02:39 GMT -8
This is how I was thinking originally, but I struggled with how to do a CUT OUT design, rather than following a pattern on the edge of a template, like trimming the edge of the formica to match the shape of the table top. Getting the bit into the hole and following along wasn't working on my practice piece because it would simply cut the template as well. That said, I wasn't trying it with a bearing guided bit. |
|
|
|
Post by danrhodes on May 8, 2017 9:06:17 GMT -8
It was my thought that making the template would be as much work as cutting the thing itself. You can get very narrow jigsaw bits for tight turns. |
|
mel
Senior Member
1964 Shasta Airflyte
Posts: 1,729
Likes: 523
Currently Offline
|
Post by mel on May 8, 2017 9:14:39 GMT -8
I forgot to mention that we did use a drill for the rounded corners, like dan suggested above.
|
|
roadtripper
Active Member
Posts: 311
Likes: 116
Currently Offline
|
Post by roadtripper on May 8, 2017 11:05:04 GMT -8
A little followup. I agree with the router but also with the comment about making the template. If you have several, make the template once, get the guide bit and you're set. One time shot maybe the good drill bit and jigsaw. And about the saw---if on the practice piece you are getting tear out with the blade you can get a jigsaw blade that cuts on the down stoke and is sometimes easier on the veneer of the ply. If you end up making templates, masonite is good stuff for that.
|
|
charliemyers
Active Member
Posts: 181
Likes: 58
Currently Offline
|
Post by charliemyers on May 8, 2017 11:49:58 GMT -8
The router is the right tool for the job as has been previously mentioned. I'd get a flush trim bit with the bearing mounted on top: MLCS Flush Trim BitDepending on the thickness of your work piece, I'd think that #6500, 6501, 6509, or 6502 from the above link would be good. These bits can't be "plunged", so you may need to drill a starter hole. There are other bits that can be plunged into the work piece, and these will not require a hole to get started if you have a plunge router. Clamp your template on top of the work piece, locate the bearing against the bottom of your template, and follow the edges. I don't remember off the top of my head, but you'll notice that the router is more controllable going one direction than the other. Whichever way the bit rotates, you'll want to move the router around the edge against the rotation...otherwise it'll try to drive away like the spinning wheels on a car against the road. Be sure to allow the bit to come to a complete stop before lifting the router or you'll risk damaging your template. If you don't feel comfortable doing the whole thing with a router, you can always do the best you can with a jig saw, and then use the router & flush trim bit with a pattern to clean it up so that you have much less sanding to do. Good luck whichever method you choose! Charlie |
|
zipper
Junior Member
Posts: 58
Likes: 11
1966 zipper , 1961 trotwood
Currently Offline
|
Post by zipper on May 9, 2017 10:15:01 GMT -8
I used a roto-zip, smaller than a router, easier, lightweight,
|
|
nccamper
Administrator
Posts: 7,743
Likes: 2,870
1962 Forester- 1956 Shasta
Currently Offline
|
Post by nccamper on May 9, 2017 11:51:42 GMT -8
Great tool sites. Thanks. A flush trim bit would work if the template is thick enough.  If your template is 1/8" birch the bearing wouldn't have enough wood to act as a guide. |
|
theresa
1K Member
from Northern Maine ~ Proud new owner of Lola, a 1960 Shasta Airflyte and Pearl, a 1962 Mobile Scout
Posts: 1,055
Likes: 347
Currently Offline
|
Post by theresa on May 9, 2017 12:11:41 GMT -8
Great tool sites. Thanks. A flush trim bit would work if the template is thick enough. If your template is 1/8" birch the bearing wouldn't have enough wood to act as a guide. That's my issue; I was trying to use the existing closet cutout as my template, so yea, only 1/8 birch ply. I will try with drilling both ends and cutting it out with the jig saw then sanding down. |
|


