mrmarty51
Leading Member

Posts: 1,787 
Likes: 423
1972 HOMEMADE
Currently Offline
|
Post by mrmarty51 on Oct 30, 2016 7:54:40 GMT -8
Well, Another new person on the forum. I was directed here from the truck forum by another member. I don't think it would be okay to disclose His name without His permission. I have an older camper trailer that was about ready to fly apart on Me. The last time I had it out ice fishing I had to have a friend bring Me out some rope so that I could tie it all back together. The seam at the top curve in the front had come apart and I knew that it would catch wind and self destruct before I got it home. A pic. of where it is at now, with all the paneling removed from the outside. I will have to come back into the forum to finish My intro but this`ll give You an idea of what I am up against. I do now have it down to the bare frame works and insulation. Interior I am afraid has to all come out, rotten floor board in areas. Well, I see that the image has to come from an alternate http source so I will have ro wait until I get back from church to get it loaded and into the forum. Okay, time to go to Church. |
|
nccamper
Administrator 
Posts: 7,744
Likes: 2,871
1962 Forester- 1956 Shasta
Currently Offline
|
Post by nccamper on Oct 30, 2016 9:45:26 GMT -8
A pic. of where it is at now, with all the paneling removed from the outside.
Welcome. It's always fun to see "Before" photos. We look forward to seeing them. |
|
mrmarty51
Leading Member
Posts: 1,787
Likes: 423
1972 HOMEMADE
Currently Offline
|
Post by mrmarty51 on Oct 30, 2016 14:09:45 GMT -8
Hey NCCamper. My camper looks almost like Yours. ![]() I am thinking that it would be best to cut the curved pieces before I remove any more from the frameworks. Just so that while it is still somewhat together that I will have the proper curves and angles for when it is time to reassemble the little unit. There is no brand naem anyplace on it. The title says "Home Made Camper", for whatever reason, I just do not know. It had previousely been owned by My Fatherinlaw then passed down to his daughter and then she gave it to Me. I have had it for several years and the only time I have ever used it was during the winters for icefishing. nO, I do not drag it out onto the ice, that is what the four weeeelers are for.  Okay, lets see if I can keep them in order. Will it work from P.B. ? Before the tear down. Welp, that did not work. i will go in and read the how tooos and try again. okay, another try. ![]() ![]() ![]() ![]() |
|
mrmarty51
Leading Member
Posts: 1,787
Likes: 423
1972 HOMEMADE
Currently Offline
|
Post by mrmarty51 on Oct 30, 2016 14:30:31 GMT -8
Okay, I have the pics in photobucket I am in library, I go over to the right side and click the IMG link, I then go into the VTT, click on the pic. image thing above the reply space, it has HTTP in the box. I delete the HTTP, right click and paste. Nothing. i leave the HTTP in the box, right click and paste and;;;;;;;;;;;;;;;;;nothing.
I am a member in several other forums and I have never had a problem with uploading pics to the forums from photobucket. do i need an X amount of posts to be able to upload pics ?
|
|
mrmarty51
Leading Member
Posts: 1,787
Likes: 423
1972 HOMEMADE
Currently Offline
|
Post by mrmarty51 on Oct 30, 2016 14:41:07 GMT -8
Well, How about if I try to share My album instead. the pics of the camper, pics. from My various journeys to alaska and fishing and icefishing annnd annnd, UHhh, Yeah, feel free to look through them. you will probably really like the pics. of My 1959 Dodge W100 Power Wagon. LOL Click the CLICK |
|
mrmarty51
Leading Member
Posts: 1,787
Likes: 423
1972 HOMEMADE
Currently Offline
|
Post by mrmarty51 on Oct 30, 2016 14:43:19 GMT -8
HEY YEAH, THAT WORKED. LOL
|
|
mrmarty51
Leading Member
Posts: 1,787
Likes: 423
1972 HOMEMADE
Currently Offline
|
Post by mrmarty51 on Oct 30, 2016 19:34:00 GMT -8
I just read the thread "Worst Experience" and something came to My mind.
Has anyone ever cut the bolts from the frame that holds down the body, screw on some 2X4s to the sides and jack the body from the frame, replace all of the floor boards and structural lumber, let it back down, drill the holes and bolt it back to the floor then replace any of the rest of the structural wood that has rotted out on the sides, top and corners ?
|
|
nccamper
Administrator
Posts: 7,744
Likes: 2,871
1962 Forester- 1956 Shasta
Currently Offline
|
Post by nccamper on Oct 30, 2016 19:52:14 GMT -8
The bolts through the plywood do an excellent job holding the box to the frame. I just replaced most of the bolts on my latest project with grade 5.
My advice, before doing any demo watch the videos here...
cannedhamtrailers.com
An excellent resource.
Also a member (vikx) wrote a great book of restoration with lots of photos. PM and ask her about it.
Ask lots of question as you go, post photos. And have fun.
|
|
mrmarty51
Leading Member
Posts: 1,787
Likes: 423
1972 HOMEMADE
Currently Offline
|
Post by mrmarty51 on Oct 30, 2016 20:52:27 GMT -8
I hope I have not gone too far, before getting some sound advice.
The plywood floor is mostly real bad. Where the water tank was is completely rotted out along with various places throughout, mainly along the edges. The roof vent had been leaking for quite some time and the floor in that area feels a bit mushy.
I am afraid this thing is going to have to be stripped down to the floor and beyond.
Thank You nccamper for all of Your replies. I will check out the cannedham and also send a PM to vikx.
I just hope that I can accomplish this task without tearing up the cabinets and interior too badly.
I thought just maybe I could get this done without removing any of the interior, not to be so. LOL
|
|
|
|
Post by vikx on Oct 30, 2016 22:31:03 GMT -8
Marty, I had to lift the body on my Red Dale because the floor was GONE... Didn't really want to do it but it worked. I unscrewed the cabinetry floor attachments and attached 2 x 4s to the sides. Lifted the body with rachet straps and pulled the mess out from under. Pix here: reddaletrailer.shutterfly.com/pictures Scroll down to the build pix to see the body lift. We are here to help. I know at least one of us has run up against THE monster in each build. |
|
msgoehring
Full Member
 Just call me Margaret the shellac, buff, sand an shine queen.
Posts: 860 
Likes: 303
1957 Westerner Deluxe
Currently Offline
|
Post by msgoehring on Oct 31, 2016 2:07:16 GMT -8
Hey Marty, welcome to the jungle 😁 Vintage trailers are awesome, and once repaired correctly will last you much longer than a more modern one. You were on the right track to posting pictures, you just went too complicated. When you're on the page at Photobucket that shows the picture you want to share, on the right hand side will be 4 ways of sharing, Email & IM, Direct, HTML & IMG followed by url's to copy and paste. Select the last option, IMG, copy all of the url in the box. Then come back here to your post and just paste the url in the body of the message your creating like this ( 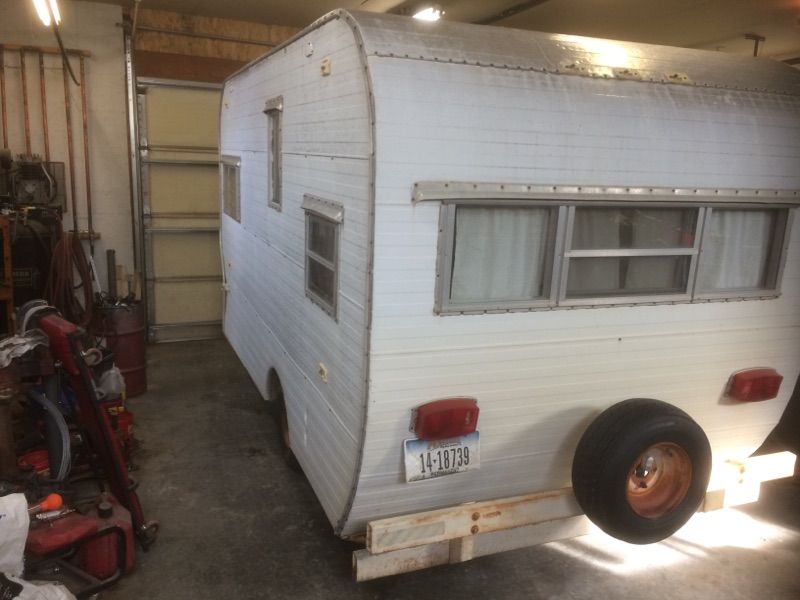 ) only without the parenthesis I added. Do you have a picture of the front with the skin on and also the side with the door in??? I was thinking it was a repainted Shasta until I saw the plywood walls and now I don't know. Some of the other more knowledgeable members may be able to figure out what you have with more pictures. Also get some of the inside cause that can sometimes help also. |
|
mrmarty51
Leading Member
Posts: 1,787
Likes: 423
1972 HOMEMADE
Currently Offline
|
Post by mrmarty51 on Oct 31, 2016 7:36:39 GMT -8
I will give it another shot with the P.B; it will have to be from the computer in the house as this little samesong just bogs down with all the adds in P.B.
I will get pics. of the interior and I will have to do some searching and see if I have any pics. of the door side.
I did remove the screws from the fender wells It appeared that they were welded to the frame but now that she screws are removed I am not so sure that they are. Screws needed to come out so the floor can be removed.
I do have some 2X6s and 2X8s from when I jacked up My old shed to pour a floor under it. It too had rotted out under the walls sill plates. I fastened the 2Xs to the corners and used them for stilts. I will try and post in a couple of pics. of that poorject too. {Poorject because I`m poor and on a very tight budget. LOL}I`m thinking that if I fasten those 2Xs to the outside structural wood, wall studs, and then fasten them together at the corners then that will prevent the walls from spreading. Using the old Simplex track jack for lifting then fastening 2Xs to be the stilts to hold it up.
Okay, it seems that I am on the right track, going to use the right angle grinder with a cut off wheel and saw off the anchor bolts to the floor.
OH, yeah. I am a retired mechanic/machinist/welder from the Montana D.O.T. after 31 years. so taking on things such as this is not a problem, keeping a full head of steam might be though. LOL
|
|
msgoehring
Full Member
Just call me Margaret the shellac, buff, sand an shine queen.
Posts: 860
Likes: 303
1957 Westerner Deluxe
Currently Offline
|
Post by msgoehring on Oct 31, 2016 19:34:21 GMT -8
I find I have tons of problems with Photobucket and mobile devices, and the ads are insane. That's why I'm in the process of moving everything to Flickr since I haven't had as much trouble with them yet. Here's a tutorial on Flickr: vintagetrailertalk.freeforums.net/thread/7276/add-photos-hosted-flickr-tutorialThen there's this thread by a longtime member whose user name is Rin Tin: vintagetrailertalk.freeforums.net/thread/4148/1965-aloha-project . He started out like you are, thinking the repairs could be made with the body on the frame, then decided it was better to remove the body like you want to do, and finally he did a frame up restoration. He goes into lots of detail about why and how he's doing things. Between him, the videos mobiltec puts out ( www.cannedhamtrailers.com ), and the great book vikx put together ( vintagetrailerrepairmanual.weebly.com ) you'll have wonderful answers to just about all your questions. Anything that you can't find in those places, there's a good chance someone on the forum can help, so don't be afraid to ask. |
|
mrmarty51
Leading Member
Posts: 1,787
Likes: 423
1972 HOMEMADE
Currently Offline
|
Post by mrmarty51 on Oct 31, 2016 21:24:30 GMT -8
Thank You MS. I will use every available source that is at My disposal.
I started to load pics. to PB and it locked up My computer so I had to walk away and come out to the garage.
I have an account with myfishingpictures but for some reason it did not recognize the JPG files I was trying to load into it.
I will try that Flicker and see if it is any better. I guess I should buy a couple of new computers but, I`m too busy spending money on poorjects. LOL
I did get the camper cleaned out. removed the power introvertor, or maybe it is an extrovertor, I`m not sure, turns 110 to 12 volts. I do not think I will be putting it back in. Planning on going to all 12 volt LED lights. The deep cycle battery should last for several days with no more light than I burn during the dark hours. Spend the day on the ice fishing and by the time supper is cooked and dishes washed it is time for a good nights sleep. If the battery goes low I can always plug it to the trailer connector and recharge it. after I get it all hooked like that.
I also have a propane lamp that attaches to the ceiling, I will be installing that too. Give off a little more heat in the cold weather and provide lighting too.
Okay, back to the house, see of PB has cut loose of the computer yet.
|
|
mrmarty51
Leading Member
Posts: 1,787
Likes: 423
1972 HOMEMADE
Currently Offline
|
Post by mrmarty51 on Oct 31, 2016 21:58:28 GMT -8
WOW. I looked over just the first page of Rin Tins Aloha project and have already expanded Mine knowledge a whole bunch. Thank You M.S.
Also. did contact vikx and have the link to get the PDF book. I will be doing that very shortly.
|
|


