mobiltec
5K Member
 I make mistakes so you don't have to...
Posts: 9,825 
Likes: 3,752
1954 Jewel In Progress...
Currently Offline
|
Post by mobiltec on Jan 12, 2016 20:37:54 GMT -8
Wow. So what would your suggestion be if we don't have a covered place to work on it? A really big tarp and make it a good one from Tarps Direct... (www.tarpsonline.com) Order a poly tarp. Silver is the best all around color. Once you pull the top vent cover you can stick an 8 foot tall 2x2 up through the vent creating a tee pee effect so rain will run off and not puddle. I did a complete repanel front to rear including much other work like that in Steamboat Springs and it rained nearly every day in the afternoon. Did it all in 17 days but that was in the summer with long days and I've done it a bunch of times. Make sure the tarp is big enough to go almost to the ground on all 4 sides of the trailer. Tie it at the bottoms with rope. No bungie cords. They damage the metal skin and or paint. You can pull the front of the tarp up over the top back to the stick to work on that half of the trailer and do the same in the rear to work on that half. At times while working on the top you will have the entire tarp off the trailer laying in front or behind ready to go up in a moments notice if you are expecting weather. You could also make an awning type thing like in the photos below. I've worked on trailers in this manner for 10 years and finally broke down and bought a metal carport to work under.  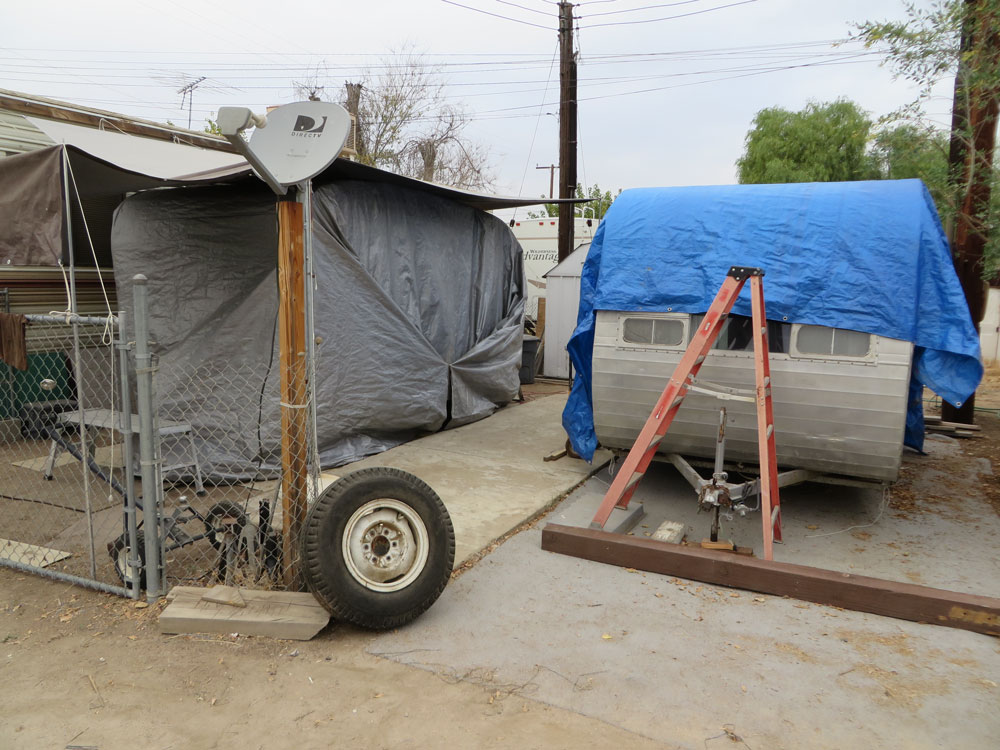 |
|
nccamper
Administrator 
Posts: 7,745
Likes: 2,872
1962 Forester- 1956 Shasta
Currently Offline
|
Post by nccamper on Jan 12, 2016 21:05:48 GMT -8
Mobiltec covers everything because he is hiding all the best restoration candidates in Southern CA. I'd like to get my hands on that camper on the right.  |
|
|
|
Post by danrhodes on Jan 12, 2016 21:06:44 GMT -8
You can also get a cheap carport. Mine is from Costco. But harbor freight also makes one cheap after coupon. I had to replace the top after 6 months due to sun damage which is why mobiltec recommends specific tarps.  |
|
chametzoo
Full Member

Posts: 585
Likes: 128
1960 Mobile Scout
Currently Offline
|
Post by chametzoo on Jan 12, 2016 21:40:24 GMT -8
Of course… listen to everything Mobiltec says. He's the master of getting it all done without luxurious facilities . Not to alarm you, but in looking at the limited photos you've posted, I'm seeing bright colors on the outside and the entire inside was wholesale sprayed all one color… including the cabinets and every bit of trim!… possibly with latex house paint. (Although it is nice that the previous owner removed cabinet hardware before painting.) The interior of of a '61 would have been golden shellacked and on the outside, the colors for Mobile Scout were usually pale and pretty conservative. The fact that this late coat of paint on the interior is massively succumbing to water damage, tells me that this 54 year old trailer has suffered a great deal of water damage. It takes a long time for water that penetrates the skin to actually appear as stains on the interior plywood finishes. Then you paint over that… and it takes a little while longer to show up again… only worse. This all adds up to decades of water leakage, which always means the framing is seriously compromised and molded. With a 54 year old trailer, it doesn't really matter what the last owner did a couple of years ago to stem the tide. After all this compromising of structure, the only thing that holds the trailer together while towing, is the unibody nature of the construction. This means that everything you see in the trailer that is "built" is supporting the total structure… that includes the bulk head and kitchen cabinets. They're all contributing to the structural integrity. When the frame and skirt boards start to deteriorate, those interior structures start to contribute more. But eventually there is a limit. If you listen to all the handy men and women on this forum, you will learn the order in which you need to disassemble in order to assess the real damage…it's not just what you see on the inside. Explore Mobiltec's videos as to how to proceed. In the best case, once the skins are lifted, you will find episodic frame damage that can be grafted in with new. Possibly selective plywood replacement and a reuse of existing skin. Of course with the skin removed, there will be opportunities to address issues such as plumbing, gas lines, electrical and insulation. |
|
chametzoo
Full Member
Posts: 585
Likes: 128
1960 Mobile Scout
Currently Offline
|
Post by chametzoo on Jan 12, 2016 21:50:21 GMT -8
On a more positive note: it appears from your exterior photo that the screw heads are unpainted, around doorway, hatch etc. Perhaps this means that skins have been removed and reinstalled and some frame repair has already happened. You can explore by peeling some of the skin back and peaking in to see what the condition is. If that's the case though, the interior finishes were still painted over and left in their damaged condition.
|
|
|
|
Post by katiebronleewe on Jan 13, 2016 5:19:44 GMT -8
Thanks everyone. We will check out Mobiltec's videos. We are wondering if we bit off more than we can chew  we have never attempted anything like this before, but my husband is very handy and can usually figure out how to do anything himself, so hopefully we'll be able to tackle this! Any other tips on taking off skins? That seems super daunting to me! |
|
nccamper
Administrator
Posts: 7,745
Likes: 2,872
1962 Forester- 1956 Shasta
Currently Offline
|
Post by nccamper on Jan 13, 2016 7:34:08 GMT -8
Removing the lower front and rear skin is easy. Remove the window, unscrew the jrail, pull a few staples then gently remove the panel trying not to destroy the paint. It may be hard to do without messing with the paint job.
If your husband is handy, he'll love the work. It's a lot of fun.
But you need a long term place to work. Repairs take longer than you think if you're working full time.
Before you do anything, watch the mobiltec videos or buy the book vikx wrote. Or both.
|
|
mobiltec
5K Member
I make mistakes so you don't have to...
Posts: 9,825
Likes: 3,752
1954 Jewel In Progress...
Currently Offline
|
Post by mobiltec on Jan 13, 2016 10:58:09 GMT -8
Removing the lower front and rear skin is easy. Remove the window, unscrew the jrail, pull a few staples then gently remove the panel trying not to destroy the paint. It may be hard to do without messing with the paint job. If your husband is handy, he'll love the work. It's a lot of fun. But you need a long term place to work. Repairs take longer than you think if you're working full time. Before you do anything, watch the mobiltec videos or buy the book vikx wrote. Or both. Yep it's really not all that tough or time consuming.... Here's a quick little preview... |
|
Ten
3K Member
Posts: 3,432
Likes: 1,467
70 Shasta 16SC + 1964 Airflyte
Currently Offline
|
Post by Ten on Jan 13, 2016 11:18:52 GMT -8
I'll just throw in .02 cents worth here, remember that demolition is the easy part. Be sure to take plenty of photos along the way, write stuff down that you know you won't remember (in my case, well...a novel...), measure measure measure, and enjoy the process!
|
|
|
|
Post by katiebronleewe on Jan 13, 2016 18:50:55 GMT -8
Thank you! We've ordered a huge tarp and we're watching videos so that we're ready to get to work when the tarp arrives.
|
|
mobiltec
5K Member
I make mistakes so you don't have to...
Posts: 9,825
Likes: 3,752
1954 Jewel In Progress...
Currently Offline
|
Post by mobiltec on Jan 13, 2016 19:41:26 GMT -8
Good job Katie. Put a one quart plastic bottle or cup or something on top of the center pole so that it doesn't wear a hole in the tarp too soon. Or some old socks. Anything to stop the the friction between the tarp and the pole. If you have any sharp places on the trailer cover those with tape or something soft to avoid wearing holes in the tarp. One string on each side of the tarp going down to the wheel well and under to the frame will keep the tarp on the trailer when you are working on either end. You only remove those if you are taking the tarp all the way off. Then just diaper front and rear corners together along the sides corner to corner with one string each and that's it. Holds up in the wind and easy to untie and then roll up over the top for work.
Hey maybe I should do a video on how to tarp up your trailer LOL...
|
|
|
|
Post by katiebronleewe on Jan 17, 2016 16:05:47 GMT -8
We took all your advice and loosened the rear skin to see what was underneath and you guys were right! Rotten wood we only got it loose part way up the back and it seems like the skins on back and top are all connected with tight tight seals so we are thinking it will come off all in one piece.    We definitely want to replace all interior birch paneling, so it seems that we have a pretty near rebuild on our hands. No idea how we got ourselves into this mess  but we are actually having a lot of fun working on it together so far! |
|
mobiltec
5K Member
I make mistakes so you don't have to...
Posts: 9,825
Likes: 3,752
1954 Jewel In Progress...
Currently Offline
|
Post by mobiltec on Jan 17, 2016 17:10:09 GMT -8
Good for you! Remember we are here to help and there is no such thing as a dumb question.
It's not all that hard to do really. I have over 400 videos on how to do this stuff with minimal tools and effort. You might want to roll that top skin up into a much bigger roll than I usually do because it includes the rear skin. You will most likely find it seamed where you can split it at the top of the front window. I bet the rear seam is a Z fold. Just leave it together and check out my video on how to roll up the skin. Just make your roll a little larger and looser because of the nice paint. Also get something like thin packing foam or tyvec of something to roll up with it to help protect the paint. It can sit on it's side while you do the work. The entire thing can be done by one person with a little help in 17 days if you worked all day every day on it. I did that with a Forester. Video series on my website.
|
|
|
|
Post by katiebronleewe on Jan 17, 2016 18:02:47 GMT -8
Would you roll it up paint side in? That seems easiest to roll but is opposite the natural curve of the trailer. Or try to roll in under/paint side out?
After getting the roof skins completely off the trailer, would our next step be to remove side skins?
|
|
mobiltec
5K Member
I make mistakes so you don't have to...
Posts: 9,825
Likes: 3,752
1954 Jewel In Progress...
Currently Offline
|
Post by mobiltec on Jan 17, 2016 18:14:57 GMT -8
No... watch the video. It will roll up the way it wants to curve naturally which is the way it was curved on the trailer. You start in front and roll under. Takes two people and some hand clamps. And the paint is why I would get some Tyvec to roll up with it. You can get that at HD or Lowes. Also makes for a good vapor barrier when you are ready to put the skin back on. youtu.be/6MB8-C6w3mU |
|


 we have never attempted anything like this before, but my husband is very handy and can usually figure out how to do anything himself, so hopefully we'll be able to tackle this! Any other tips on taking off skins? That seems super daunting to me!
 but we are actually having a lot of fun working on it together so far!