luther
New Member
Posts: 3 
Likes: 1
1966 Monitor
Currently Offline
|
Post by luther on Jun 13, 2015 15:11:55 GMT -8
Hello Everbody!
I am new to the vintage travel trailer world and and recently purchased a '66 model Monitor. Unsurprisingly, there is some fairly severe water damage to the lower framing and plywood floor. I have now figured out that the floor is sandwiched between the lower floor framing and the wall framing. My question is, will the overall structure of the trailer be compromised if I piece the plywood floor in ( raise one stud wall at a time to correct the lower framing and get the replacement floor under it) or does the plywood need to be continuous all the way across the floor? I plan to install a floating wood floor over the plywood.
Any advice would be appreciated!
Thanks,
Luther
|
|
|
|
Post by vikx on Jun 13, 2015 22:25:45 GMT -8
Welcome Luther and hello!
It's hard to answer your question without photos. The walls are installed either "on top" of the floor or "at the side" of the floor.
I am guessing you can piece the floor as long as the carriage bolts anchoring everything to the frame are secure.
The reason this question is hard to answer is because we need more information. If the floor is not attached to the frame properly, the trailer may have to come down further. Be sure that the skins are lifted to assess what repairs are needed.
|
|
luther
New Member
Posts: 3
Likes: 1
1966 Monitor
Currently Offline
|
Post by luther on Jun 14, 2015 3:12:33 GMT -8
Thanks, Vikx.
Yes, I agree about the pictures (worth a thousand word, and all!). I'll get some during today's work.
In my case, the walls are on top of the floor. Currently, the plywood is installed in one sheet all the way across and under both walls. I would like to split the replacement floor and repair one side of the trailer at a time.
I officially got over my skin lifting fears yesterday!
More details to come.
Thanks,
Luther
|
|
luther
New Member
Posts: 3
Likes: 1
1966 Monitor
Currently Offline
|
Post by luther on Jun 14, 2015 12:38:15 GMT -8
Here are some pictures of how my trailer is constructed. I would like to replace the floor frame members, the plywood floor, and the lower wall frame members on one side at a time to avoid completely detaching the body from the frame. This would require that I split the plywood somewhere near half way across the trailer. I would add some front to rear support stringers between the existing cross joists to support the plywood seam. I would also like the side anchor bolts to go all the way through the wall frame lower members rather than being covered by them like the current design shown in the picture below. Does this approach seem reasonable? Thanks again for any advice. Luther ![]() ![]() 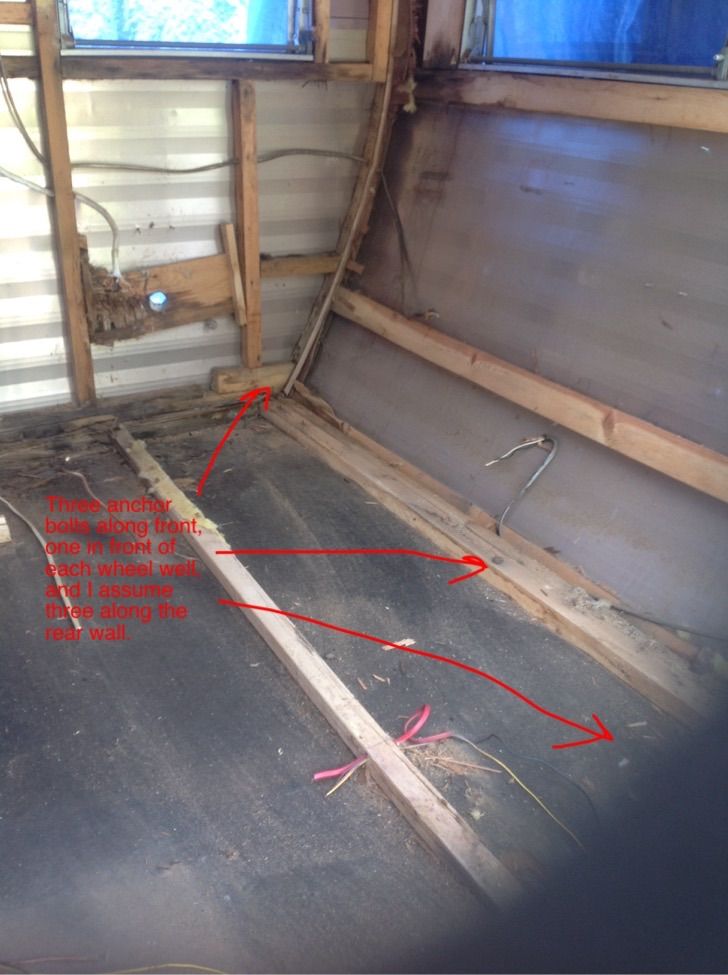 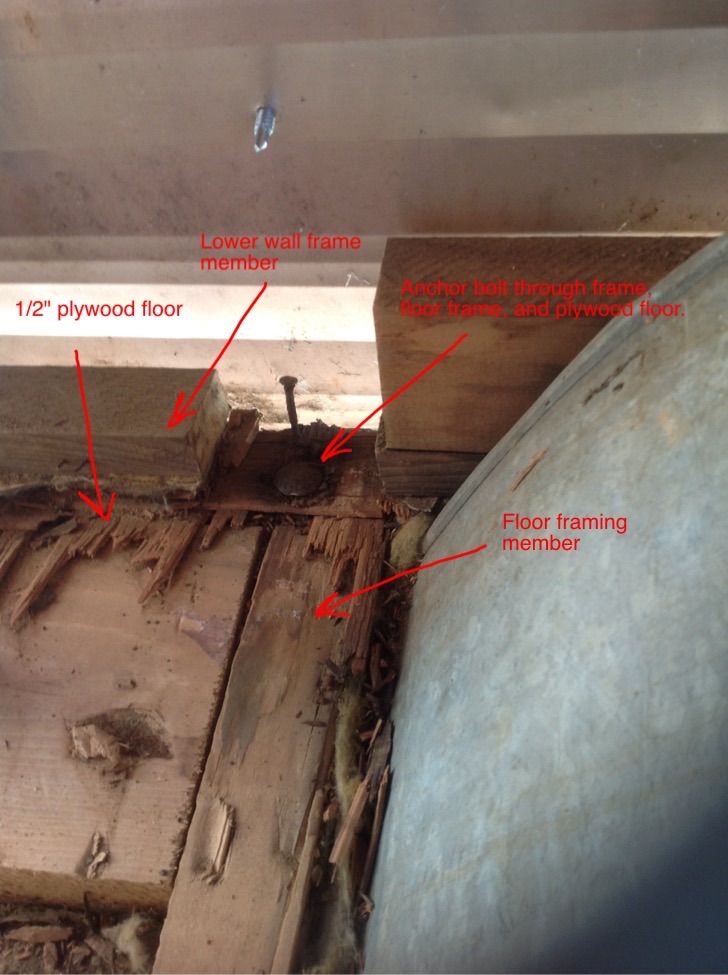 |
|
nccamper
Administrator 
Posts: 7,744
Likes: 2,871
1962 Forester- 1956 Shasta
Currently Offline
|
Post by nccamper on Jun 14, 2015 19:07:28 GMT -8
I'll offer up a site you might find helpful. cannedhamtrailers.com/57shasta.htmThis is a member who shows how they usually come apart and go back together. In most cases it's best to work from the outside in. Your photos show the complexity of working from the inside out. People do it but it's not something I've tried. Since the strength comes from being bolted and screwed together in layers, you may have to find a way to lift the box off the frame, lay new plywood in, replace framing and lay it back down. The carriage bolts have to hold together the plywood, framing and metal subframe. Somebody smarted than me may have something different to add. |
|
thralldad
Member

Posts: 35
Likes: 8
Currently Offline
|
Post by thralldad on Jun 15, 2015 9:08:04 GMT -8
I replaced mine the hard way. If you have room and overhead cover it would be easier to totally disassemle it for the repairs. I did not have the required area and jacked up the walls with a floor jack and screwed 2x4s in to support the shell ( after removing the skins).
|
|
|
|
Post by danrhodes on Jun 18, 2015 12:26:45 GMT -8
Since we're talking about floors, hopefully someone has some advice for me. My floor consists of a 1/4" sheet of ply on the bottom, a little over 1 inch framing and 1/4" ply on top. Within this sandwich is glued a honeycomb of cardboard, like in a cheap door, that gives the floor rigidity. The total floor thickness is about 1-1/2", the metal frame only has 2 outriggers, front and back and the bottom plywood sits right on the frame.
All of this needs to come out, but obviously cardboard isn't going back in...has anyone ever seen a solid plywood floor? I was considering 3/4" marine ply on the bottom and 3/4" T&G sturdifloor plywood glued and screwed on top.
|
|
|
|
Post by vikx on Jun 18, 2015 22:47:56 GMT -8
Many of mine have plywood "only" floors. Most are about 5/8" thick with a layer of tarpaper, coating, or other on the bottom. I think an 1 and 1/2 inch solid floor is going to be way heavier than intended for a trailer.
I would go with an underbelly, floor joists and insulation. Subfloor on top, could be as thin as 3/16ths if you plan on T and G flooring...
|
|
|
|
Post by danrhodes on Jun 22, 2015 7:50:30 GMT -8
Many of mine have plywood "only" floors. Most are about 5/8" thick with a layer of tarpaper, coating, or other on the bottom. I think an 1 and 1/2 inch solid floor is going to be way heavier than intended for a trailer. I would go with an underbelly, floor joists and insulation. Subfloor on top, could be as thin as 3/16ths if you plan on T and G flooring... Hi Vikx, I'm having a little trouble visualizing how I would replace this "slab" floor with a joist system...this trailer only has the most basic metal frame, with outrigger cross pieces in the front and back and the main 2 C-channels ending at the rear springs. Are you saying I could replace this cardboard sandwich floor with a thin plywood underbelly, approximately 1 inch thick joists and thin plywood floor and stay within the 1-1/2" thickness of the current floor?...basically replacing the cardboard filler with joists? |
|
|
|
Post by vikx on Jun 22, 2015 21:34:12 GMT -8
I was just thinking the space was already there, with the cardboard. 1/8" masonite makes a good belly. It's pretty tough, surprisingly. I paint the underside with waterproofing roof sealer, easy clean up, available at HD. So then add joists the thickness of the cardboard and insulate around/in between. Should only need 3 running up the middle and whatever is used as a sill. I like foam better than fiberglass in a belly; doesn't absorb water. You are making a sandwich, belly, insulation/joists, then subfloor. Depending on the thicknes, you use 1/2 to 3/4 ply. The joists give something to anchor the ply to. In other words, you have a space to work with, use it rather than make it solid. JMO, insulated floors really help. Here's a link to my Cardinal build: s189.photobucket.com/user/vikxphotos/library/58%20Cardinal%20Two%20into%20One?sort=6&page=20You can see the belly going in on page 20, then 19, 18, etc to follow the progress. |
|
|
|
Post by danrhodes on Jun 23, 2015 9:34:42 GMT -8
I was just thinking the space was already there, with the cardboard. 1/8" masonite makes a good belly. It's pretty tough, surprisingly. I paint the underside with waterproofing roof sealer, easy clean up, available at HD. So then add joists the thickness of the cardboard and insulate around/in between. Should only need 3 running up the middle and whatever is used as a sill. I like foam better than fiberglass in a belly; doesn't absorb water. You are making a sandwich, belly, insulation/joists, then subfloor. Depending on the thicknes, you use 1/2 to 3/4 ply. The joists give something to anchor the ply to. In other words, you have a space to work with, use it rather than make it solid. JMO, insulated floors really help. Here's a link to my Cardinal build: s189.photobucket.com/user/vikxphotos/library/58%20Cardinal%20Two%20into%20One?sort=6&page=20You can see the belly going in on page 20, then 19, 18, etc to follow the progress. Thanks Vikx...those pictures really help and I finally have a plan I can understand. After installing the masonite, you show a few photos of rows of bolt/nuts under the trailer. Is this the joists attached to the masonite and what type of hardware is this (why not just screw up into the joists from the bottom?)? I assume that you install the carriage bolts to the frame after the top plywood is installed? |
|
|
|
Post by vikx on Jun 23, 2015 21:47:16 GMT -8
The Masonite has some sheer strength but is basically there to hold the insulation in place and keep debris out of the belly. It covers the entire frame before the joists go in.
The joists are installed with carriage bolts. On the Cardinal, I bolted thru the joists/belly and frame metal. The upper subfloor is installed with 1 5/8 screws; a very strong and secure attachment. If the bolts go thru from the subfloor, they must be inset and filled with floor leveler to allow the top luan to lay flat. I've done it both ways. I do not like having to inset the bolts in visible areas (the middle of the floor). In the dinettes and under the bed doesn't matter.
The underside photos show smaller hexhead screws attaching the belly to the wooden joists. They are similar to metal siding screws. The seams were painted with the waterproof sealant.
To Clarify: the bolts you see attach the joists to the frame. There are also side bolts holding the bottom walls to the sills. The smaller hexheads hold the belly and prevent sags. (belly was also stapled)
Hope this helps. Happy to answer more questions.
|
|
|
|
Post by danrhodes on Jun 24, 2015 9:33:35 GMT -8
The Masonite has some sheer strength but is basically there to hold the insulation in place and keep debris out of the belly. It covers the entire frame before the joists go in. The joists are installed with carriage bolts. On the Cardinal, I bolted thru the joists/belly and frame metal. The upper subfloor is installed with 1 5/8 screws; a very strong and secure attachment. If the bolts go thru from the subfloor, they must be inset and filled with floor leveler to allow the top luan to lay flat. I've done it both ways. I do not like having to inset the bolts in visible areas (the middle of the floor). In the dinettes and under the bed doesn't matter. The underside photos show smaller hexhead screws attaching the belly to the wooden joists. They are similar to metal siding screws. The seams were painted with the waterproof sealant. To Clarify: the bolts you see attach the joists to the frame. There are also side bolts holding the bottom walls to the sills. The smaller hexheads hold the belly and prevent sags. (belly was also stapled) Hope this helps. Happy to answer more questions. You've given me a lot to work with. This frame does not have nearly the same number of attachment points as your Cardinal I think 4 carriage bolts across the front outrigger and 4 across the rear where the frame stops at the rear springs, so I either have to get creative with the joist strength front/rear or I need to get the rear frame extended. The rear floor on the original trailer wasn't actually tied to the main floor at all, about 3 feet just held in place by the side walls, so anything I do is bound to be more safe...I just really don't want to get into welding if I can avoid it. |
|
|
|
Post by vikx on Jun 24, 2015 11:03:53 GMT -8
I did go a bit overboard with the carriage bolts on the Cardinal... the holes were there tho. LOL. The frame is not original to a Cardinal (late 50s Cardinals have weak, usually broken frames). We modified the frame to fit a canned ham body; also widened and lengthened the body. It was an intense but fun build. Lots of thinking went on. My 52 Hanson has about 2 feet overhang in the back with no support. The joists do go to the back and add some support. I think the general idea with old hams is that nobody would be walking back there; just the bed...Oddly, the Hanson walls were bolted on top of the frame. Cardinal walls are on the side; bolted thru the sill boards. Both are very strong. Here's a photo showing the Hanson frame. It did have two metal runners to the back two by, then 3 joists in the middle, bolted to the frame. All provide some support to the butt portion.  Here's the link to the page of the Hanson Story where the floor/frame is: s189.photobucket.com/user/vikxphotos/library/The%20Hanson%20Story?sort=6&page=5You can scroll thru the pages to get a better idea of what was done. The belly in this particular trailer is Coroplast, a type of corrugated plastic. (like cardboard) It is 1/4 inch thick and was inset into the frame. I prefer to lay the belly as the Cardinal. Be sure you check your frame very closely for cracks and rust thru. If it's sound, extra joists should add strength. It's also possible to add cross bars from side to side and bolt them rather than weld. I've bolted a few when welding would have endangered the trailer body... Can you imagine welding with cardboard stuffing? Yours is the only one I've seen with that. You have a RARE TRAILER! Keep us in the loop. |
|
|
|
Post by danrhodes on Jul 19, 2015 13:54:28 GMT -8
I replaced mine the hard way. If you have room and overhead cover it would be easier to totally disassemle it for the repairs. I did not have the required area and jacked up the walls with a floor jack and screwed 2x4s in to support the shell ( after removing the skins). In my earlier discussions with @vikx, I totally missed your comment thralldad. Do you have any photos of your process for lifting and securing the 2x4? I have been planning to do it the "hard way" for several weeks now. |
|


