|
|
Post by Teachndad on Nov 24, 2016 6:28:02 GMT -8
Hi Friends,
I absolutely love the icebox rebuild! My Westerner, Andy didn't come with an ice box. I kept the one I took out of a '55 Starfire. The Frame is 1/4" too large for the opening, but where there is a will, there is a way.
It's Thanksgiving Day and I continue to be thankful for posts like Greg's that show the restoration step by step.
Nice job Greg!
Rod
|
|
gypsyatheart
New Member
Nice rain and snow free weather is all I'm asking for. I can deal with cold, but not wet.
Posts: 15 
Likes: 11
It is not a Shasta...nope!?
Currently Offline
|
Post by gypsyatheart on Nov 24, 2016 8:15:45 GMT -8
I'm with all of you that wish o had a pole barn or someplace to build like that. I can't even get mine into the garage and mid rebuild we have gotten to cold weather. I've tarred mine up and am praying for a calm, clear sky day to uncover and reapply the panels to the roof completely. Great pics.
I cut through and removed my frame bolts, jacked each section up as I removed and slid new floor in. I want to remove the frame bolts again in summer, jack it up like a boat and lip out the trailer to fix any frame issues then. I tebuilt my wheel wells with sheet metal, fiber board/sound board and ply so they look a little better from the inside. Still have a lot to do but I enjoy the work it seems to be therapeutic.
|
|
Vintagehotdog
Active Member
 Hi, we are Paul and Irvina, Currently rebuilding a 12' 1958 Easy Traveler
Posts: 129
Likes: 40
1962 Oasis 18'
Currently Offline
|
Post by Vintagehotdog on Nov 27, 2016 18:13:31 GMT -8
I don't know about the insight, I've never gone this far with a trailer before. Learning as I go, relying on past experience and people like you. Build threads are my favorite, especially with pictures, lots of pictures. Thought I'd share my project as I have learned so much from everyone sharing theirs. Yeah...not sure about helping...more like terrifying me ;-) If I had a nice, level workspace, it might not seem so scary, but mine is stuck on a rutted 60 year old asphalt driveway that's sloped about 20 degrees, so moving the frame around would be pretty impossible. Praying for minimal flooring rot, and hope to get back to it this weekend. Haha, I am somewhere between you two as far as a shop goes. I enclosed my 10' x 20' metal carport,that sits on gravel, with 3/4" styrofoam insulation on 3 sides, some of which I will have to use on the trailer walls! 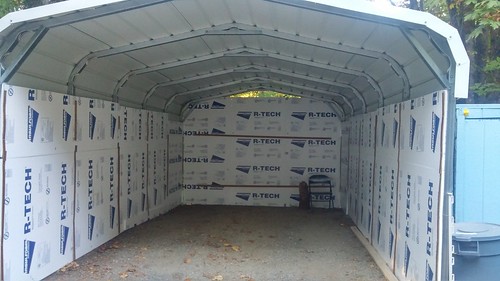 20160921_180116_HDR 20160921_180116_HDR by vintagehotdog, on Flickr |
|
Vintagehotdog
Active Member
Hi, we are Paul and Irvina, Currently rebuilding a 12' 1958 Easy Traveler
Posts: 129
Likes: 40
1962 Oasis 18'
Currently Offline
|
Post by Vintagehotdog on Nov 27, 2016 18:27:49 GMT -8
The walls were laid face to face to see how well they matched up: Boy, I wish I had thought of this. |
|
|
|
RinTin
Full Member
Posts: 760
Likes: 292
Currently Offline
|
Post by RinTin on Mar 28, 2017 13:40:43 GMT -8
Paneling the Ceiling and Ends Before spraying shellac, measurements were taken to lay out the birch plywood then the panels were pre-cut according to the layout and the width of the trailer framing. I then set up a finish rack and sprayed the panels in production fashion, finally getting my gun dialed in and a finish I was happy with.      The roof framing cross pieces were pre-cut then spaced and fastened to the plywood panels with screw nails before installation. Pre-cut roof framing:  Laying out and fastening the roof framing:  Openings were framed, test fitted, and routed after the paneling was fastened. At first I was afraid that the router base would scratch the finish but decided to go for it and it turned out to not be a problem for me. Sometimes taking chances pays off.    I started installing the ceiling panels in the middle, reasoning that if the wall framing was out of square the difference would be split by the time I got to the bottom of each end. One thing I leaned for this piece is it is best to fasten the curb side first. The tall cabinet makes this wall much stiffer making it less agreeable to adjusting. Also, I overhung and fastened the roof cross framing at the seams first then slid each succeeding panel underneath, butting the seams together. I found by leaving the edges unfastened about a foot back from the seam it was easy to lift and slide the next piece into place.   The framing around the vent was raised 3/4” and tapered to the edges with cedar shingles. I used lath screws to fasten the panels to the cabinets and drywall screws to fasten the edges of the panels to the top of the walls.   1/8” plywood was used for the radiuses and 1/4” for the rest. I glued a strip of 1/8” plywood along the seams of the 1/8” to flush them out with the 1/4” plywood so the roof framing and interior trim pieces would fit better.   Have you guessed that I like shots of clamps all lined up? The front radius panel had to be pre-fit to mark the speaker boxes for Dynamat. I fastened guides to the outsides of the wall, standing them off 1/4” to aid in placing the panels. This was a huge help since I was working by myself.   Another thing I found is that butting and attaching the window sections to the radius sections before installing them added enough weight to help the 1/8” plywood make the bend as well as making a nice tight seam at that joint.    Hanging the rear:  Asphalt sealer was applied along the bottom of the front and rear edges for water protection. Originally all the plywood edges were untreated and extended to the very bottom of the framing, exposing them to road spray. In my opinion this is a major design flaw and cause of rot. I believe this was noted earlier, but I re-designed the plywood bottom terminations and now none of the plywood edges are exposed.    The bottom of the plywood and cross framing was fastened to the edge of the plywood sub-floor and an interior trim piece I added inside the trailer along the front and rear ends of the floor.   Ceiling and end panel installation complete:       |
|
mel
Senior Member
 1964 Shasta Airflyte
Posts: 1,729 
Likes: 523
Currently Offline
|
Post by mel on Mar 28, 2017 14:56:36 GMT -8
It looks awesome! love seeing your progress!
|
|
nccamper
Administrator 
Posts: 7,744
Likes: 2,871
1962 Forester- 1956 Shasta
Currently Offline
|
Post by nccamper on Mar 28, 2017 14:57:37 GMT -8
Beautiful.
|
|
RinTin
Full Member
Posts: 760
Likes: 292
Currently Offline
|
Post by RinTin on Mar 29, 2017 12:34:22 GMT -8
I'm glad a few of you are still tagging along as I drag this trailer build out. In this long post I show you a few tricks I used installing the sink, countertop and backsplash. Enjoy! Originally the kitchenette countertop was in 2-pieces, with a thin removable piece behind the range. I can see the logic in this as it makes it easy to retrieve something that gets dropped down behind the range. However, aesthetically, in my opinion, it leaves something to be desired so I decided instead to build a 1-piece countertop. Hopefully I won’t regret this decision later. Rather than cut the sub-top out of a single piece of plywood I made it by edge gluing two pieces together. Using 3/4” marine grade plywood, (yes overkill) I cut out the two pieces and pre-formed the metal edge trim as it would be much easier to form the trim at this time. The piece behind the range was relieved to help heat from the oven escape, although the oven will likely never be used. In fact I haven’t even checked to see if it works.  Then the large piece was cut, test fitted, and the two glued together and test fitted again:      The backsplash trim I bought requires that the backsplash be installed before the plastic laminate so this was a good a time get that done. The backsplash was first measured and cut to size then pre-fitted by using the countertop and shimming it up to get it in the correct position.    With the backsplash held in place, I then marked the window and receptacle locations, cut them out and stapled the backsplash into place.   Back when I built the kitchenette base unit, I modeled it based on my 1960 Aloha. In order for my icebox and range to fit into the available space, the flange of the sink needed to sit on top rather than within the cabinet framing.  Being an undermount type sink, this meant I needed to recess the sink up into the underside of the plywood sub-top in order for the sup-top to sit flat on top of the cabinet. I first made a template for the sink cutout, sizing the cutout approximately flush with the sides of the sink bowl.  Oh yes, by this time the sink was re-porcelained in almond. Next I located the sink on the underside of the sub-top and laid it out.  Then, using the template, I marked and made the sink cutout, drilled holes for the faucets (getting them as close to the edge of the sink as possible) and routed the recess for the sink.     Before installing the sub-top the platform for the range was built and a final test fitting done.   The range fits tighter than I would like but it will work. Next I did a rough cut of the plastic laminate.  Then the underside and edges of the sink cutout were sealed, the sink screwed to the sub-top, the top tested for fit with the sink installed, and the end of the piece behind the range was supported.     Finally I installed the sink drain, fastened the sub-top to the cabinets, installed the backsplash base trim and glued down the plastic laminate.     While I was working with contact cement I went ahead and sorted out the dinette table. I wanted a 120v outlet below the front window so I located it, cut out the table top and trimmed the leg height to fit it underneath the outlet. While doing so I slipped in and out of the seats to make sure the corners were clipped adequately for relatively easy access.     To fit the edge trim for the sink opening I screwed the cutout template to the piece I cut out of the sub-top for the sink opening to make a buck for bending the metal around. Pieces of wood extending past the edges were screwed to the buck to keep the metal trim aligned. The edge trim was bent by hand backwards around the buck. As each side was bent, to keep it in place and tight to the buck, holes were drilled through the trim and it was screwed to the buck. The screw holes were located to also be used for fastening the trim to the sink opening upon final installation.     Lastly the faucets, backsplash edge trim, range, and for full effect the ice box door was installed. Counter edge trim was used on the wall to trim out the backsplash.             Can you tell by the number of pictures that I'm quite pleased with how it turned out? |
|
ladywendolyn
2K Member
Posts: 2,315
Likes: 928
1964 Golden Falcon
Currently Offline
|
Post by ladywendolyn on Mar 29, 2017 21:41:08 GMT -8
Thanks so much for posting this! It's like having a step by step tutorial. I think my sink is under mount so I am going to bookmark this thread
|
|
RinTin
Full Member
Posts: 760
Likes: 292
Currently Offline
|
Post by RinTin on Mar 30, 2017 9:46:32 GMT -8
Thanks so much for posting this! It's like having a step by step tutorial. I think my sink is under mount so I am going to bookmark this thread Hopefully your sink will fit into the available space with enough room that you don't have to recess it up into the sub-top like I had to. It can be challenging when making changes to see ahead and sort out the step by step sequences as you progress through a project. For example, back when I realized that the only way I could build the kitchen base cabinet the way I wanted it was to have the sink bowl flange overlay the cabinet frame, at the same time I also had to figure out the sink, plumbing and countertop installation process. Glad that you are getting something out the re-build. I do enjoy posting about it. |
|
strange1
Active Member
Posts: 159
Likes: 103
1965 Shasta Airflyte
Currently Offline
|
Post by strange1 on Mar 30, 2017 14:07:18 GMT -8
WOW...! Nice work.
|
|
sglshot
Member
Posts: 32
Likes: 1
Currently Offline
|
Post by sglshot on Mar 30, 2017 22:58:04 GMT -8
Rintin what size screws did you us for your wall framing.
|
|
handkey
Active Member
Posts: 217
Likes: 83
1964 Forester 14
Currently Offline
|
Post by handkey on Mar 31, 2017 13:22:00 GMT -8
Your enjoyment of the project comes out in your craftsmanship and I suspect you are emanating pure pure joy! Your metal work looks as good as your carpentry work
|
|
RinTin
Full Member
Posts: 760
Likes: 292
Currently Offline
|
Post by RinTin on May 10, 2017 11:25:31 GMT -8
I want to say that I appreciate everyone's comments and interest in this thread. It's what makes it all worthwhile. I also hope none of you are put off by my failure to respond to some of your questions and remarks. I'll try to improve in that area. Anyhow, moving right along it's time to pull some cable. Next I decided to wire the trailer, figuring it would be easier to route the wires around the outside corners before installing the curbing. The 120v wiring was done first as it is easier to work the smaller 12v wires around the larger 120v wires if needed. The 120v system is very simple, just three receptacles, one above the dinette table, one in the kitchenette backsplash, and the third inside the curbside dinette seat to power a battery maintainer/charger. Each receptacle is a separate circuit with a 15 amp breaker. With this simple system I saw no reason for 120v lights or a charger/converter. Whenever 120v is available, the battery maintainer/charger will easily stay ahead of the minimal draw from the LED lights to keep the battery charged. A diagram was drawn up:  The junction boxes were then installed and the wiring ran back to the main panel location. I used 12ga. Romex wires, run back to a Square D QO 60 load center located under the gaucho on the street side wall. Not the most convenient location for access, but close to the power inlet and hidden from view.    Finally the receptacles and cover plates were installed. The load center was left undone for now and will be wired after the siding is finished and the shore power inlet installed.    In the upper left corner of the last picture you’ll see my first major screw up of the project. This was the first hole I drilled to run the wiring around the outside corners and I ran it through to the interior. It was one of those sinking moments where the instant I did it I knew I screwed up. Oh well, I’ll cover it with something and the seat cushions will hide it. That is one mistake I don’t think I’ll ever make again.
|
|


 I love this thread and will return to it often. Thank you so much for taking the time for such fine craftsmanship and descriptive writing. This is what everybody needs to know and see. I couldn't figure out how you do it until you gave away you had a helper! Then it all made sense


