newmexicogal
Junior Member

Posts: 77 
Likes: 25
Currently Offline
|
Post by newmexicogal on Jan 25, 2014 16:41:48 GMT -8
|
|
Hamlet
2K Member

Posts: 2,820 
Likes: 925
Currently Offline
|
Post by Hamlet on Jan 25, 2014 19:33:45 GMT -8
I'm a little confused. WHen you say "rear wall", do you mean the inside of the skin or the wood paneling?
|
|
newmexicogal
Junior Member
Posts: 77
Likes: 25
Currently Offline
|
Post by newmexicogal on Jan 25, 2014 20:06:39 GMT -8
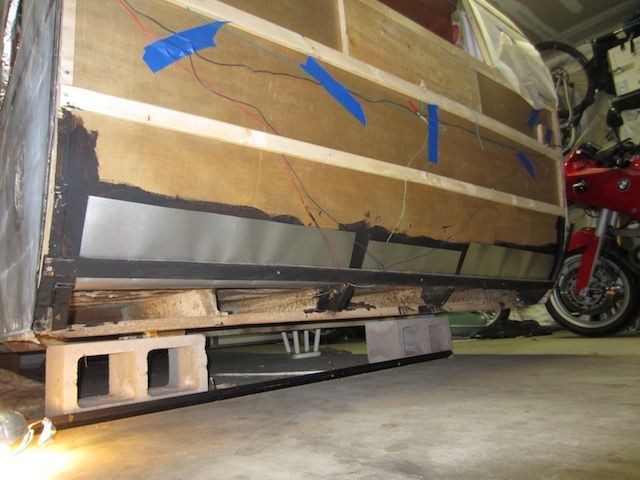
Hamlet, Yep. I know it's confusing and I didn't do a great job of explaining my dilemma. I'll try again.
The wood paneling comes down to just below the floor. There is a small gap between the paneling and the floor.
The metal skin comes down lower than that. Road spray gets caught by the skin and directed to the paneling/floor junction, and the gap.
Some people use wood trim to close that gap but I'm searching for a more water tight solution.
|
|
|
|
Post by bigbill on Jan 25, 2014 20:48:06 GMT -8
How about adding a board across there then take a piece of alum and close the whole area in then seal edges like you would a window. Then bring the alum skin down over your flashing and seal it with tape also. The only problem is if you get a leak up high that runs down the wall the water will be trapped. you could also let the added flashing come just outside the rear skin and not seal the rear edge this would carry road spray past the rear wall but would still allow some drainage.
|
|
mobiltec
5K Member
 I make mistakes so you don't have to...
Posts: 9,822
Likes: 3,749
1954 Jewel In Progress...
Currently Offline
|
Post by mobiltec on Jan 25, 2014 21:07:43 GMT -8
You couldn't find 1/8 inch paneling?
|
|
kirkadie
1K Member
Posts: 1,156
Likes: 556
'69 Serro Scotty Hilander
Currently Offline
|
Post by kirkadie on Jan 26, 2014 12:28:37 GMT -8
I wrapped the bottom edge of Scotty with aluminum flashing similar to Bill's suggestion when I replaced the rear floor plywood. Also used copious amount of 'fence post paint' on it. I used my pneumatic staple gun shooting staples in about every inch or two. The flashing goes up about 8" up the wall (on the inner panelling) which then got a 1x4 (one of the typical horizontal cross pieces)on top of it. It will of course be covered by the outer skin, and should do what you're thinking. Scotty did that on both the front and rear wall bottoms.
|
|
newmexicogal
Junior Member
Posts: 77
Likes: 25
Currently Offline
|
Post by newmexicogal on Jan 26, 2014 14:52:41 GMT -8
You couldn't find 1/8 inch paneling? Larry, I did replace the back wall with 1/8 inch paneling and I *think* I did everything just as you recommend in your videos. It's just the crack where the paneling meets the floor and the metal skin hangs down past it in the back that has me whipped up.  |
|
mobiltec
5K Member
I make mistakes so you don't have to...
Posts: 9,822
Likes: 3,749
1954 Jewel In Progress...
Currently Offline
|
Post by mobiltec on Jan 26, 2014 15:37:05 GMT -8
You couldn't find 1/8 inch paneling? Larry, I did replace the back wall with 1/8 inch paneling and I *think* I did everything just as you recommend in your videos. It's just the crack where the paneling meets the floor and the metal skin hangs down past it in the back that has me whipped up. Oh there is supposed to be a starter board there. Let me go get a photo for you because I just put a brand new one in the 57 Westerner and it is still exposed... |
|
mobiltec
5K Member
I make mistakes so you don't have to...
Posts: 9,822
Likes: 3,749
1954 Jewel In Progress...
Currently Offline
|
Post by mobiltec on Jan 26, 2014 15:49:39 GMT -8
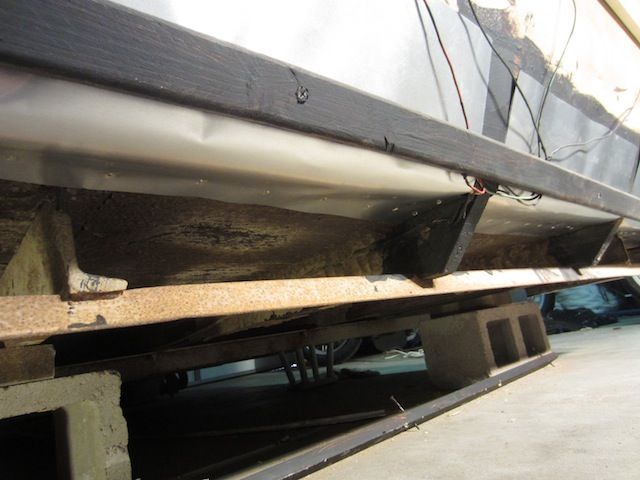
This is what the bottom of the paneling attaches to and then you get another piece of one by on the other side for framing and sandwich the paneling between the two. It sits on top of the end of the floor and sticks out a bit till it matches up on both ends with the radius framing. I suggest either a one by 4 or better yet a 1 by 6 as straight as you can find and with little to no knots. Rip the outside edge where the paneling will attach at the same angle that will match up with the bottom of the radius walls. Glue it and screw it to the floor sheathing.


|
|
newmexicogal
Junior Member
Posts: 77
Likes: 25
Currently Offline
|
Post by newmexicogal on Jan 27, 2014 5:47:03 GMT -8
Bigbill, Kirkadie and Mobiltec -- a big smooch to you all! Thanks so much for the help. Lula Belle did not have that starter board thingy when I took her back end apart (someone had done a half-assed repair before me). Larry, the pictures are great! Now I gotta' figure out how much tearing apart I have to do to install that, then I plan to do an aluminum plate as suggested. Thank you all so much!  |
|
newmexicogal
Junior Member
Posts: 77
Likes: 25
Currently Offline
|
Post by newmexicogal on Feb 2, 2014 6:18:46 GMT -8
|
|
kirkadie
1K Member
Posts: 1,156
Likes: 556
'69 Serro Scotty Hilander
Currently Offline
|
Post by kirkadie on Feb 2, 2014 11:36:52 GMT -8
NMG,
Make sure and glob on fence post paint to the 'leading edge'(pointing toward the hitch) of that flashing along the bottom board so it can't collect any water whilst driving down the road. I'm more concerned about collecting moisture from below at this point.OK? OK.
|
|
newmexicogal
Junior Member
Posts: 77
Likes: 25
Currently Offline
|
Post by newmexicogal on Feb 4, 2014 8:40:58 GMT -8
NMG, Make sure and glob on fence post paint to the 'leading edge'(pointing toward the hitch) of that flashing along the bottom board so it can't collect any water whilst driving down the road. I'm more concerned about collecting moisture from below at this point.OK? OK. Kirkadie -- Roger that. Right now Lula Belle is sitting on concrete blocks in the garage and is only 7 inches off the ground. Once her wheels/axle/springs go back on and I can slide under, her entire underbelly will get a good coating of the magic goo. I will pay particular attention to the area you mention. Thanks! |
|
|
|
Post by bigbill on Feb 4, 2014 14:46:19 GMT -8
I would pull the edge of the flashing down and run a layer of seal under it just like it was a window then screw it to the floor and then put the fence paint over the seam. This would give you a positive seal. If I wasn't going to do that then I would place a small board in front of the flashing about a half inch away to break the flow of air and water. Just my opinion.
|
|
newmexicogal
Junior Member
Posts: 77
Likes: 25
Currently Offline
|
Post by newmexicogal on Feb 5, 2014 16:07:27 GMT -8
BB, Thanks for the advice. We put a half a tube of Lexol at the staple line under the flashing as you recommended. However, we like the idea of the board in front of the flashing. My husband has a borrowed air stapler and is looking for an excuse to staple *anything* that will hold still so he's all over your idea!
|
|