|
|
Post by bigbill on Nov 30, 2019 18:26:58 GMT -8
It is time to start a new chapter of "What did you do to your trailer today". So here we go with chapter 12. These chapters contain a wealth of information about who is doing what to what. Please continue to share your adventures, experiences both good and bad as this helps us all learn.
|
|
turbodaddy
1K Member

Posts: 1,086 
Likes: 462
17' 1965 Fan "Sunseeker"
Currently Offline
|
Post by turbodaddy on Nov 30, 2019 19:17:16 GMT -8
Maybe I'll make history by being the first post on chapter 12?
Today I unpacked the trailer and emptied the porta potty for the last time this year. Just got home from our annual Thanksgiving trip to Maine. In years past, my girls stayed in the camper with me. This time they opted for a room in my sister's house. I have to say it was challenging to keep warm, with extreme wind and temps into the 20s. I usually use an electric space heater, but this time I wanted to see how it would be if I was "off the grid" so only used the propane furnace with thermostat set at 68 to 70F during the day. It did keep it warm, with minimal battery drain. Being somewhat of a recluse, I really like having a place to get away from all of the barking dogs, loud TV and endless babble that others don't seem to mind. At night, I had to turn off the furnace in order to sleep, it just cycled on and off every 5 to 10 minutes. Makes me think about a "Wave" heater instead, although I am extremely sensitive to exhaust fumes, and have had problems with condensation inside the camper in the past. About 4 inches of blankets, a wool hat, pillows on my head with a nose hole for breathing...I survived. I guess I like camping best when it isn't winter. After a 6 hour drive I'm happy to be home safely, and hope for the same for all of my fellow VTT folks.
|
|
nccamper
Administrator 
Posts: 7,743
Likes: 2,870
1962 Forester- 1956 Shasta
Currently Offline
|
Post by nccamper on Dec 1, 2019 5:46:31 GMT -8
...it was challenging to keep warm, with extreme wind and temps into the 20s. ... Makes me think about a "Wave" heater instead, although I am extremely sensitive to exhaust fumes, and have had problems with condensation Anything below freezing is a huge challenge with a wave3 unless it's kept running on low. No exhaust fume issues but condensation can be a problem unless the vent and a window stay cracked open which is not a bad idea with the heater running but at temps that low it seems counter-intuitive. In colder climates I'd consider a Wave 6.
-- Teachndad
I think your windows look great. --
Thanks BigBill for starting this next thread.
|
|
roadtripper
Active Member

Posts: 311
Likes: 116
Currently Offline
|
Post by roadtripper on Dec 1, 2019 8:28:04 GMT -8
Yesterday I painted the Masonite that will go on the belly. Not a one day job, but that’s what’s goin on here. Couple years ago when I started the 62 traveleze restore, I did a total skin off rebuild, but not frame off. Some may remember pictures. I was able to do some floor framing repair and replace some of the bolts, thinking I’d do more under later. Since I’m changing springs and tires now, I’m up on blocks and decided to clean the rest up. I tore off all the old 1/2 black fiber, and old Fiberglas insulation. I was surprised at how clean and new most of the exposed wood was. I put up 1” rigid insulation—-the “direct burial” type. Where the old belly board was smashed between the wood and steel, I found I was able to remove all that scrap with a little gentle prying or a nudge from a bottle jack, and a small battery operated sawsall. In order to not have to cut the new board with joints at all steel frame members I can now slide larger pieces between and screw to the wood 2x2 framing.
I’ll then take up any slack with some 1/4” hard rubber pads I made and replace most of the rest of the bolts. I painted the rough side down on the Masonite as it seemed it would adhere better. I used exterior primer and then 2 coats of exterior floor paint. I’ve used the black post paint, but using this because it goes on nice and will be easier to mark and cut full painted sheets. Seems to be going well. All but the lying on the cold wet gravel with all the crap falling in my face. Winter repairs are such fun.
|
|
mobiltec
5K Member
 I make mistakes so you don't have to...
Posts: 9,822
Likes: 3,748
1954 Jewel In Progress...
Currently Offline
|
Post by mobiltec on Dec 1, 2019 18:14:56 GMT -8
...it was challenging to keep warm, with extreme wind and temps into the 20s. ... Makes me think about a "Wave" heater instead, although I am extremely sensitive to exhaust fumes, and have had problems with condensation Anything below freezing is a huge challenge with a wave3 unless it's kept running on low. No exhaust fume issues but condensation can be a problem unless the vent and a window stay cracked open which is not a bad idea with the heater running but at temps that low it seems counter-intuitive. In colder climates I'd consider a Wave 6.
-- Teachndad
I think your windows look great. --
Thanks BigBill for starting this next thread.
If you want to get away from condensation you need a vented heater. Check these out... nuwaystove.com/product/model-2000/ |
|
turbodaddy
1K Member
Posts: 1,086
Likes: 462
17' 1965 Fan "Sunseeker"
Currently Offline
|
Post by turbodaddy on Dec 1, 2019 18:53:35 GMT -8
Thanks for this Larry, I have an 80s vintage Attwood Hydroflame furnace that is mounted in a cabinet below the Norcold fridge. It works just fine, my only gripe is the noise factor. These Nuwave units look like they are meant to be free standing, so air can circulate around like a woodstove. I like the idea of quiet, but don't see how it could be installed in a 7'x 14' box. The price is very reasonable compared to the Attwood, but it is "apples to oranges" with respect to the complexity of the controls.
On my Maine trip, I was surprised at how little battery depletion occurred even when leaving it on all day. With two 100 amp/hr deep cycle batteries I think I could go about 60 hrs, leaving them at about 50% discharged. It is just the damn noise that is the problem.
|
|
mobiltec
5K Member
I make mistakes so you don't have to...
Posts: 9,822
Likes: 3,748
1954 Jewel In Progress...
Currently Offline
|
Post by mobiltec on Dec 2, 2019 6:38:51 GMT -8
Thanks for this Larry, I have an 80s vintage Attwood Hydroflame furnace that is mounted in a cabinet below the Norcold fridge. It works just fine, my only gripe is the noise factor. These Nuwave units look like they are meant to be free standing, so air can circulate around like a woodstove. I like the idea of quiet, but don't see how it could be installed in a 7'x 14' box. The price is very reasonable compared to the Attwood, but it is "apples to oranges" with respect to the complexity of the controls. On my Maine trip, I was surprised at how little battery depletion occurred even when leaving it on all day. With two 100 amp/hr deep cycle batteries I think I could go about 60 hrs, leaving them at about 50% discharged. It is just the damn noise that is the problem. Watch this video. This is where I found out about the stove. I will be using one in my Jewel... |
|
CorvettCrzy
Full Member
Posts: 934 
Likes: 273
'58 Corvette, '64 Franklin
Currently Offline
|
Post by CorvettCrzy on Dec 4, 2019 20:19:37 GMT -8
Spent the weekend tucking the Corvette in for the winter. Pulled Frankie (1964 Franklin) in the barn long enough to take the stove and sink out (original) and a yucky old refrigerator (not original). Found what appears to be the "main" leak above the frig around 2 vents that are literally overlapping each other. Can't figure out why they'd put 2 in. Added a little roofing tar around them to get them really gooey and hopefully stop a little more of the water from sneaking in. Planning to get a new roof anyway. Spent some time looking it over and it appears it has an underbelly similar to yours Roadtripper! I will look for a thread on your traveleze. I kept wondering where the mice were getting all of the insulation that was in the stove, under the bed, then I found a hole in that black stuff and it looks like it may have come from in there. Was hoping to just remove it and put foam insulation in, wasn't planning on putting the black stuff back? Hoping getting all that off will make it lighter as well! Off I go hunting for Roadtripper. I've got some time for lessons. Right after we put a new tarp on Frankie my husband pulled a bluebird school bus in the barn to convert for the BoyScouts.  I will use "his" project as a way to ultimately get "my" project done  . |
|
|
|
Post by Teachndad on Dec 8, 2019 7:43:16 GMT -8
Hi Friends, Does trying count in this thread instead of doing? Yesterday I had everything laid out and prepared to replace worn and broken rivets on the main front window frame assembly for my Westerner. So, we go to the rivet squeezer and we find out the semitubular rivets I ordered are too short.  While a little frustrating, I sort of guessed it might happen. This project is about learning anyways. I should have ordered longer ones just in case. I will order longer ones this week and we will go at it again next week. We double checked lengths of other flush mount rivets and agreed to try next weekend. BTW, Thanks NCCamper for the positive comments on my windows in an earlier post.  Happy Restorations, Rod |
|
mobiltec
5K Member
I make mistakes so you don't have to...
Posts: 9,822
Likes: 3,748
1954 Jewel In Progress...
Currently Offline
|
Post by mobiltec on Dec 8, 2019 7:57:24 GMT -8
Hi Friends, Does trying count in this thread instead of doing? Yesterday I had everything laid out and prepared to replace worn and broken rivets on the main front window frame assembly for my Westerner. So, we go to the rivet squeezer and we find out the semitubular rivets I ordered are too short. While a little frustrating, I sort of guessed it might happen. This project is about learning anyways. I should have ordered longer ones just in case. I will order longer ones this week and we will go at it again next week. We double checked lengths of other flush mount rivets and agreed to try next weekend. BTW, Thanks NCCamper for the positive comments on my windows in an earlier post. Happy Restorations, Rod Rod you don't know how many times I've had to switch gears in the middle of trying to do something because a part isn't right. Like you said it's all part of the learning process... Part of the fun really. |
|
nccamper
Administrator
Posts: 7,743
Likes: 2,870
1962 Forester- 1956 Shasta
Currently Offline
|
Post by nccamper on Dec 17, 2019 16:16:26 GMT -8
We had three days of mid 60s weather in the middle of December. Unheard of here.
So I cut the vent hole out and installed the new passive vent. It's wired for a Fantastic Fan which the next owner can install if so desired.
I also cut out the kitchen window, clean and polished the window then installed it.
|
|
|
|
Post by Teachndad on Dec 22, 2019 5:17:57 GMT -8
Yesterday I painted the Masonite that will go on the belly. Not a one day job, but that’s what’s goin on here. Couple years ago when I started the 62 traveleze restore, I did a total skin off rebuild, but not frame off. Some may remember pictures. I was able to do some floor framing repair and replace some of the bolts, thinking I’d do more under later. Since I’m changing springs and tires now, I’m up on blocks and decided to clean the rest up. I tore off all the old 1/2 black fiber, and old Fiberglas insulation. I was surprised at how clean and new most of the exposed wood was. I put up 1” rigid insulation—-the “direct burial” type. Where the old belly board was smashed between the wood and steel, I found I was able to remove all that scrap with a little gentle prying or a nudge from a bottle jack, and a small battery operated sawsall. In order to not have to cut the new board with joints at all steel frame members I can now slide larger pieces between and screw to the wood 2x2 framing. I’ll then take up any slack with some 1/4” hard rubber pads I made and replace most of the rest of the bolts. I painted the rough side down on the Masonite as it seemed it would adhere better. I used exterior primer and then 2 coats of exterior floor paint. I’ve used the black post paint, but using this because it goes on nice and will be easier to mark and cut full painted sheets. Seems to be going well. All but the lying on the cold wet gravel with all the crap falling in my face. Winter repairs are such fun. Man! That's a ton of work!! I love the lying on cold wet gravel part.  Pix? |
|
roadtripper
Active Member
Posts: 311
Likes: 116
Currently Offline
|
Post by roadtripper on Dec 22, 2019 7:51:53 GMT -8
Yes it was a ton of work. Probably good I didn’t realize how much at the start or it might not have been done.
But i did finish it a couple days ago and I’m real happy with it. I have pics on my phone, but haven’t posted in awhile
and my flicker stuff all vanished, so I don’t know.
couple things if anyone tries this. I used lath screws. They have a very large flat head. Get “sharp point” not “ self drill”.
Also. At joints I put the screw between the sheets with a large fender washer. Leave a fat 1/8” at least between so expansion doesn’t make them buckle.
And I replaced a few more bolts. You know those floor bolts with the flat top that vts sells. They are called elevator bolts and any hardware store should have them in various sizes.
|
|
|
|
|
|
Post by danrhodes on Dec 23, 2019 21:00:40 GMT -8
I got my 1954 RCA Victor Desktop TV working real good. I also have all the episodes of I Love Lucy on DVDs. So this tv will be displayed in my 54 Jewel and playing I Love Lucy episodes at the rallies... I'm also finishing up the last of the cabinets on the jewel so I'll be building new walls next. Then once the walls are up the wrap goes on and we're in business. Photos of cabinets soon. 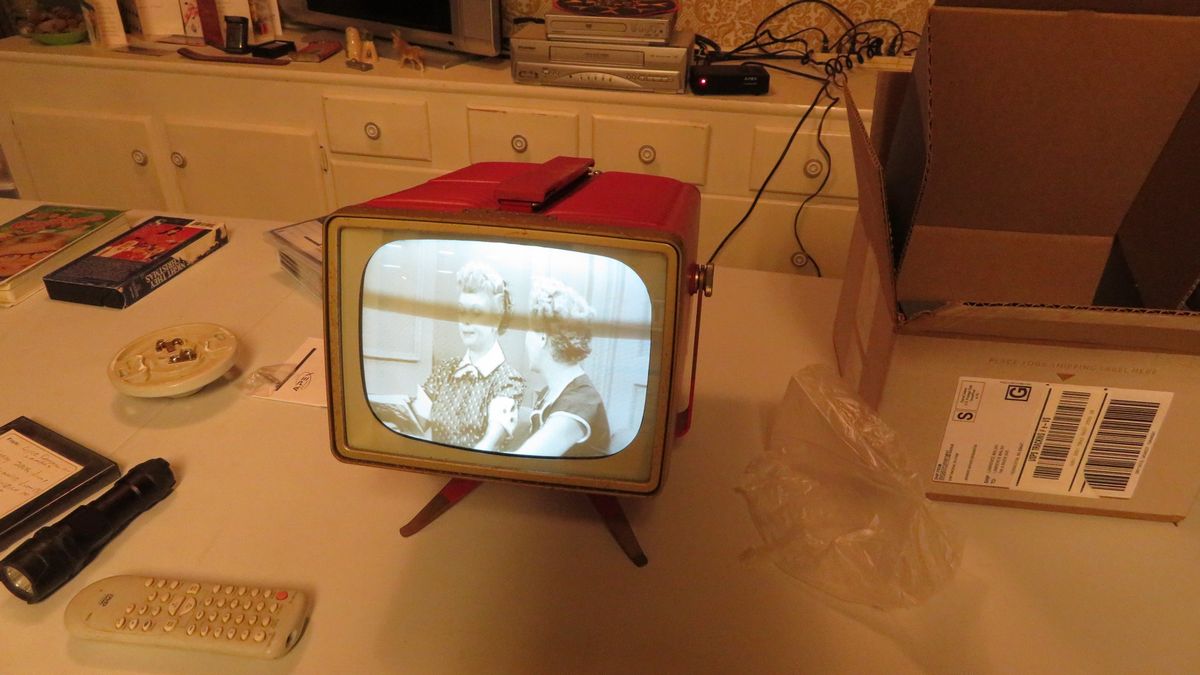 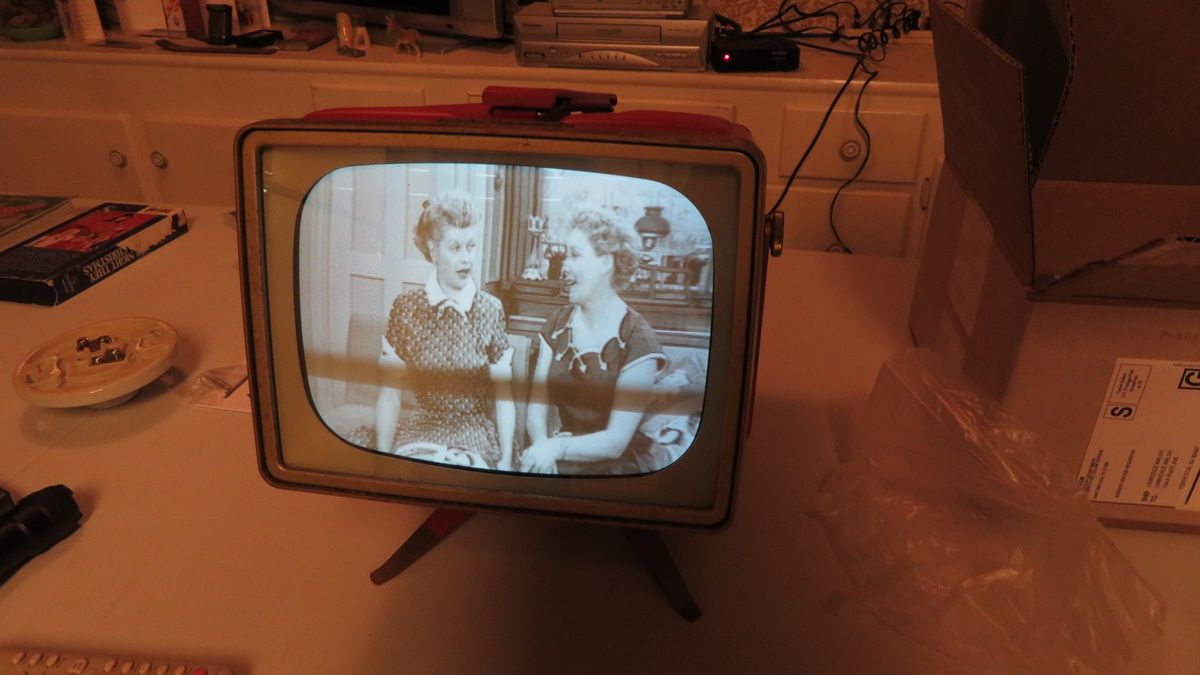 That's really cool... What did you need to do to get the TV working? Is it a tube TV? |
|


 I will use "his" project as a way to ultimately get "my" project done
  .
.

 While a little frustrating, I sort of guessed it might happen.


