debranch
Active Member
 Wee Camp
Posts: 237 
Likes: 90
71 Shasta Compact
Currently Offline
|
Post by debranch on Mar 20, 2019 5:22:21 GMT -8
WhitneyK,
Thank you I’m glad it is giving you ideas on how to make your project special. There is a lot we can learn from this site, and the folks that contribute to it. Do your research and if you have a question that you can’t seem to find a thread that addresses it then ask. Debra
|
|
debranch
Active Member
Wee Camp
Posts: 237
Likes: 90
71 Shasta Compact
Currently Offline
|
Post by debranch on Apr 4, 2019 13:48:02 GMT -8
Its been a busy 2 weeks for me I had to drive to the mid-west for a Military school. They are always busy they say it is a 140 hour curse and they do it in 2 weeks. It will be a long drive home. I did bring the door lock with me and have had a little bit of time the past few evenings to work on it.  entry assest entry assest by debra branch, on Flickr This is what they looked like before I started working on them  clean lock2 clean lock2 by debra branch, on Flickr after some soaking combined with lots of scrubbing + steel wool its looking better.  clean lock5 clean lock5 by debra branch, on Flickr There is a lot of pitting on the outside of the lock but that doesn't really bother me. I don't want everything to look brand new on the camper. I just want it as clean as I can get it. As of today Richard has not gotten the wiring roughed in. He needs to get busy on that or the project will not be completed on schedual. We already have a camp site booked at Stone Mountain in late June. All the bits and pieces don't have to be completed but it does have to be camp able. I have a ways to go and not a lot of time to get it there. Hopefully; Dewey has made progress on the windows, and I have asked my brother to make me so legs for my benches but he hasn't got them done yet (6 months later). I have told them both I need them done by the end of May. |
|
debranch
Active Member
Wee Camp
Posts: 237
Likes: 90
71 Shasta Compact
Currently Offline
|
Post by debranch on Apr 6, 2019 18:49:49 GMT -8
Yesterday was a long day...... I drove home from the western side of Missouri to North Carolina. Today was spent getting started on wiring the Compact.  wiring started1 wiring started1 by debra branch, on Flickr we are wiring the compact for 110 and 12v. The fuse box will be in the front curb side corner.  wiring started2 wiring started2 by debra branch, on Flickr The interior lights came in today also, and the counter top should be delivered to Lowes on Tuesday. We also ordered the Aluminum molding / trim from Home Depot. We tried to order them through Lowes but they couldn't find anyone to source the trim through its a bummer because we prefer to shop at Lowes, but I'm glad that I am able to get the items I need delivered to the house. I need to get started working on my Kitchenette/counter so we will know what level the fuse box needs to be mounted at. I also need to figure out how I'm going to trim my outlet boxes on the inside, they have to stand out about 1/8"-1/4" into the cabin of the camper to set flush on the outside of the wall. What have others done to work around this issue? |
|
debranch
Active Member
Wee Camp
Posts: 237
Likes: 90
71 Shasta Compact
Currently Offline
|
Post by debranch on Apr 15, 2019 16:05:16 GMT -8
The Compact has been slow going. I had hoped Richard would have gotten farther along with the electrical but know he wants to wait till I get the Kitchenette cabinet shelf in so he can attach it to the shelf under the counter. To help me figure out all my measurements I placed the refrigerator where we want it to be, raised it about 2" off the floor the final height of the counter top will set just above the bottom edge of the horizontal slat on the panel to the left of the fridge, about an inch below the window.  frigde frigde by debra branch, on Flickr We are getting in each others way a lot. 2 people working in less than 70 square feet is hard. 2 people working in 10 square feet doesn't work. But we are working around it because there are some jobs I just cant do alone. It rained most of the day Sunday so Richard and I started installing some of the decorations. We wanted to attach some things with bolts from the outside and the things what will be holding weight we wanted to make sure there was solid wood behind it not just attached to the 1/8" plywood. The light is from E-Trailer, I found the mirror at a antique shop for a few dollars and it was left over from a project in the house, and the hook was in the camper when I got it. I recycle and reuse what I can.  mirror up mirror up by debra branch, on Flickr The mirror is attached from the backside with bolts and I used covered nuts to the front to cover the bolt ends, it gives it a finished look. We hung the TV mount in the corner by the cabinet. We also added a box over the window to use as storage / shelf, it is also attached through the outside with bolts and decorative nuts on the inside. After adding the box for storage we added the brackets for the fabric bunk also using bolts for support.  shelf up shelf up by debra branch, on Flickr Power and Cable hookup will be by the TV to keep things tidy. I still have a lot to do and the excess threads on the bolts will have to be cut off and tape added before the skin is added but I'm trying to do things properly and make sure I have the things we want and need in this little lady when completed. 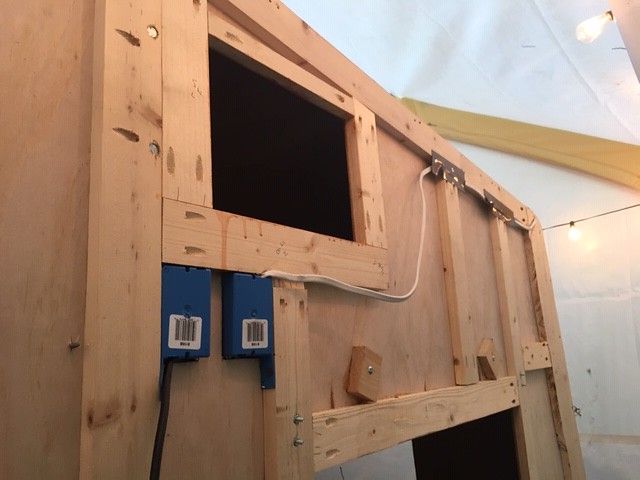 outside mount outside mount by debra branch, on Flickr Its back to work I'm going to try to get the lower cabinet front glued tonight. Still have a ways to go before I can get the skin back on this lady. As always I am thankful for this site and all the shared info that I find here. Working on this camper is the best therapy..... of course everyone reading this Knows this simple fact. Debra |
|
debranch
Active Member
Wee Camp
Posts: 237
Likes: 90
71 Shasta Compact
Currently Offline
|
Post by debranch on Apr 21, 2019 14:16:58 GMT -8
Hi Y'all, I hope everyone had a wonder filled Easter.
We have made some progress this week. I worked on the cabinet faces and finished gluing them up earlier this week.
 lower cabinet by debra branch, on Flickr lower cabinet by debra branch, on Flickr
I started working on the lower cabinet. I'm building it in place, I have fabricated built-in shelves before but I have never made a cabinet before so this is something new for me but I I'm enjoying the process.
 wire2 by debra branch, on Flickr wire2 by debra branch, on Flickr
Working around the wiring was the hard part.
Than I installed the shelf so Richard could get going on the electrical.
 wire3 by debra branch, on Flickr wire3 by debra branch, on Flickr
I did the cut out on the left hand side so we could get to the outlet behind the refrigerator once the counter is in place. Sometimes its the little things that make a difference.
Richard has gotten started on the breaker box. He has ran most of the AC power now there are 2 exterior AC outlet boxes to run still. We are waiting to get the upper cabinet in so I can make sure that it will be inside the upper cabinet, for the awning lights should we decide to use them. We have not bought any thus far, but wanted to make sure we planed ahead so if or when we get some we have an easily accessible plug for them. We will also have an outlet on the curb side beside the storage compartment, we will have an exterior table there and an outlet to use by the table will be handy.
 wire6 by debra branch, on Flickr wire6 by debra branch, on Flickr
The DC power going to the battery box directly behind the hitch is going through the floor we put it in flexible conduit.
 wire5 by debra branch, on Flickr wire5 by debra branch, on Flickr
Richard screwed the box to the shelf leaving a little space behind the box to allow air movement and space for the wiring going down through the floor. He still has to get the DC runs finished.
 groundDC by debra branch, on Flickr groundDC by debra branch, on Flickr
This is where the individual DC grounds will be, the area on the inside of the tongue. Each wire will be separated. When Richard gets the electrical completed I will post final pictures. The main ground is underneath the camper on the frame.
I have also been working on the Kitchenette cabinets. I got the upper cabinet pieces complete. Finished the lower face. I also cut the last piece of plywood for the toilet room wall and started polyurethane them.
 poly cabinet2 by debra branch, on Flickr poly cabinet2 by debra branch, on Flickr
I still have a ways to go I would like to say I'm done with polyurethane but I still have more to do after these piece are done. I know I have the door and screen door remaining but I have no doubt that there will be more to do. I hope that I will be able to get these items installed by next weekend and that much closer to being able to get on the road and camping in this Girl.
I still have plenty to keep me busy I would say the list is getting shorter but I haven't put one on paper I think I'm afraid to right now its too long and would probably discourage me. I have a lot to do if I'm going to make my mid-June camp worthy deadline.
as always, Thanks for reading.... Debra
|
|
Shan Delee
Member
Posts: 41
Likes: 6
1963 Century
Currently Offline
|
Post by Shan Delee on Apr 22, 2019 5:47:08 GMT -8
You are an inspiration!!!
|
|
debranch
Active Member
Wee Camp
Posts: 237
Likes: 90
71 Shasta Compact
Currently Offline
|
Post by debranch on Apr 23, 2019 17:38:12 GMT -8
Thank You sdelee
I have always told my children that they can accomplish anything if they are willing to work for it. I believe anything worth having, is worth the work. I must lead by example. I want them to be the best they can be so I must always strive to do my best. That is the same example that my parents always showed me. Debra
|
|
debranch
Active Member
Wee Camp
Posts: 237
Likes: 90
71 Shasta Compact
Currently Offline
|
Post by debranch on Apr 29, 2019 18:51:04 GMT -8
I'm getting closer to the finish. Richard got the 12v power running.  DC power DC power by debra branch, on Flickr Its always nice to have lights. I was also able to get the upper shelf installed in the toilet room with my daddy's help. I trimmed around the outlet boxes, this is the outlet behind the TV with cable connection. I trimmed around each of the outlets the same way to take up the extra space between the wall and outlet covers. 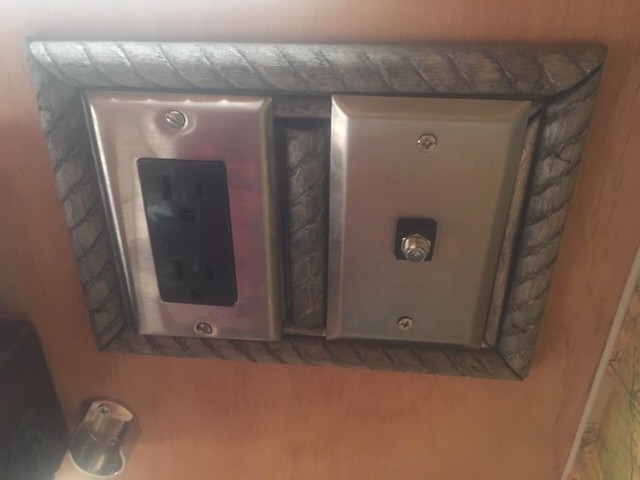 outlet trim outlet trim by debra branch, on Flickr The details are what make each project special. I dry fit the pieces I polyurethane....  bathroom wall dryfit bathroom wall dryfit by debra branch, on Flickr toilet room wall, I still need to fasten it.  lower cabinet dryfit lower cabinet dryfit by debra branch, on Flickr Lower cabinet dry fit I am waiting to install it I want Richard to get the electric complete before I fasten it in.  upper dryfit2 upper dryfit2 by debra branch, on Flickr upper cabinet dry fit. I added the track for a bypass door Daddy came over on Saturday and helped me install the upper cabinet.  upper cabinet install upper cabinet install by debra branch, on Flickr I was so happy that daddy came by the house and helped me install the cabinet and toilet room upper shelf. He is 80 years old and isn't able to help me like he once did. I find it funny when I get Richard to help me I have to make sure he understands what we are doing. Daddy and I speak the same language.... Carpentry Daddy knows just by observing the project and very little explaining. We have worked together so many times through the years that we know how the other one thinks. He is my mentor and teacher. I miss doing projects and spending time with him, but I know I am lucky to have such a grate Daddy who has taught me so much. He is the reason that this project has progressed so quickly and I am so happy that he was able to see how much I have accomplished. I added the metal trim across the bottom ordered from HD its held on with double faced tape. Its the small details that make it special. Sunday evening I did the cut outs for the outdoor outlets  outside outlet for table outside outlet for table by debra branch, on Flickr We have a table that will attach to the outside of the camper and we wanted an outlet handy under it.  upper outlet outdoor upper outlet outdoor by debra branch, on Flickr I added a box up high near the door.  outlet back outlet back by debra branch, on Flickr The panel will cover the backside of the outlet inside the cabinet. Richard can get the remaining electrical completed now. We have one more light to add + a fantastic fan still needs to be added before we can start insulation. Coleman helped me measure the camper Friday for the new skin we sent the info today to get skins ordered. I started working on the door and door trim today. I still have a lot to accomplish but there is less now then there was last week. As always I am thankful for this site and all the shared knowledge I don't know if I would be able to accomplish this project without all the info shared here... Debra |
|
debranch
Active Member
Wee Camp
Posts: 237
Likes: 90
71 Shasta Compact
Currently Offline
|
Post by debranch on May 6, 2019 18:45:54 GMT -8
Hi, y'all Its been a busy week between work and I had drill this past weekend. My first overnight camping this year. It rained so hard that the range looked like a lake. Despite how busy my week has been we were still able to make progress. Richard worked on electrical and plumbing.  battery battery by debra branch, on Flickr He got the battery installed.  AC DC AC DC by debra branch, on Flickr This is how he decided to run our 12v grounds he still needs to pack some raw rubber around the space to insure that no water gets into the conduit, and cut off the extra bolt length. Richard wrapped all the 12v wires in the coiled black wrap and adhered all the wires to the back side of the panels.  wireing wireing by debra branch, on Flickr all 12v grounds are in one wrap, all hots are in the other going to the fuse box. Richard also cut the hole in the floor for the toilet he still needs to run the water lines for the toilet and the sink and the drains for all the water. I have been working on the front lower cabinet and entry door this week. I have a little more to do before the kitchenette is complete but its coming along. We still need to get the refrigerator in place. Richard needs to get a section of drain line for it so we can drain it with the gray water from the sink. I don't want the drip pan at the back to slosh water on the floor going down the road. I will upload pictures when it is complete. We are still waiting on our counter top we have had to order it 3 times now. I hope the 3rd times the charm. At this point I'm going to be waiting on it to get here. I have been trying to get things ordered before I need them so I have them when they are needed. I added a lift for the fantastic fan so water can drain away from the vent. 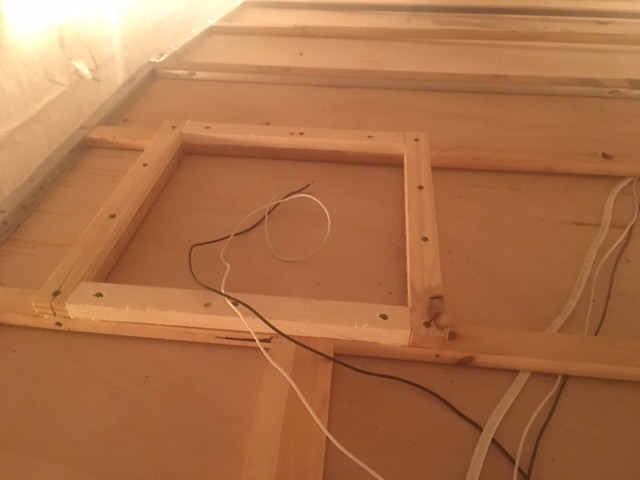 vent frame1 vent frame1 by debra branch, on Flickr The fantastic fan came in today. I also got the install kit and lap sealant, once we get the skin on we it will be ready. I also worked on some of the trim  back shelf trim back shelf trim by debra branch, on Flickr I added a piece of metal trim to the bottom edge of the back shelf.  bathroom wall bathroom wall by debra branch, on Flickr and I added trim to the toilet room wall after i used brad nails to secure the wall. I like the way it turned out. I ordered my New Skin today. They will be shipped by Wednesday and if all goes well I hope to be able to install them in 2 weeks..  I have a bit more to do before I can install the skins but I am doing a little each day after work. I should be ready to add the insulation this weekend. I still have to make a list of things to accomplish and create an activities list by importance. As always thanks for reading... |
|
|
|
Post by vikx on May 6, 2019 20:28:33 GMT -8
Love to see everyone's ideas and different way of doing things. Be sure to sand/slope the edges of the fan lift framing so it doesn't cut your new roof. Great work!
|
|
debranch
Active Member
Wee Camp
Posts: 237
Likes: 90
71 Shasta Compact
Currently Offline
|
Post by debranch on May 11, 2019 19:37:48 GMT -8
Thank you, vikx for reminding me to soften the edges of the vent trim. I definitely don't want to forget something that will cause me problems down the line. I worked on several small items this week. lots of smalls to do before I can install the skin. I set down and worked on an activity's list. I'm sure its not complete but its something to work from and as I think of other things I'm adding them. I took care of the trim and cut the hole for the vent at the same time.  IMG_1014 IMG_1014 by debra branch, on Flickr I also test fit the fan to make sure the hole was the correct size. Richard got the water line and fridge drain ran behind the refrigerator, so we were able to install the refrigerator. I was than able to complete construction of the lower cabinet.  IMG_1030 IMG_1030 by debra branch, on Flickr I have started on the counter top construction. I'm gluing a strip of wood to the front edge for the trim to fasten to. Tomorrow I hope to trim the excess wood so Richard can take it Monday to the cabinet shop to install the Formica to the top I could probably do it myself but time is getting short and Richard coached Football with the man that owns the shop. He does excellent work and has all the tools needed to accomplish the job. With Richards help I got the towel rack I made last summer installed in the toilet room. I made it out of a scrap board, 3 web belts, and the same road atlas used on the cabinets the PO had painted.  IMG_1028 IMG_1028 by debra branch, on Flickr The little bucket is for washcloths. I added hooks on the wall to hang pants we pack light when we travel and wear jeans more than 1 day, each of us will have a hook to keep the camper *****. I will post a pic when I get the towels in the rack, it works very well and the straps are long enough to hold our bath towel and beach towel if we want to. I decided to add tie down points just inside the toilet room door and inside the lower kitchenette cabinet so when we carry things we can keep them from moving around and banging into the walls.  IMG_1029 IMG_1029 by debra branch, on Flickr We just thought we would find them useful while traveling. We also worked on more trim.  IMG_1031 IMG_1031 by debra branch, on Flickr Richard borrowed a drill press from a friend it really made the job easy. we still have more trim to do but we are doing it as we can. I think the rest of the trim will have to wait till the windows are installed. I also went around the outside of the camper and made sure there were no screws or bolts that would interfere with skin installation and sanded any edges of wood that were high (blended the edges of the wood). I still need to tape the bolts heads. We got the Insulation this evening and I am hoping to get started on that job tomorrow. As always thanks for reading, more to come...... Debra |
|
jeremiah
Active Member
Posts: 274 
Likes: 36
Currently Offline
|
Post by jeremiah on May 12, 2019 2:23:56 GMT -8
Go Richard ! Can you please post a picture of you and Richard standing with the trailer ? He has done so much. I hope he wrote his name inside a wall somewhere. Thank You
|
|
WhitneyK
Active Member
Posts: 492
Likes: 169
'67 Shasta Compact
Currently Offline
|
Post by WhitneyK on May 12, 2019 17:08:40 GMT -8
Really enjoying watching your progress Debra, keep up the good work!
Probably going to steal your idea for the bigger closet / potty room.
|
|
debranch
Active Member
Wee Camp
Posts: 237
Likes: 90
71 Shasta Compact
Currently Offline
|
Post by debranch on May 18, 2019 19:18:28 GMT -8
Thank you, Jeremiah and WhitneyK We will post Pics of us working on the camper but there has never been more than 2 of us home at the same time. I hope when we start skin installation we will have more hands so pictures of us doing work will be easier. Richard said that it should be pictures of me because he thinks I am doing all the building, he under estimates how important the carpenters assistant is. He also is not taking credit for all the electrical work he has done. There are so many things that you can't do by yourself on projects. We had hoped to start skin installation this weekend but there was a problem with our skin so that has been delayed, but that is OK. I was getting worn-out so it was nice to slow down. I still got stuff accomplished this week. I finished the counter top base and sent it to have the Formica put on it Monday. We haven't gotten it back from the shop yet. We added liquid nails to the rafter boards and braced it inside the camper to create tension gluing the roof and rafters together.  IMG_1032 IMG_1032 by debra branch, on Flickr We decided to use foam-core board 1/2 inch  IMG_1045 IMG_1045 by debra branch, on Flickr It is very easy to work with the only tools needed for installation is a straight edge, (long board) box cutter, tape measure. I taped all the screw and bold heads on the outside of the camper to protect the skin.  IMG_1049 IMG_1049 by debra branch, on Flickr With Richards help we started wrapping the camper today. I also fitted the bench seat base, it fits snug and added trim to the edge of the bench.  IMG_1051 IMG_1051 by debra branch, on Flickr There is still plenty to do. As always thanks for reading. More to come..... Debra |
|
|
|
Post by vikx on May 18, 2019 21:13:21 GMT -8
Looks good Debra,
You might consider a strip of tape on the wires running down the front of the camper. Also measure and take photos of the exact location. Never hurts to be SURE before you hang the skin...
|
|


/Campers/67%20Shasta?preview=2019-02-03+18.01.00.jpg)